If you work for a large enterprise that still runs automated workflows using Window’s Scheduled Tasks feature, then look no further. This guide will demonstrate how you can use a Github repository to manage not only the scripts triggered by a Scheduled Task but also the Scheduled Tasks themselves! It makes for a very clean implementation that will ease the administration of the tasks anytime you need to create new tasks, update existing ones, or even migrate the tasks to a new host!
Traditionally, these scheduled task servers are managed in the following way:
- Admin develops script using powershell/python on their local machine.
- Admin copies script to windows task server
- Admin configures a new scheduled task to run the script at a specified interval
- If changes are needed, admin typically has to log back into the server and make the changes to the local copy of the script or scheduled task
Using the approach detailed here, the scheduled task will be managed like this instead:
- Admin clones the win-schtask-cicd repository and creates a new feature branch
- Admin develops the script on their local machine
- Admin defines the scheduled task as an XML file on their local machine
- Admin creates a pull request to merge their feature branch with main
- Github Actions automatically deploys the new/updated scheduled task to the windows task server
Table of contents
Open Table of contents
Requirements
- A cloned version of JPSOAR/win-schtask-cicd that is pushed to your own remote private Github repository
- A Windows Server
- Administrative access to the server
- SSH Server installed on your Windows Server
- (Optional) Python installed on your Windows Server
- A Linux based server where we’ll install the Github Self-Hosted Runner
- Github supports the installation of the Self-Hosted Runner on Linux/Windows/MacOS but I’ve chosen to showcase Linux for the purposes of this guide
- If you have a firewall between your Windows Server and your Self-Hosted Runner, you’ll need ports open for both SSH and SMB
Setting up the Github Repository
Let’s get this started! To begin, we’ll create a new repository based off the JPSOAR/win-schtask-cicd template and then define some Github Actions Secrets so it works in your environment. We’ll also clone the new repository to your local machine so we can start developing additional scheduled tasks outside of the 2 examples ones provided for you in the template.
-
Login to Github and then go to JPSOAR/win-schtask-cicd
-
Select Use this template
-
Give your repository a name and be sure set it to private. Then select create repository.
-
On Github, in your new repository, Go to Settings -> Secrets and variables -> Actions
-
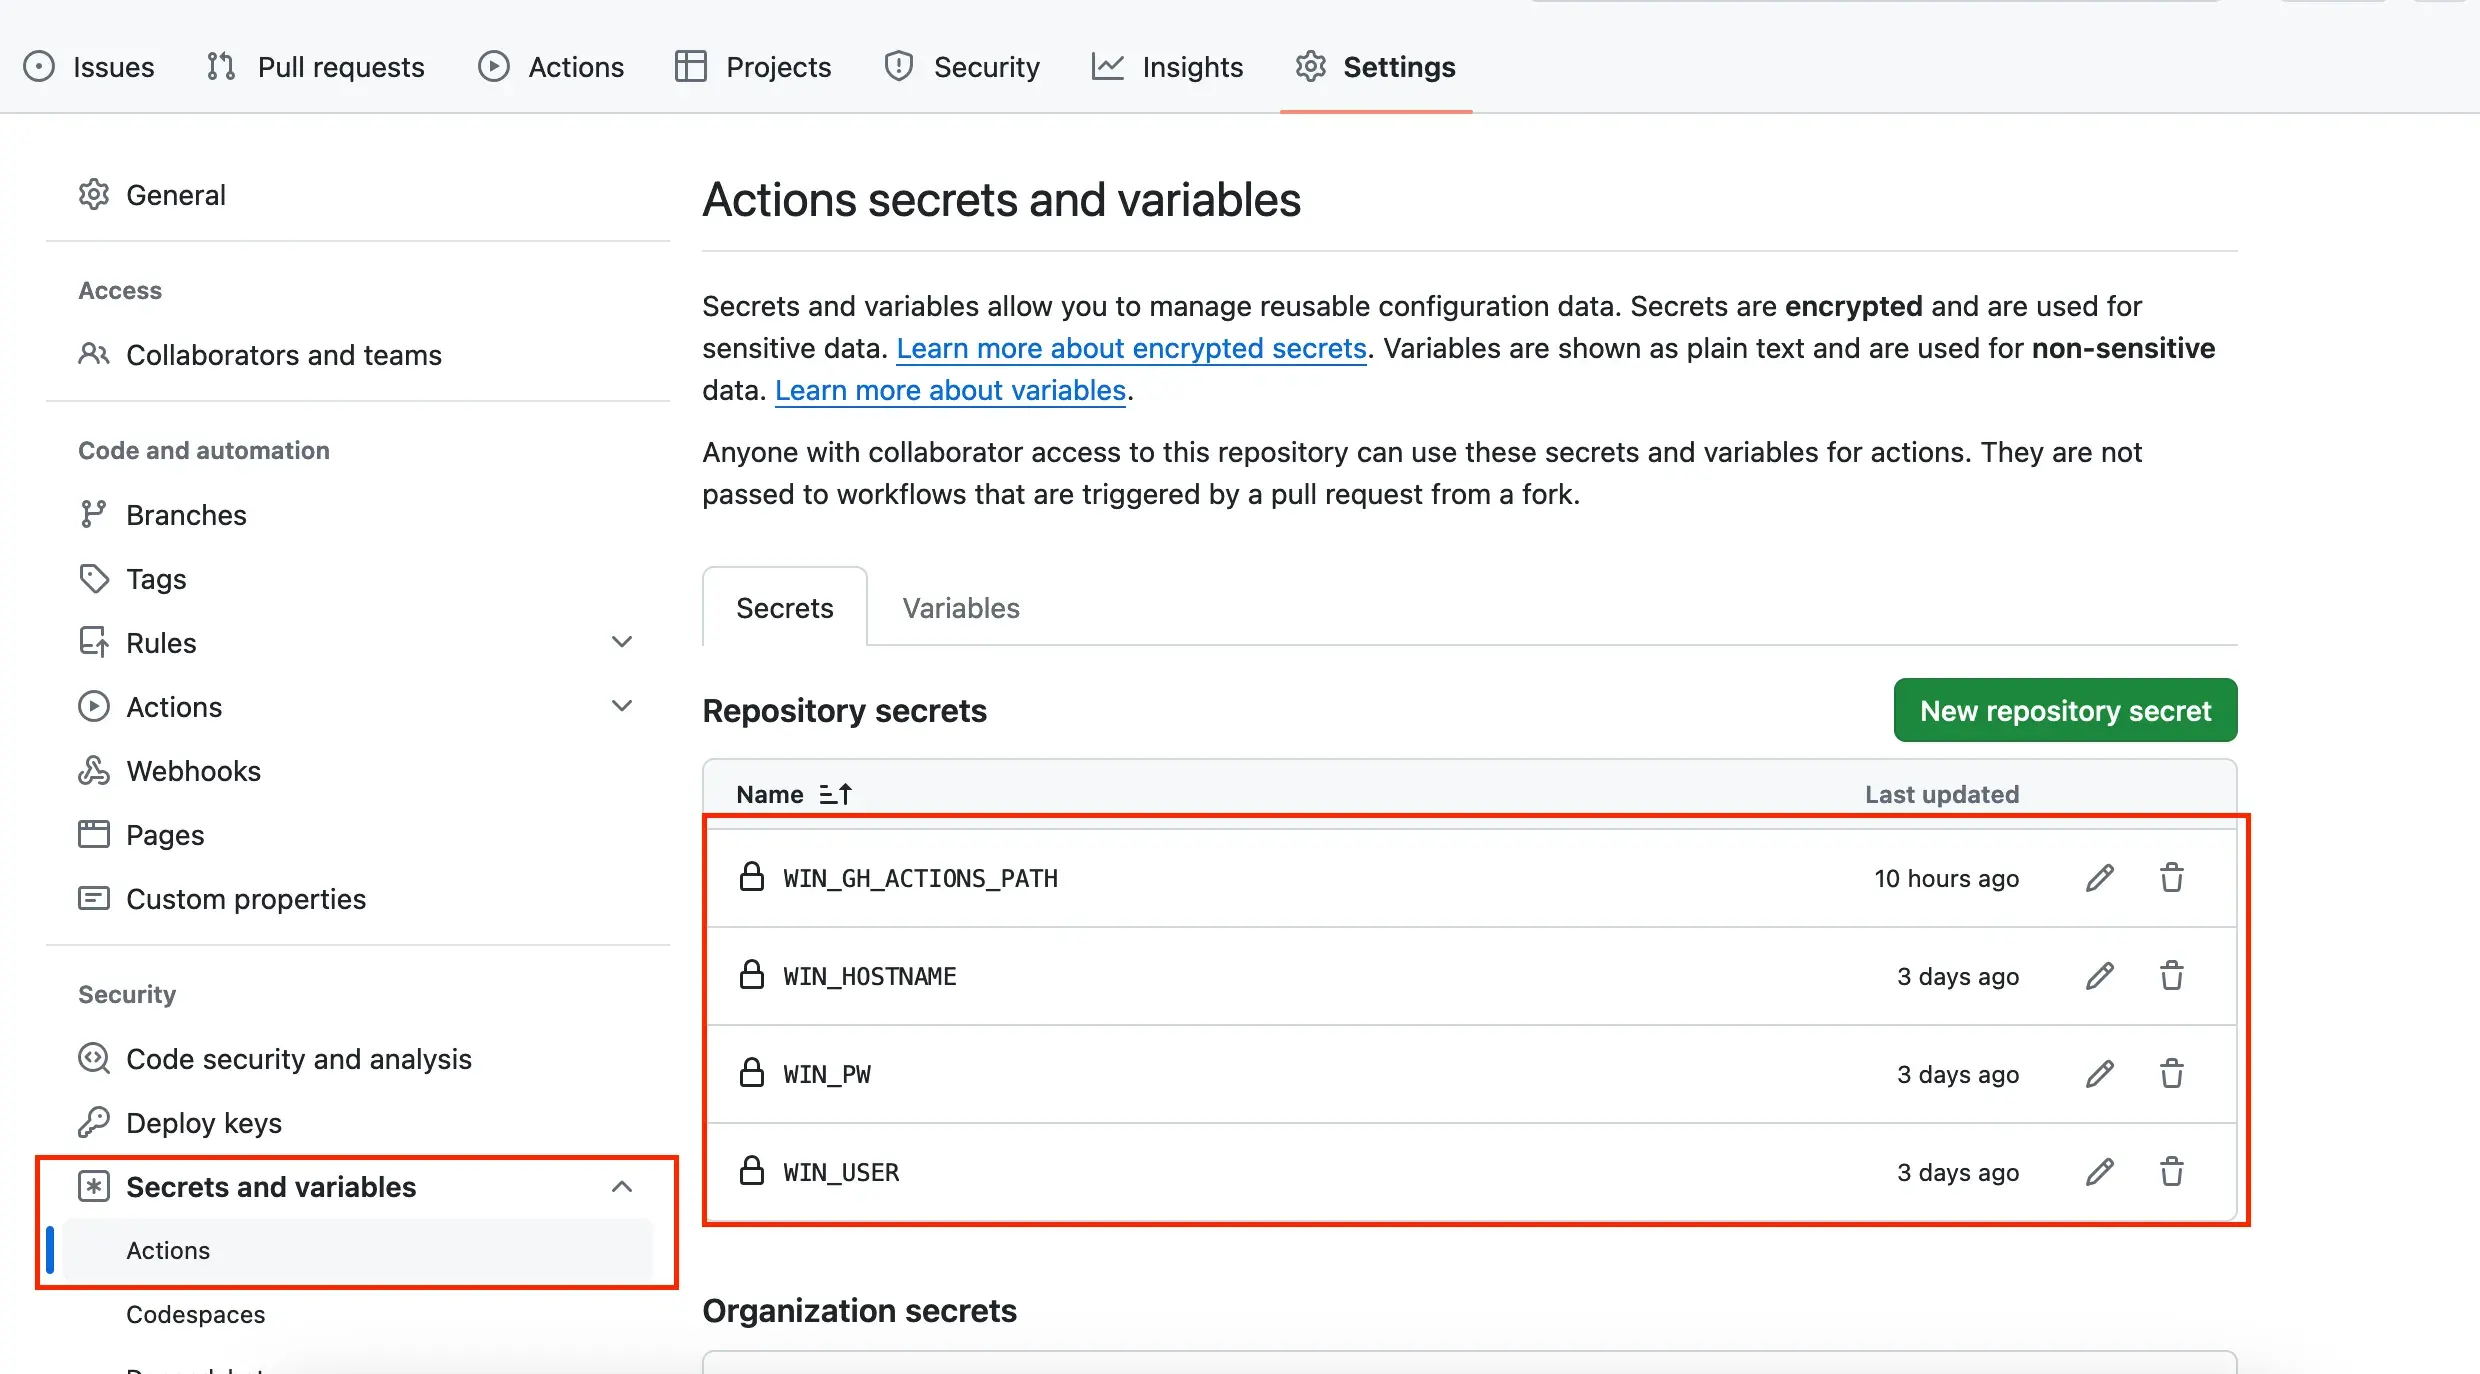
Here you’ll need to configure 4 new repository secrets with values that will be unique to your environment. The secrets are referenced by the
.github/workflows/deploy.ymlfile that is responsible for deploying the scheduled tasks to your server!If you’re not sure of what values to specify at this time, don’t worry! Just create the variables for now and continue on with the guide. You can come back and update the values as their mentioned throughout the process.
Secret Name Value (Example values that I’ve used for my environment) Description WIN_GH_ACTIONS_PATH C:\\GithubActions The local path to the shared GithubActions folder on your windows server WIN_HOSTNAME Winserver2022 The hostname of your Windows server WIN_USER sa_gh_actions The local user account on the Windows server that will be used to for transferring files and configuring the Scheduled Tasks WIN_PW ** The password for sa_gh_actions
Configuring the Windows Server
I’m assuming you’re reading this guide because you’ve already got a suitable Windows Server :) I’m running Windows Server 2022 myself but I think anything 2012 or newer would do just fine. Hop onto your server with an administrator account and let’s get started!
-
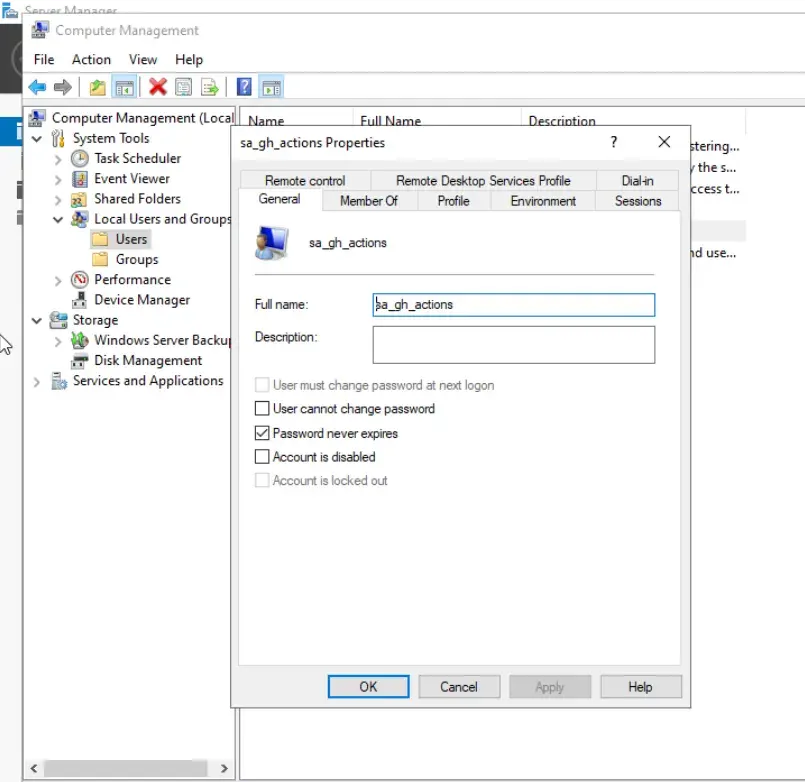
Create a new service account (user) on your windows server. We’ll use this user account to transfer files from the self-hosted runner to a file share we create in the next step.
-
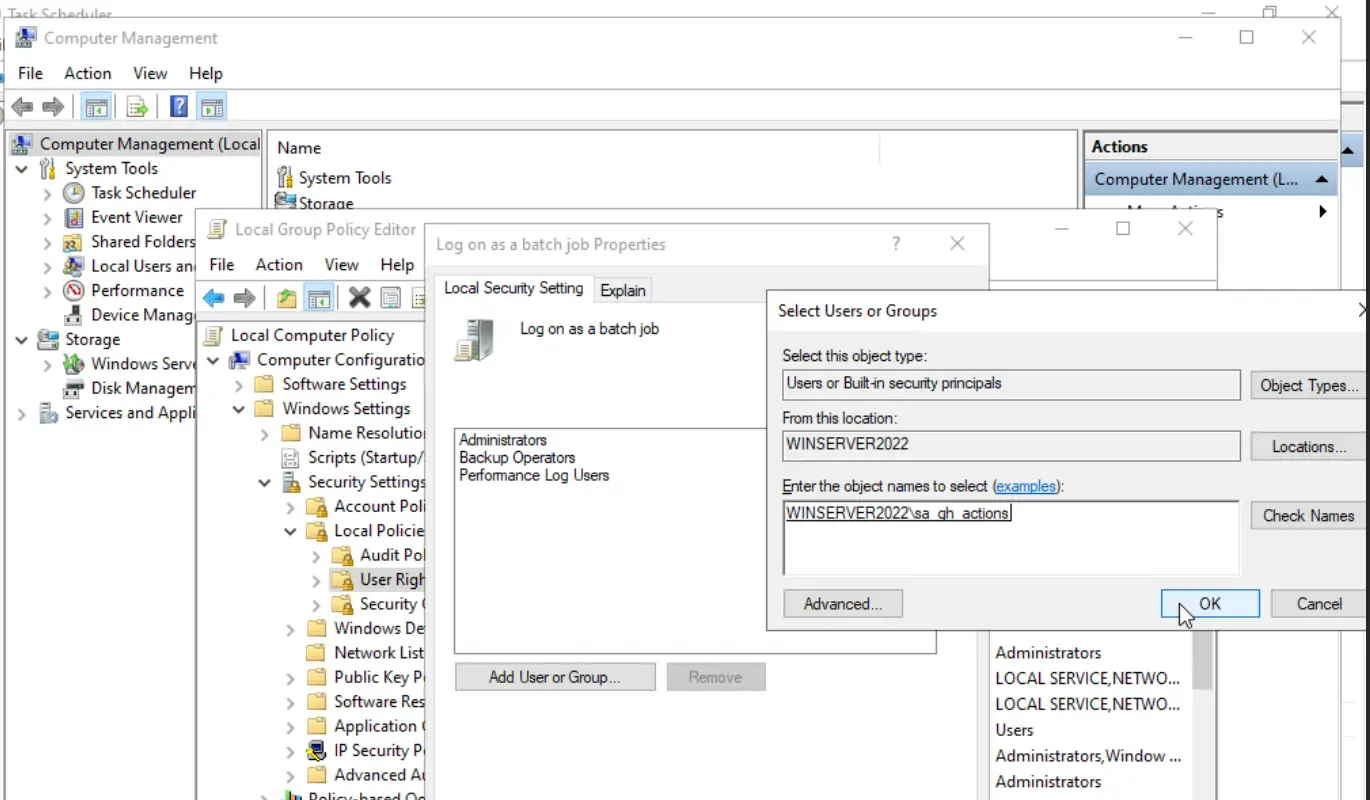
The service account will need to have the Log on as batch job right assigned to it in order to run scheduled tasks without being logged in. This can either be accomplished by adding the account to the local administrators group on the server (do so at your own risk) or by assigning the rights specifically to the account through group policy. I’ve opted to go the local group policy method (shown below). If your server is part of a domain, this group policy setting will have to be applied at the domain group policy level.
-
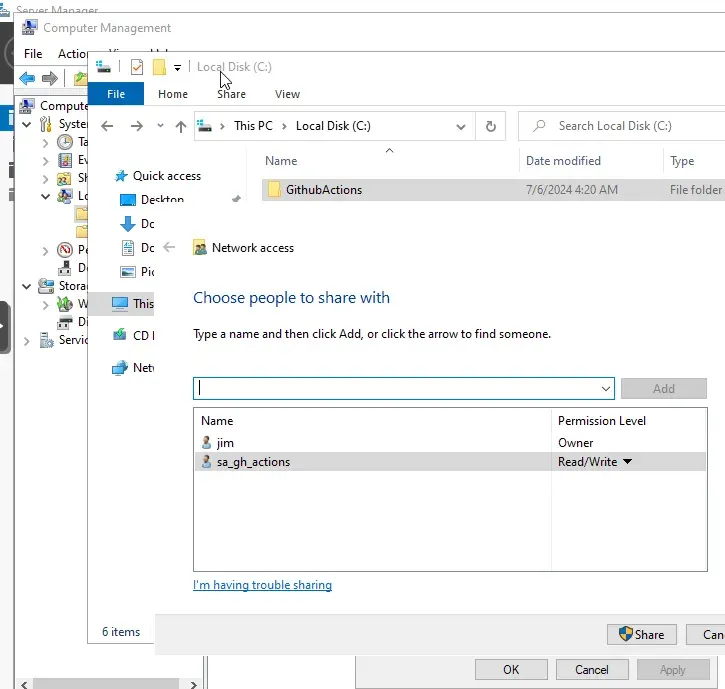
Create a new folder called
GithubActionssomewhere on your server. I put mine at:C:\GithubActions -
Enable Sharing on the folder by Right Clicking the Folder -> Properties -> Sharing -> Share. Give your new service account Read/Write access and then click Share
-
Install OpenSSH Server so we can access this server over SSH from the Github self-hosted runner
- Open the Add an optional feature menu in Windows System Settings
- Click Add a Feature -> Select OpenSSH Server
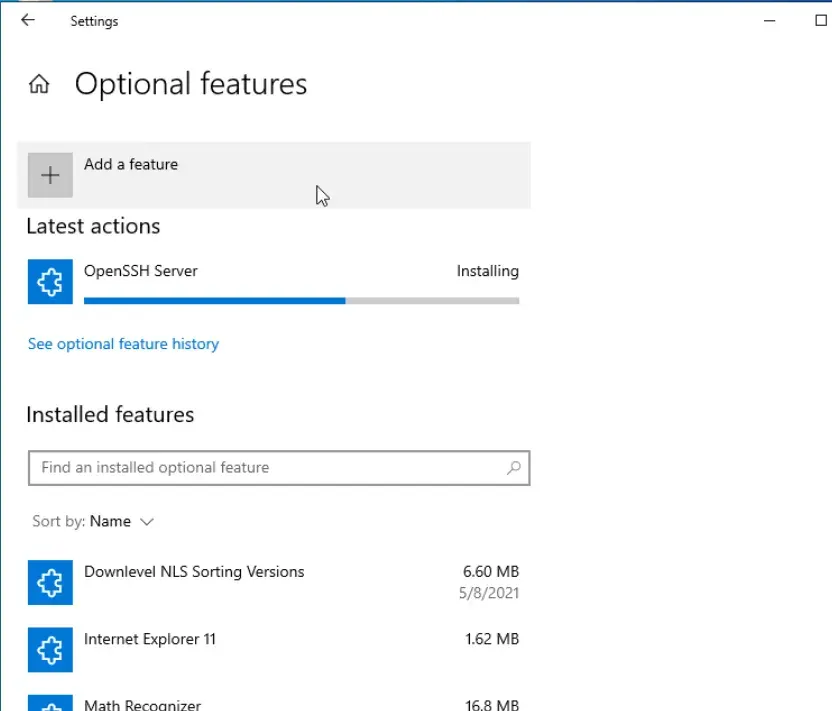
- Once installed, Open Services and start both the OpenSSH SSH Server and OpenSSH Authentication Agent services and then in Properties change the Startup type to Automatic
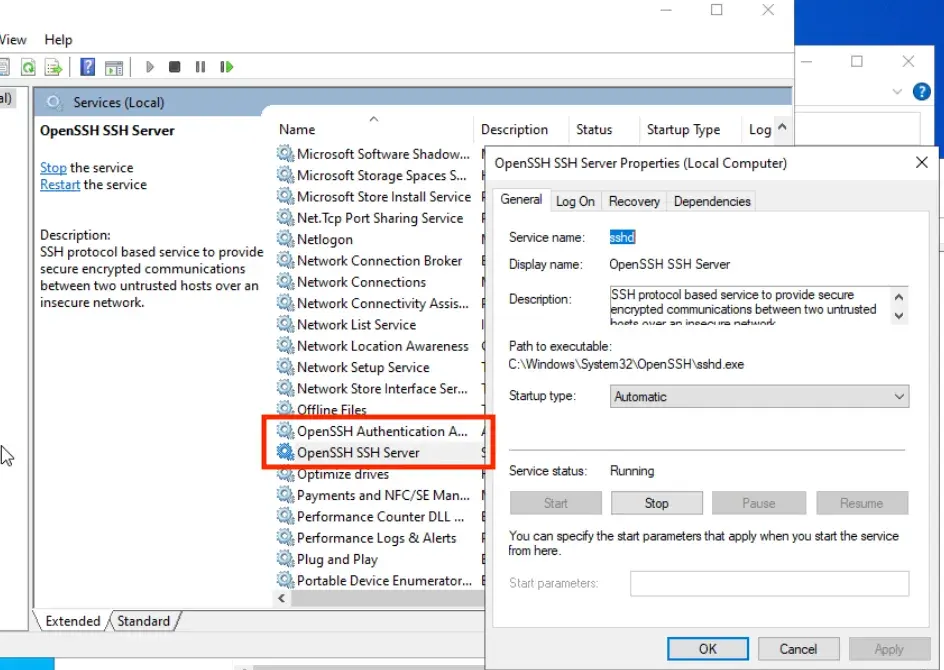
-
(Optional) If you plan to run Python Scripts as a scheduled task, install Python on the server by going to https://www.python.org/downloads/ and running the executable.
- Be sure to check the boxes for installing as admin, adding python to path, and to install Python for all users.
Configuring Public Key Authentication - Windows Server
If you’ve configured your windows server up to this point, you will be able to SSH into the server using a username and password but the ideal scenario is to set up public key authentication.
I found this great resource on YouTube that walks you through configuring the settings required: https://www.youtube.com/watch?v=9dhQIa8fAXU
You should follow the instructions in the video to a tee (cutting corners does not work, I tried lol.) but here’s the gist of what’s going on:
- Edit the
sshd_configfile on the Windows Server to allow public key authentication. - Generate a public/private key pair:
- Public Key goes on the Windows Server.
- Private Key goes on the Self-Hosted Github Runner.
- Create an
authorized_keysfile that contains your generated public key inC:\Users\YOURUSERHERE\.ssh\authorized_keys. - Edit the ACLs of the
authorized_keysfile according to the video.
As long as you follow along with the video you should be able to successfully ssh to your windows server from the Self-Hosted Github Runner using Public Key Authentication
Configuring the Self-Hosted Runner
There are serious security implications when using a self-hosted runner on Github. Untrusted workflows running on a self-hosted runner can result in malicious code execution, exposing access to an internal network, and much more. Please read up on this before continuing.
To stay safe, you should always ensure your version of the repository is Private. I’ve deliberately not configured a self-hosted runner for my public version of this repository for this exact reason. :)
I have a Linux VM dedicated to being a Github Self Hosted Runner in my home lab which is why I needed to enable an SMB file share on the windows server so I could transfer the files. You could technically just install the Self-Hosted runner on the Windows Server to avoid the hassle of transfering the files but that violates best practices
-
In your cloned repository on github go to Settings -> Actions -> Runners -> New self-hosed runner
-
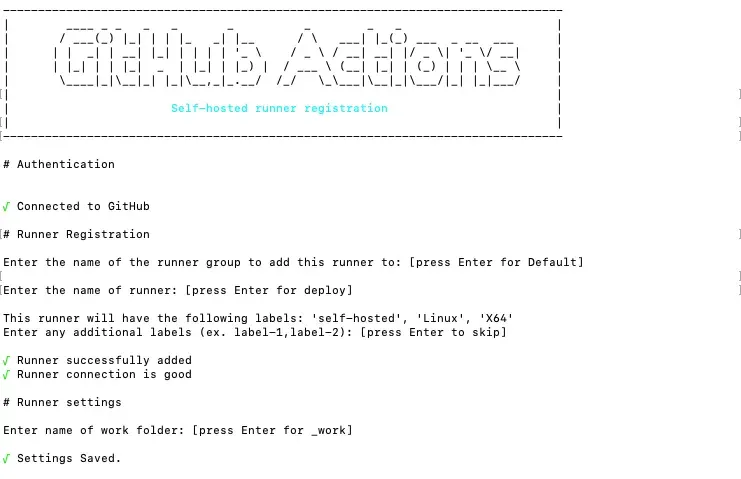
Follow the instructions from github to install the self-hosted runner on the OS of your choosing.
-
You can optionally run the self-hosted runner as a service so its always running. See the Github docs here: https://docs.github.com/en/actions/hosting-your-own-runners/managing-self-hosted-runners/configuring-the-self-hosted-runner-application-as-a-service
-
If you’re like me and your runner is installed on a linux system we’re going to use rsync to transfer the files. Install rsync and supporting tools using
sudo apt-get install cifs-utils -
Excellent, now the schtask_deploy.yml file will run on your own self hosted runner!
-
Optionally test the ability to transfer files to your windows server:
echo "Hello Internet!" > test.txt #create simple test file
smbclient //windowservername/GithubActions -U sa_gh_actions%YOURPASSWORDHERE -c "put test.txt test.txt" #Transfer test.txt using smbclient
putting file test.txt as \test.txt (1.6 kb/s) (average 1.6 kb/s) #Success!
Configuring Public Key Authentication - Github Runner
Our goal is to be able to SSH from the Self-Hosted Github Runner to the Windows Server using Public Key Authentication so that we’re not prompted for a username and password combination.
-
Copy the private key you created earlier to your Github Runner to
/Home/YOURUSERNAME/.ssh/YOURPRIVATEKEYFILEHERE -
In the .ssh folder, run the following commands to create an SSH Config file:
touch config nano config -
Add the following content to your config file:
Host YOURWINDOWSHOSTNAME HostName YOURWINDOWSFQDN User YOURWINDOWSUSERNAME IdentityFile ~/.ssh/YOURPRIVATEKEYFILENAME -
Save your changes to config
-
Test your ability to SSH to your Windows Server:
ssh sa_gh_actions@winserver2022 -
Success!

Adding your own Scheduled Tasks
Now that all the prerequisites are configured, we’ll cover how to start developing your own automation scripts in the repo so they will be automatically deployed to your server as scheduled tasks
Cloning the Repository
-
Clone your newly created repository to your local machine using either Github or SSH and open the repo in an editor like VS Code
-
For local python development a virtual environment must be created and activated
Python -m venv venv #If developing on Linux/MacOS run the following to activate the venv environment source /venv/Scripts/activate #If developing on Windows run the following to activate the venv environment /venv/Scripts/activate.ps1 #Install Python Requirements pip install -r /setup/requirements.txt -
Its best practice to add new content to the repository via a separate branch and then use a pull request to commit the changes to the main branch. Create a new branch by running
git checkout -b YOURBRANCHNAME
Folder Structure
Scheduled Tasks are deployed to your Windows Server using the following Folder Structure:
.
└── Scripts/
    ├── ScheduledTaskName1/
    │   ├── AutomationScript1.py
    │   └── ScheduledTask1.xml
    └── ScheduledTaskName2/
        ├── AutomationScript2.ps1
        └── ScheduledTask2.xml
Each scheduled task has 3 components:
- A separate folder within
Scripts/. The name given to the folder will become the name of the scheduled task once deployed to the server - An automation script to be executed by the scheduled task (currently I have examples for both Python and Powershell).
- An XML file that defines the scheduled task itself.
- The XML file is the result of exporting a scheduled task from the Windows Task Scheduler UI (but more on that below)
Scheduled Task XMLs
Generating a Scheduled Task XML
Windows Task Scheduler has an export feature that exports a task’s configuration as an XML file. I’ve found that using the Windows Task Schedule UI to create the first task and then export it is the simplest way to get started. From there, we can just copy and tweak the XML for every other task we want to define in our repository.
This section demonstrates how I created the schtask_catfacts.xml file to run the script in the repo at /Scripts/CatFacts/get-CatFacts.py. If you cloned the repo, you’ll obviously already have the finished product but I wanted to showcase how it works so you can apply it to your usecase.
- On your Windows Server, open Windows Task Schedule
- Create a new folder in the Task Scheduler Library called
Githib - Right click the new folder and select Create Task
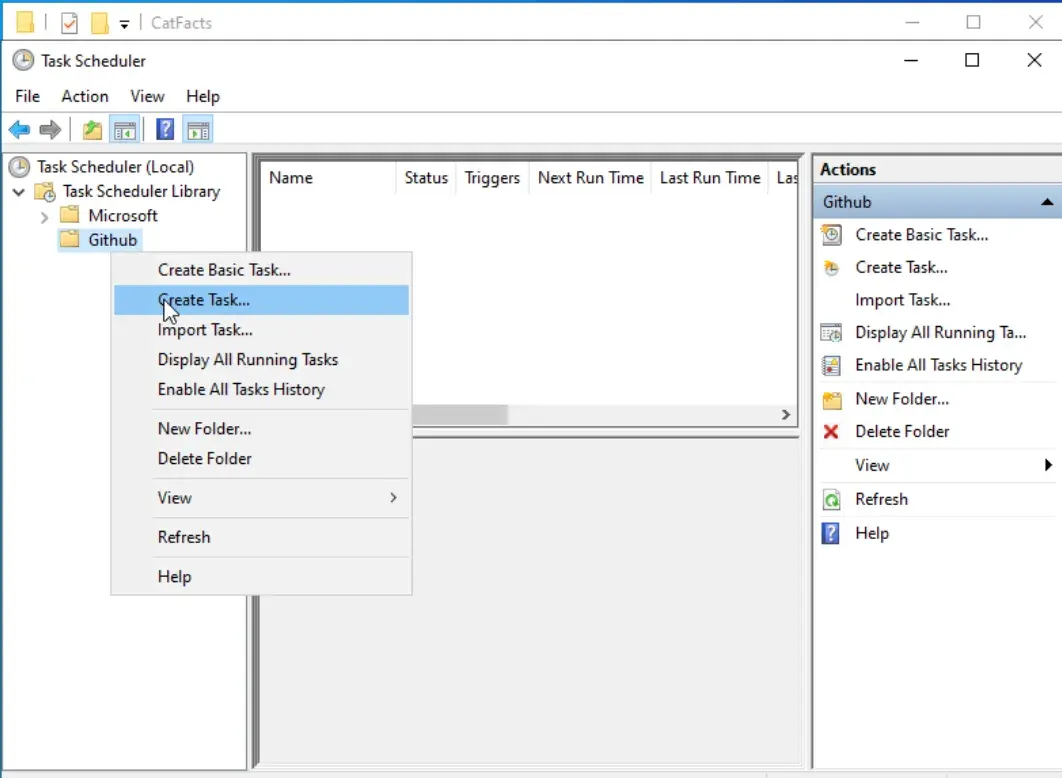
- Adjust the settings so the task runs as the sa_gh_actions action we set up earlier
- Toggle on the option to Run whether the user is logged on or not
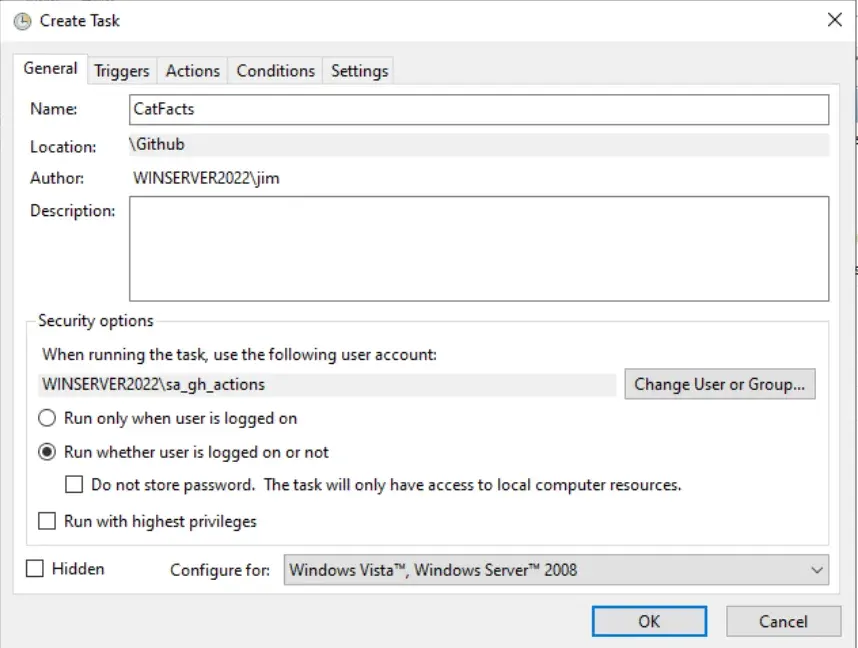
- In the trigger tab, adjust it to your liking. I’ve set mine to trigger every 8 hours starting at midnight.
The Actions tab is where all the magic happens. Here we’ll specify the task to run the get-CatFacts.py script using the venv python environment created for us by the github actions deploy.yml script. Again, we’re doing this manually through the UI for this first go, but once we can export the scheduled task as an XML, we won’t need to do this for future tasks.
-
Select New and set the dropdown to
start a program. Fill in the following information:Field Name Value Description Program/Script C:\GithubActions\win-schtask-cicd\venv\Scripts\python.exeWe run python scripts from the command line by first specifying python.exe. In this case, we don’t want server’s default python.exe, we want the specific one that’s in our virtual environmentAdd arguments C:\GithubActions\win-schtask-cicd\Scripts\CatFacts\get-CatFact.py -outpath C:\GithubData\CatFacts\CatFacts.jsonHere we’re specifiying the path to the python script we want to execute, in this case get-CatFact.py and then passing in where we want the output of the script to be saved via the command line variable 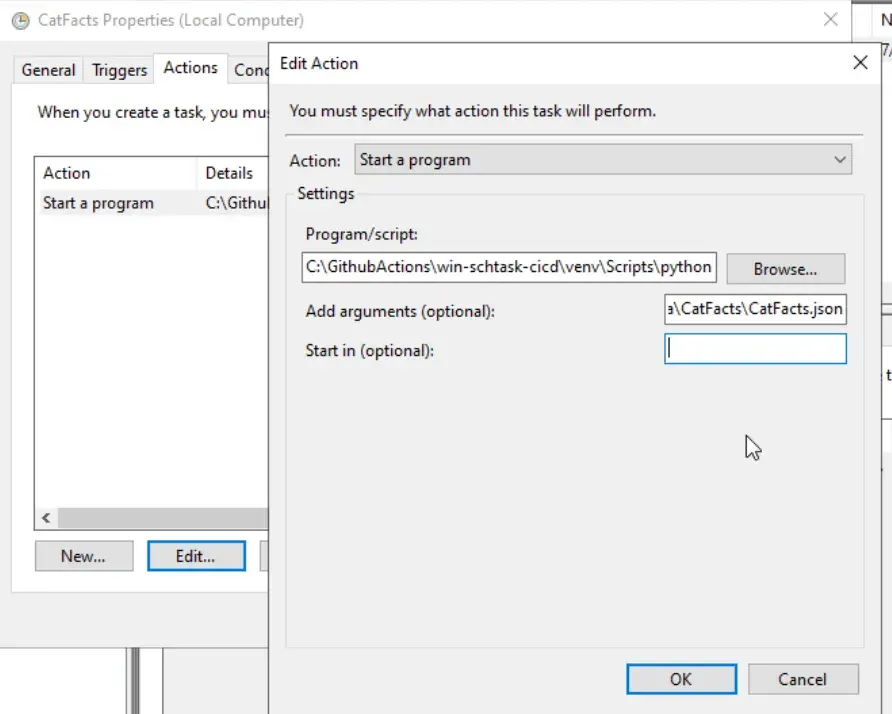
Get an error message about Log on as batch job required? Scroll back up to the top where I mentioned this in the create user step
-
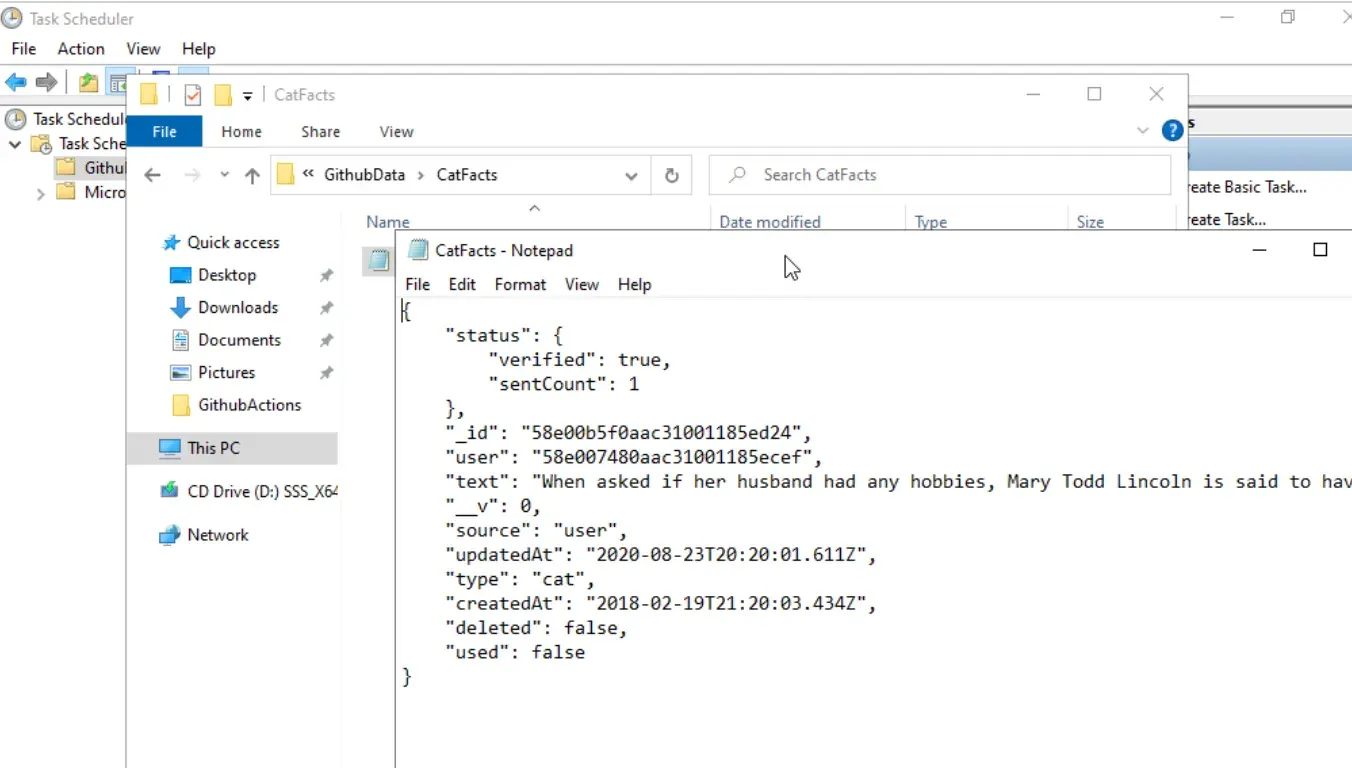
Click Ok to save your task. Next, let’s test it. Right click the task and select Run. If it worked, you should see the file CatFacts.json in the C:\GithubData\CatFacts folder
-
Phew!! Finally, we’ve created a working scheduled task using the script within the cloned repository… All of this just so we can export that task as an XML and include it in the
/Scripts/CatFactsfolder of the repository.
Yes, the repo on Github already includes this XML but I felt it was imported to showcase how I generated the XML so anyone could reproduce my steps.
Without further delay, In Windows Task Scheduler, Right click the task and select Export and save the file somewhere.
- Copy the exported XML file into the
/Scripts/CatFactsfolder of the local repository to complete this section.
Editing a Scheduled Task XML
It’s often easier to just edit an existing Scheduled Task XML as supposed to creating one in the UI and exporting it. The XML schema is simple enough so I’ll cover some basics but a full explanation can be found from Microsoft here.
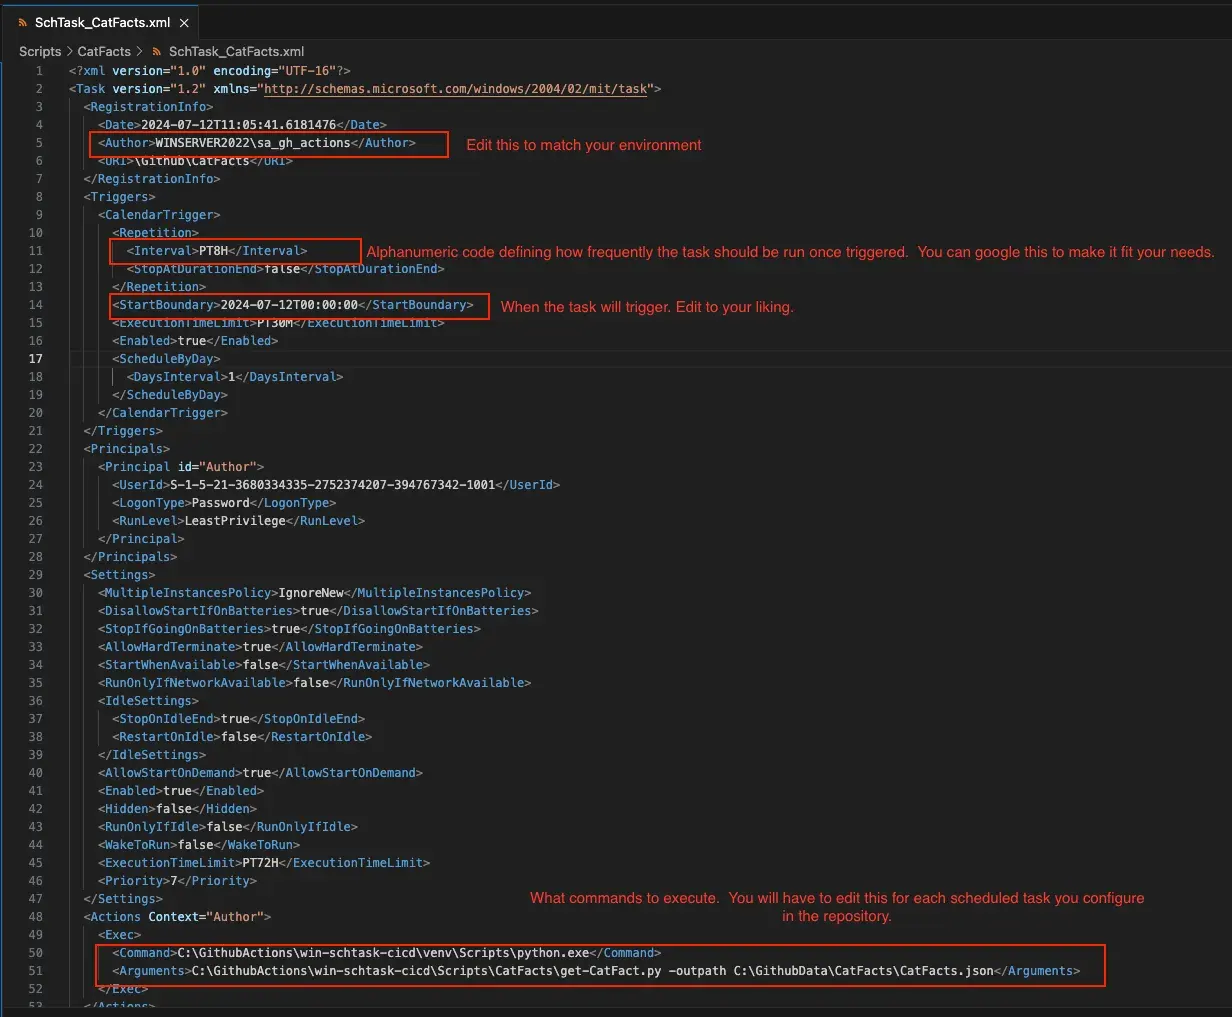
The above screenshot highlights what attributes will need to be edited should you choose to copy my SchTask_CatFacts.xml to serve your own purposes.
Deploying Your Scheduled Tasks
Congratulations… You’ve made it to the end of this extremely long guide. First of all, thank you for reading. I had a lot of fun making it so I hope it was enjoyable for you as well :)
-
Review
.github/workflows/deploy.ymlto get a sense of how the script and XML file are deployed as a Scheduled Task to your server.You’ll notice that the build script runs whenever changes are pushed to main
name: Deploy to Windows Server
on:
push:
  branches: [main]
workflow_dispatch:

jobs:
build:
  name: Build
  runs-on: self-hosted
  env:
    WIN_HOSTNAME: ${{ secrets.WIN_HOSTNAME }}
    WIN_USER: ${{ secrets.WIN_USER }}
    WIN_PW: ${{ secrets.WIN_PW }}
    WIN_GH_ACTIONS_PATH: ${{ secrets.WIN_GH_ACTIONS_PATH }}
You’ll also notice that some variables are pulled in from your repository secrets. So, if you missed the step at the beginning to add those in your repository settings, now is a great time to go back and do that.
-
Add, commit and push your new branch containing your changes to Github
#Stage all files with changes
git add .
#Commit changes
git commit -m "Some Descriptive Message Here"
#Push your local branch to Github
git push --set-upstream origin YOURBRANCHNAMEHERE
You’ll only need to add the
--set-upstream origin YOURBRANCHNAMEHEREwhen you push a branch for the first time. If you push the same branch multiple times, you can just usegit push -
In Github you should see that your branch had recent changes. Select the big green button to Compare & pull request

-
On the next screen, add a nice description if you’d like, otherwise select Create pull request
-
Some checks will run and if all looks good, you should have the option to Merge pull request. Select that and then push confirm

-
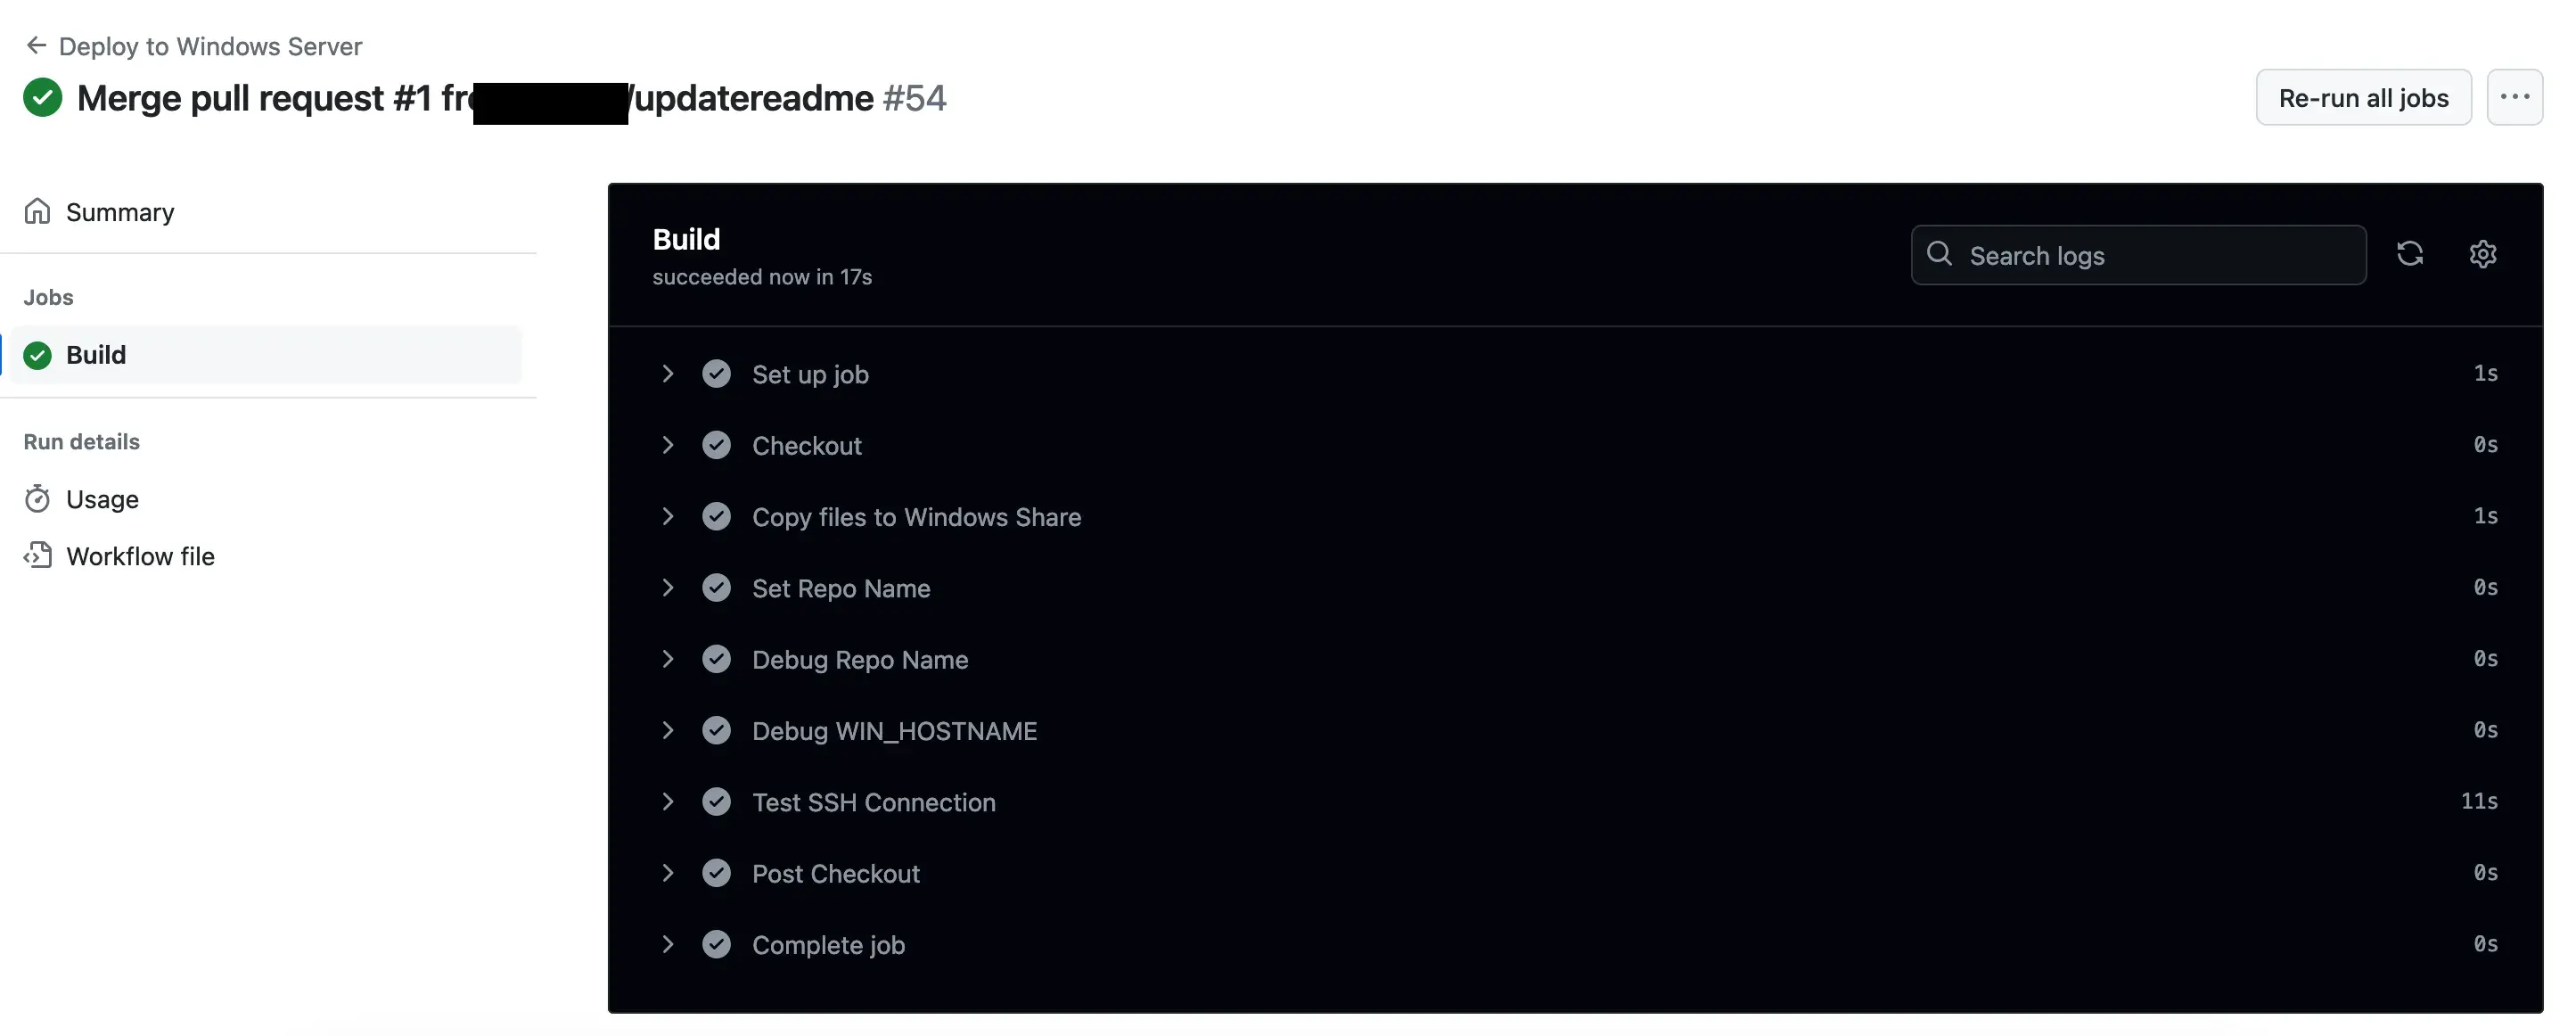
In the Actions tab you’ll notice a new workflow should have started. Click into it to view details. If everything worked successfully you should see lots of checkmarks! :)
-
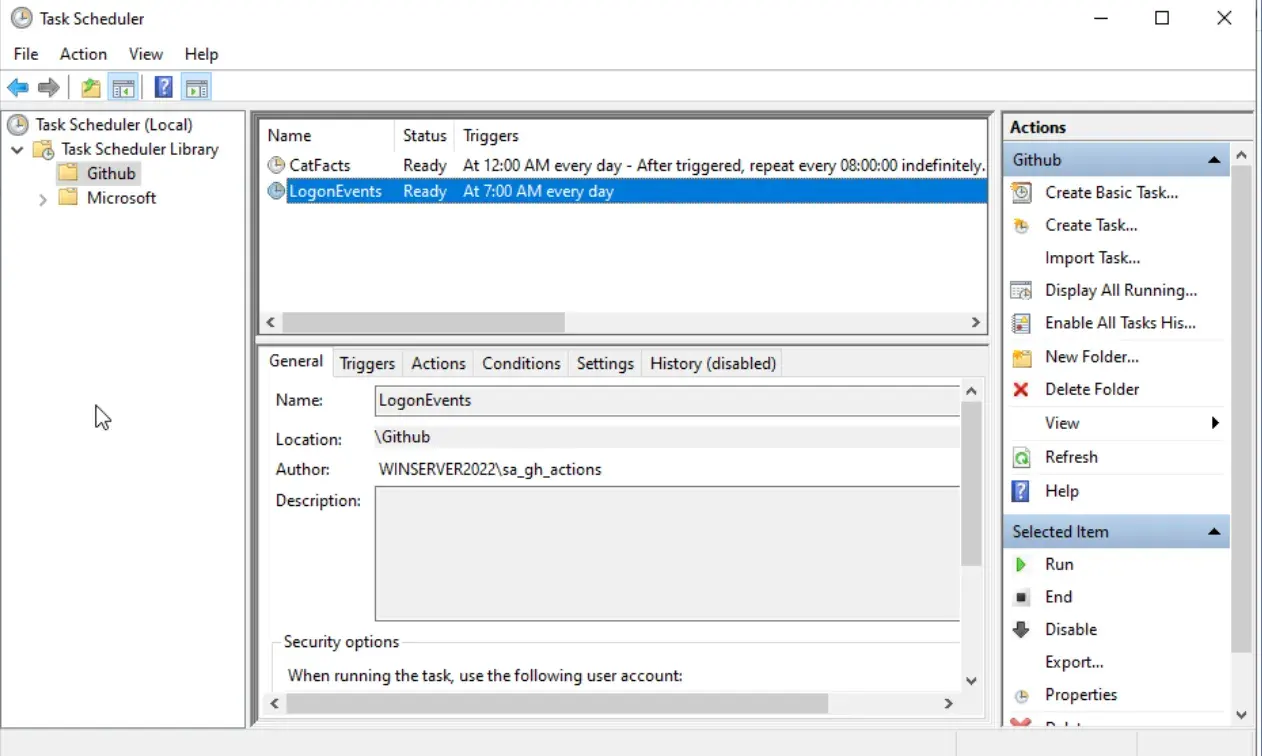
Login to your server to verify that the scheduled tasks are there and configured correctly.
-
Rinse and repeat this step as many times as you need… Make some changes to your code, push the code, test it on the server, etc. This was a game changer for me and made the process of managing scheduled tasks so much easier. Happy coding!