Cortex XSOAR is a great security tool but getting started can feel overwhelming. In this post, we’ll utilize a fictional scenario of a smart coffee pot sending alert emails to demonstrate the capabilities within XSOAR. My goal for this guide is to introduce XSOAR to newcomers and once completed, be able to apply the concepts learned to production scenarios.
Table of contents
Open Table of contents
Defining the Use Case
Like many fellow ITers, I am an avid coffee drinker so for this tutorial let’s assume the following:
-
I have a “smart” coffee maker that’s capable of sending email alerts to a preconfigured email
coffee_demo@jpit.io -
The email that the smart coffee maker always sends the email with a subject line of
Coffee Alert -
The body of the email will be in the following format:
Alert Code: CODE_NUMBER_HERE Message: MESSAGE_HERE -
The supported Alert Codes are the following:
Code Description 1 Pot Empty 2 Coffee Brew Complete 3 System Malfunction - See message -
XSOAR will generate an incident ticket whenever an email with subject
Coffee Alertis received and take a different action based on theAlert Codepresent in the emailAlert Received XSOAR Action Pot Empty Assign ticket to intern letting them know to make a new pot of coffee :) Coffee Brew Complete Close the ticket System Malfunction Increase the severity of the incident and tag the Coffee Maker error as evidence
Walkthrough
Installing Mail Listener and a Mail Listener Instance
In this section we’ll install the Mail Listener content pack and partially configure a new instance of the integration
-
Download and install the
Mail listenerContent pack from the marketplace if you don’t already have it installed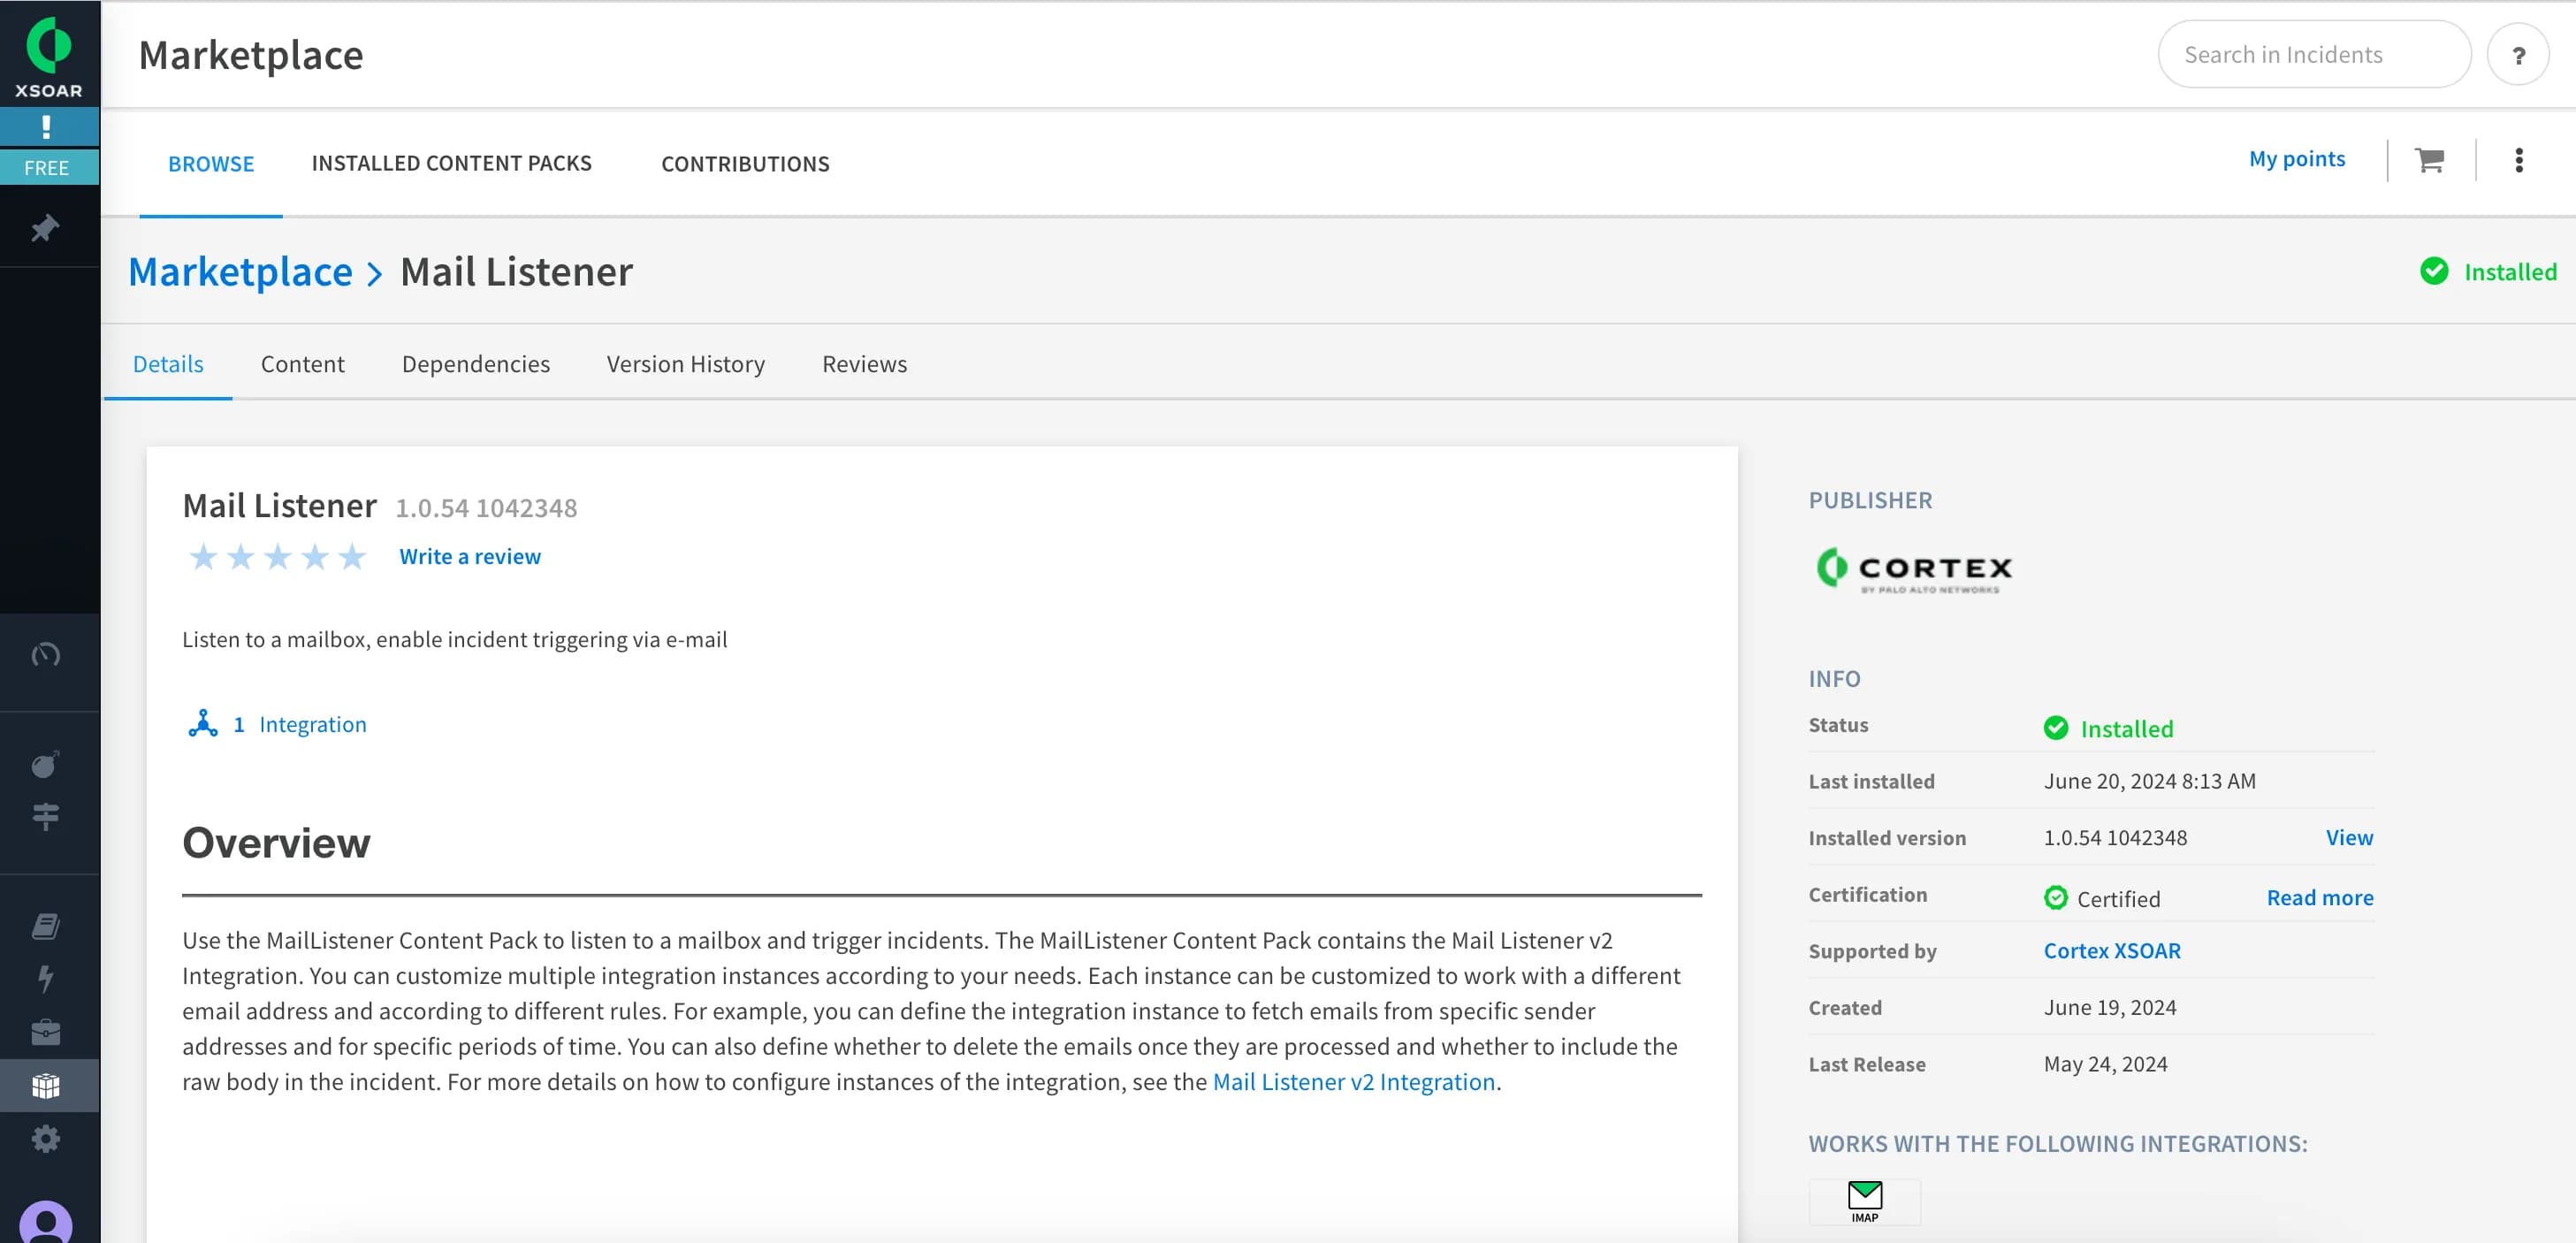
-
In Settings -> Integrations -> Search for
mailand find theMail Listener v2integration and click Add instance
-
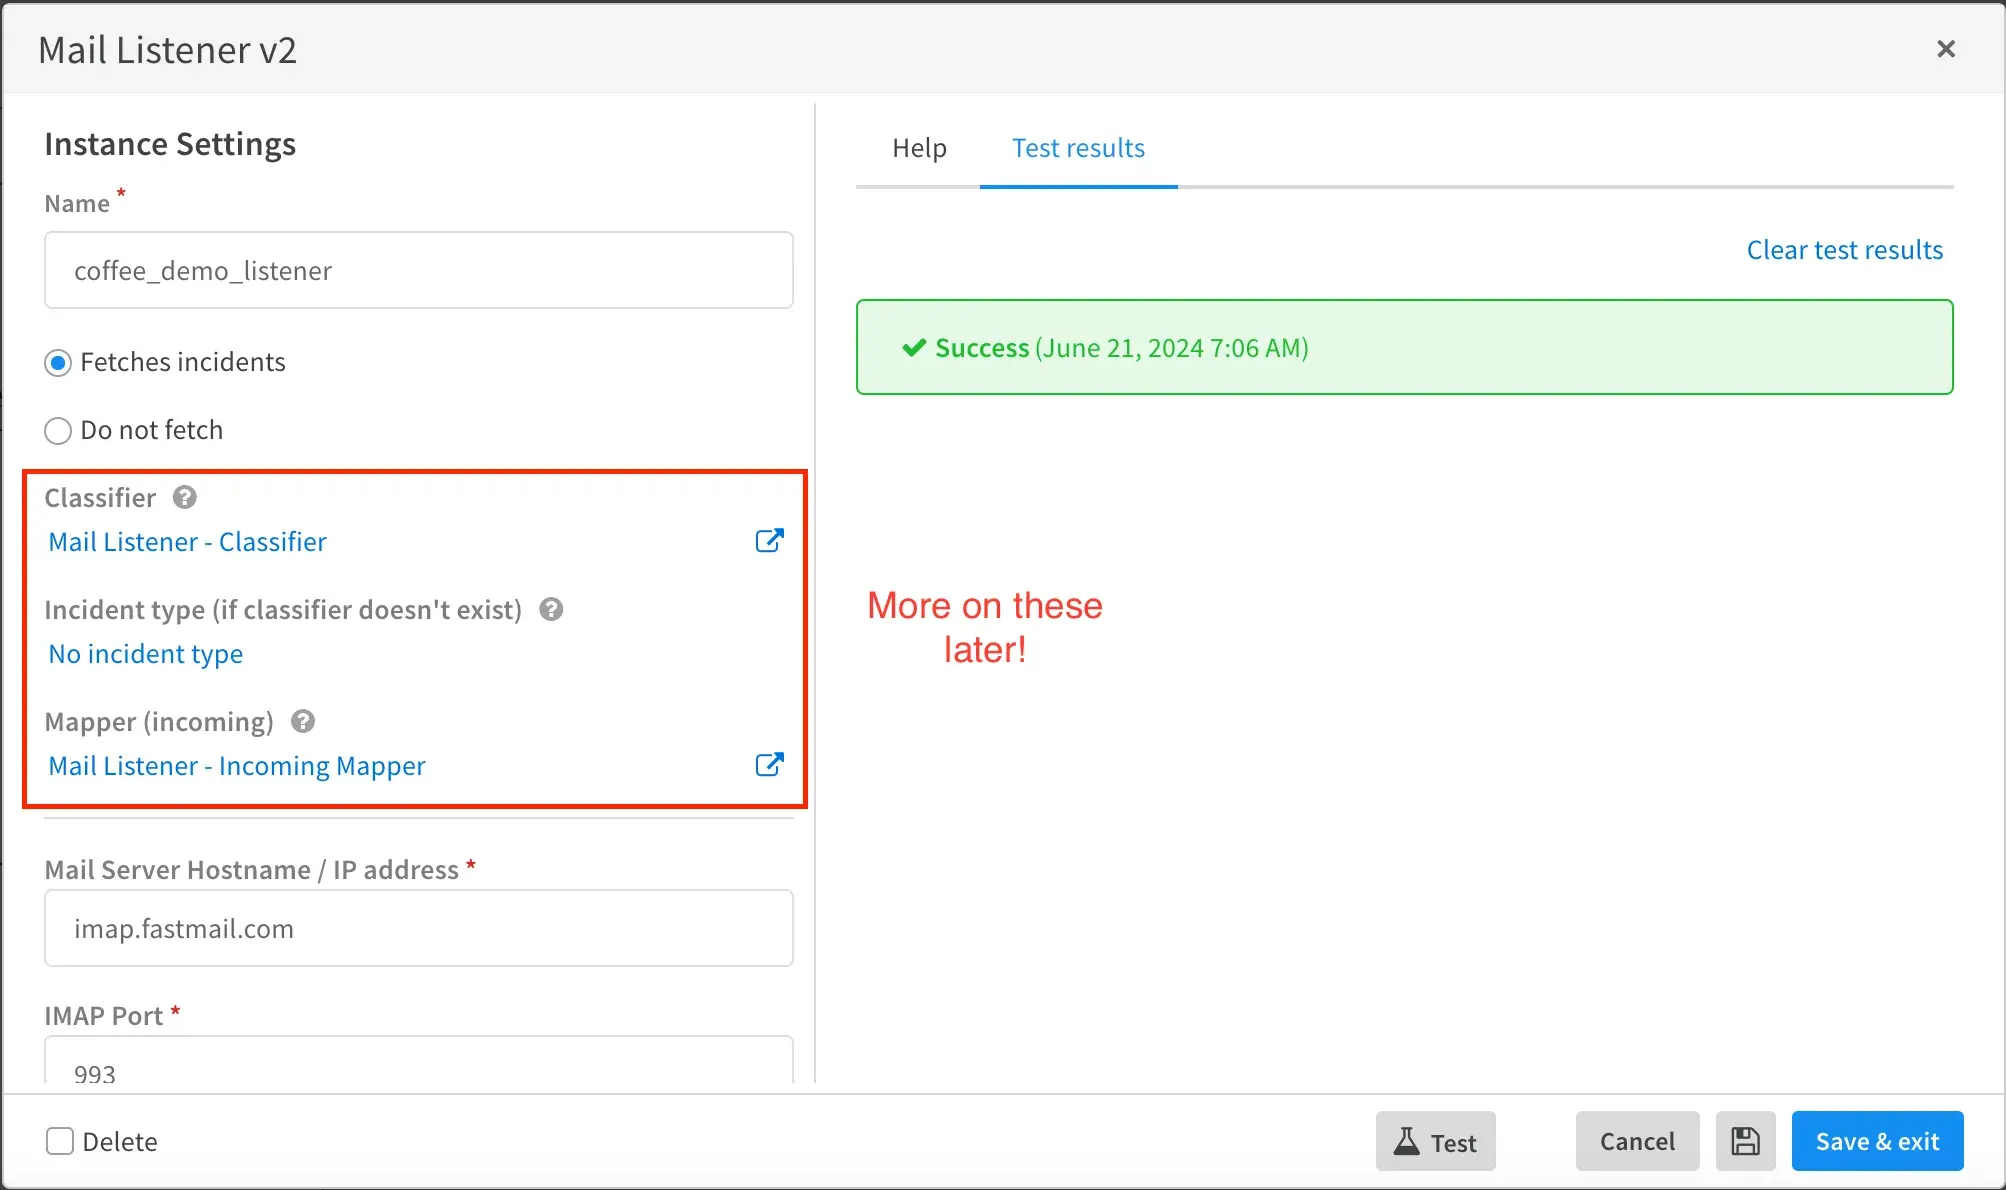
Configure a new
Mail Listener v2instance- Obviously this step will be different for everyone but the idea is to configure this instance to listen for emails coming into our inbox from the coffee maker.
- For me, I specified the following attributes. All others were left to their default values
Field Value Explanation Name coffee_demo_listener Give the instance a name of your choosing Fetching Do not fetch Leave this set to “Do not fetch” for now. We’ll toggle it on later Mail Server Hostname / IP address imap.fastmail.com I use fastmail but this will obviously change to whatever your email provider uses IMAP Port 993 Again, use whatever your provider suggests Username coffee_demo@jpit.io This is the email we want to eventually fetch our coffee email alerts from Password **** Incoming mail folder INBOX/XSOAR This is the folder we want the instance to fetch email from. I’ve yet to make an XSOAR folder in my inbox, but we’ll do that next :) We’ll also come back to the classifer, incident type, and mapper settings later on
-
Click Test and make sure you get a Success Response. Then Click Save and Exit
Mailbox Set up
This portion of the walkthrough takes place outside of XSOAR. We need to create a new folder in our email account’s inbox and configure a rule to automatically move emails that come from our coffee maker to that folder.
-
Login to mail account that you configured in the previous steps
-
Create the folder you specified in the mail listener instance. For me I need to create a folder called
XSOARinside of myInbox -
Create a new rule such that whenever a new email is sent to
coffee_demo@jpit.iowith subjectCoffee Alert, the email is moved to theXSOARfolder.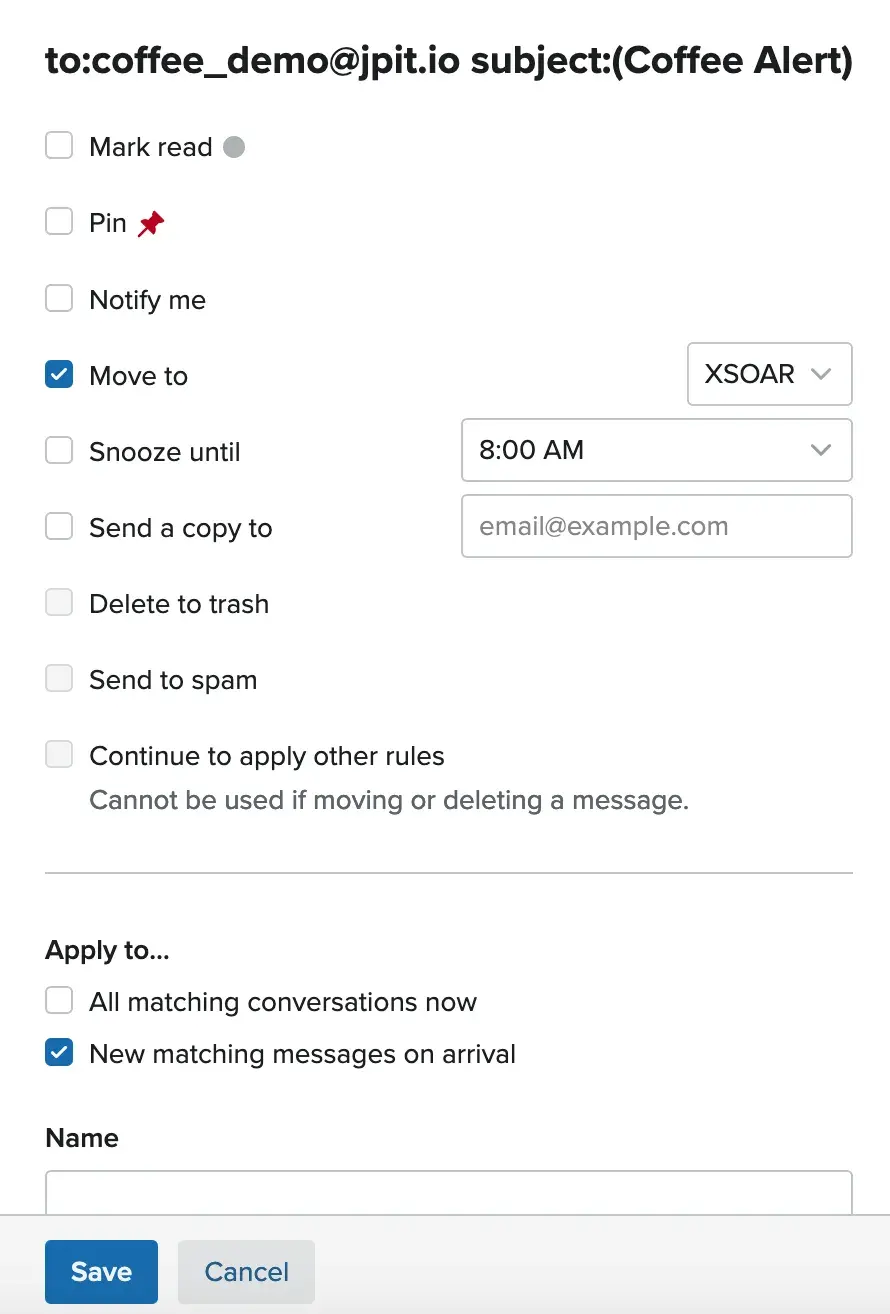
Again, I’m using FastMail, but configuring mail rules are a feature of just about every email provider.
-
With the mailbox rule set, we can now test to ensure XSOAR can pull in emails that end up in
Inbox\XSOARfolder. Return to yourMail Listener v2instance and select the Fetches Incidents radio button. Being sure click Save and Exit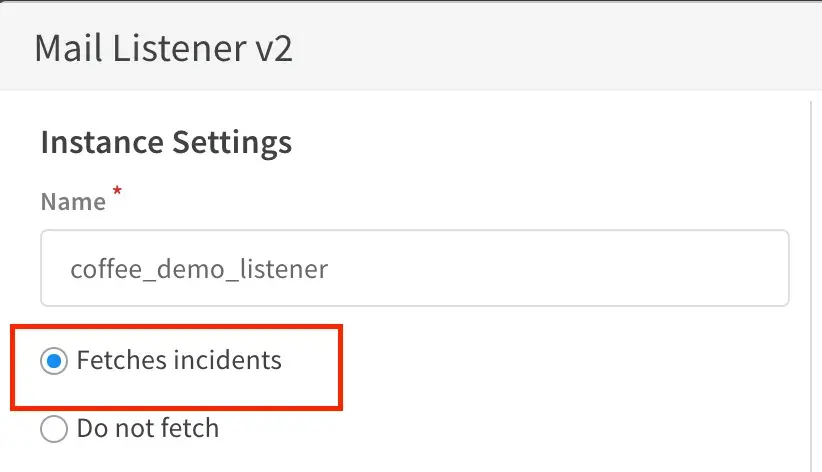
-
Next we’ll send a test email that mimics the behavior of our fancy schmancy smart coffee pot to ensure our settings are correct and XSOAR ingests the email. I’ll send an email to coffee_demo@jpit.io with the following content:
Field Value To coffee_demo@jpit.io Subject Coffee Alert Body Code: 1
Message: Need more coffee! -
Hooozah!! After a couple minutes, you should see that there is a new incident with name
Coffee Alertin your XSOAR instance.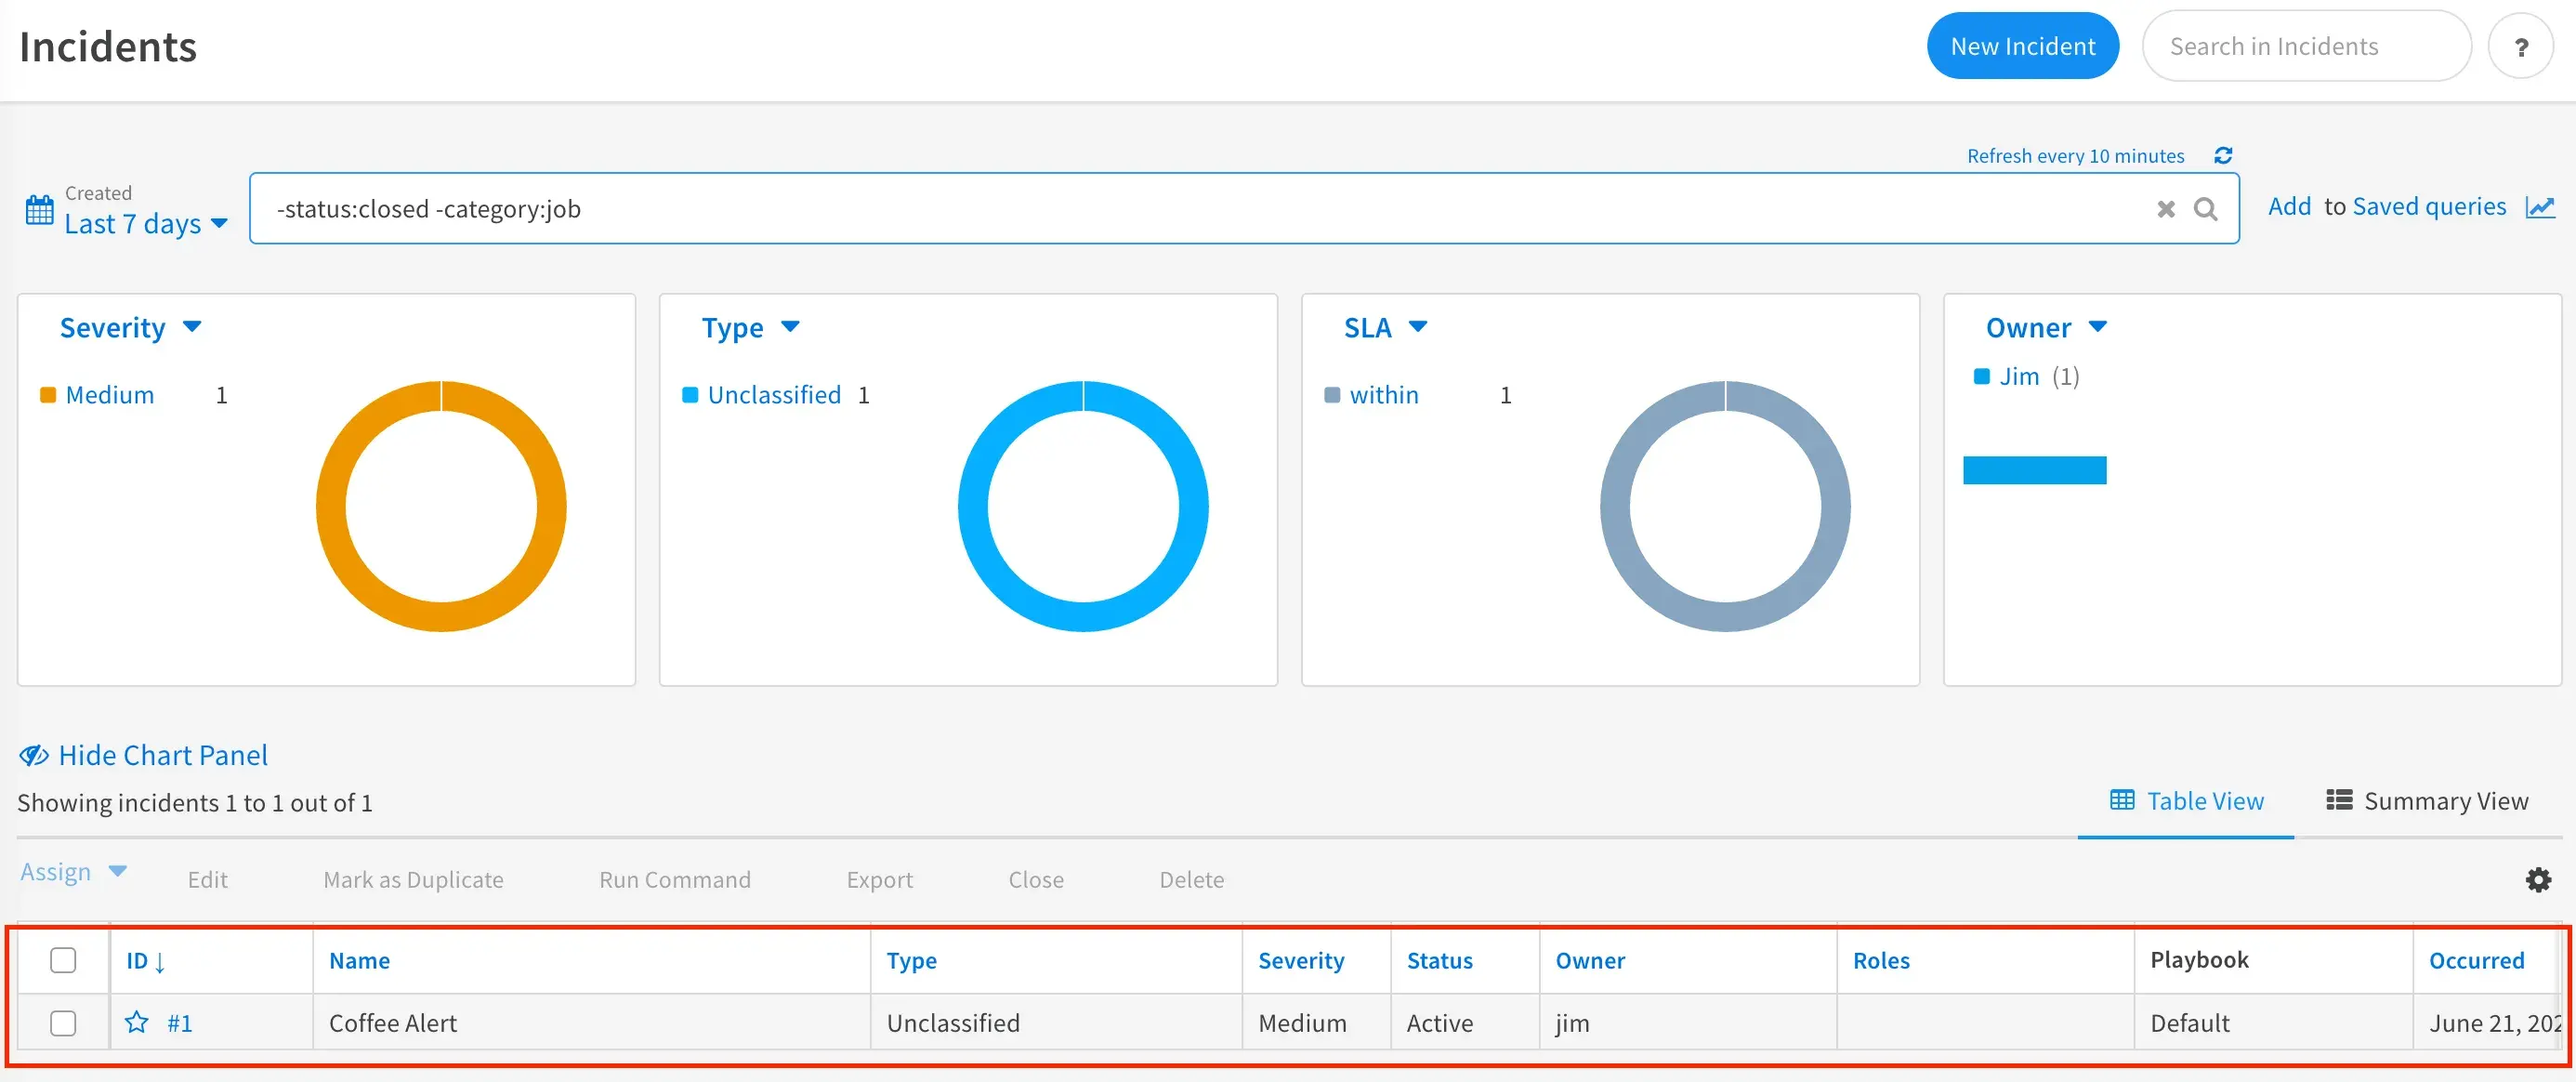
-
The incident that got created was done so using the default settings shipped with XSOAR and the Mail Listener v2 integration. In the next sections we’ll create new custom content so WE get to me in control of what happens when we get a coffee maker alert >:)
Creating a New Incident Type
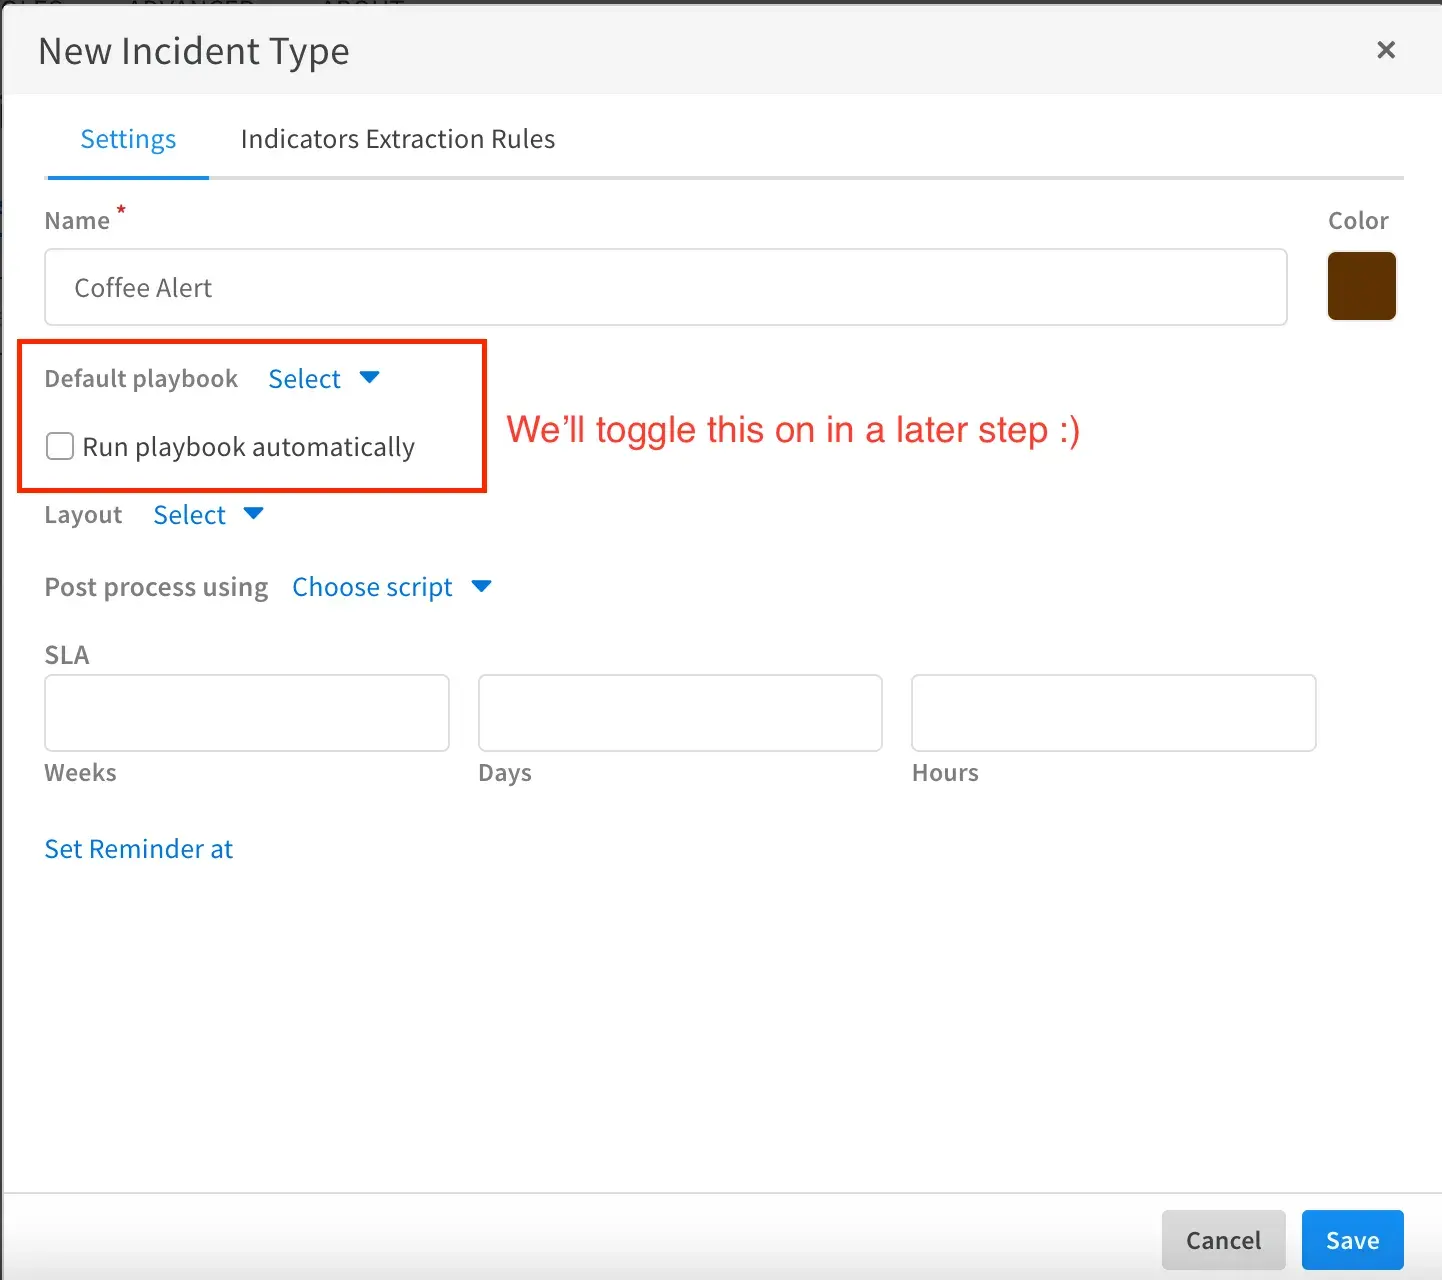
- Incident types, in XSOAR, are the vessel that contain all configurations for a workflow. They control what playbook to run, what fields get applied to the incident, and much more. As such, we’ll create a new incident type called
Coffee Alert - Go to Settings -> Objects Setup -> Types -> New Incident Type and then give the new incident type a name. Feel free to give it a color as well…I went with brown for obvious reasons!
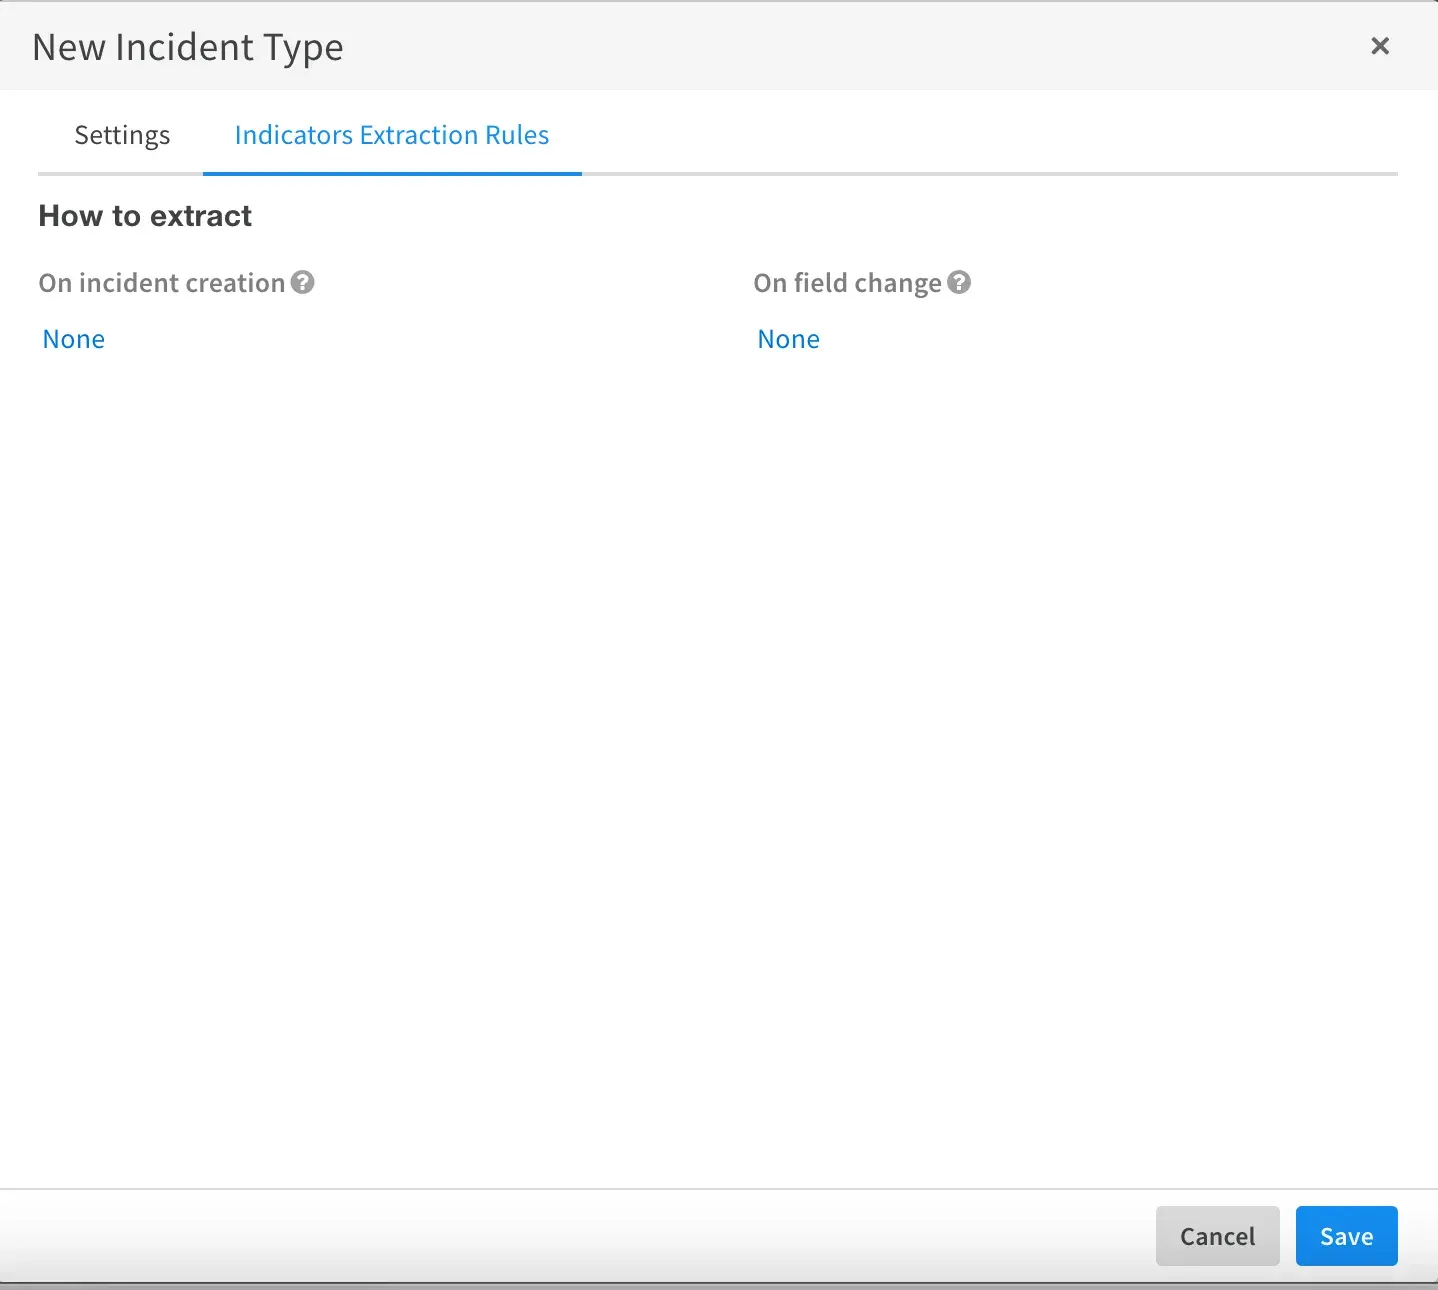
- In the Indicator Extraction Rules set everything to None as we won’t be using that feature for this demo. Then Click Save.
Creating a Classifier
Ok, so things are about to get tricky but just hang on my fellow Security folks!
Right now there’s nothing connecting our Mail Listener v2 instance to our new incident type. We need a way to tell XSOAR everytime an email comes into our XSOAR mailbox folder, that IF AND ONLY IF it has a subject line matching Coffee Alert THEN it should create a new Coffee Alert incident. This is exactly what the Incident Classifier is for in XSOAR.
-
Go to Settings -> Objects Setup -> Classification & Mapping -> New -> Incident CLassifier

-
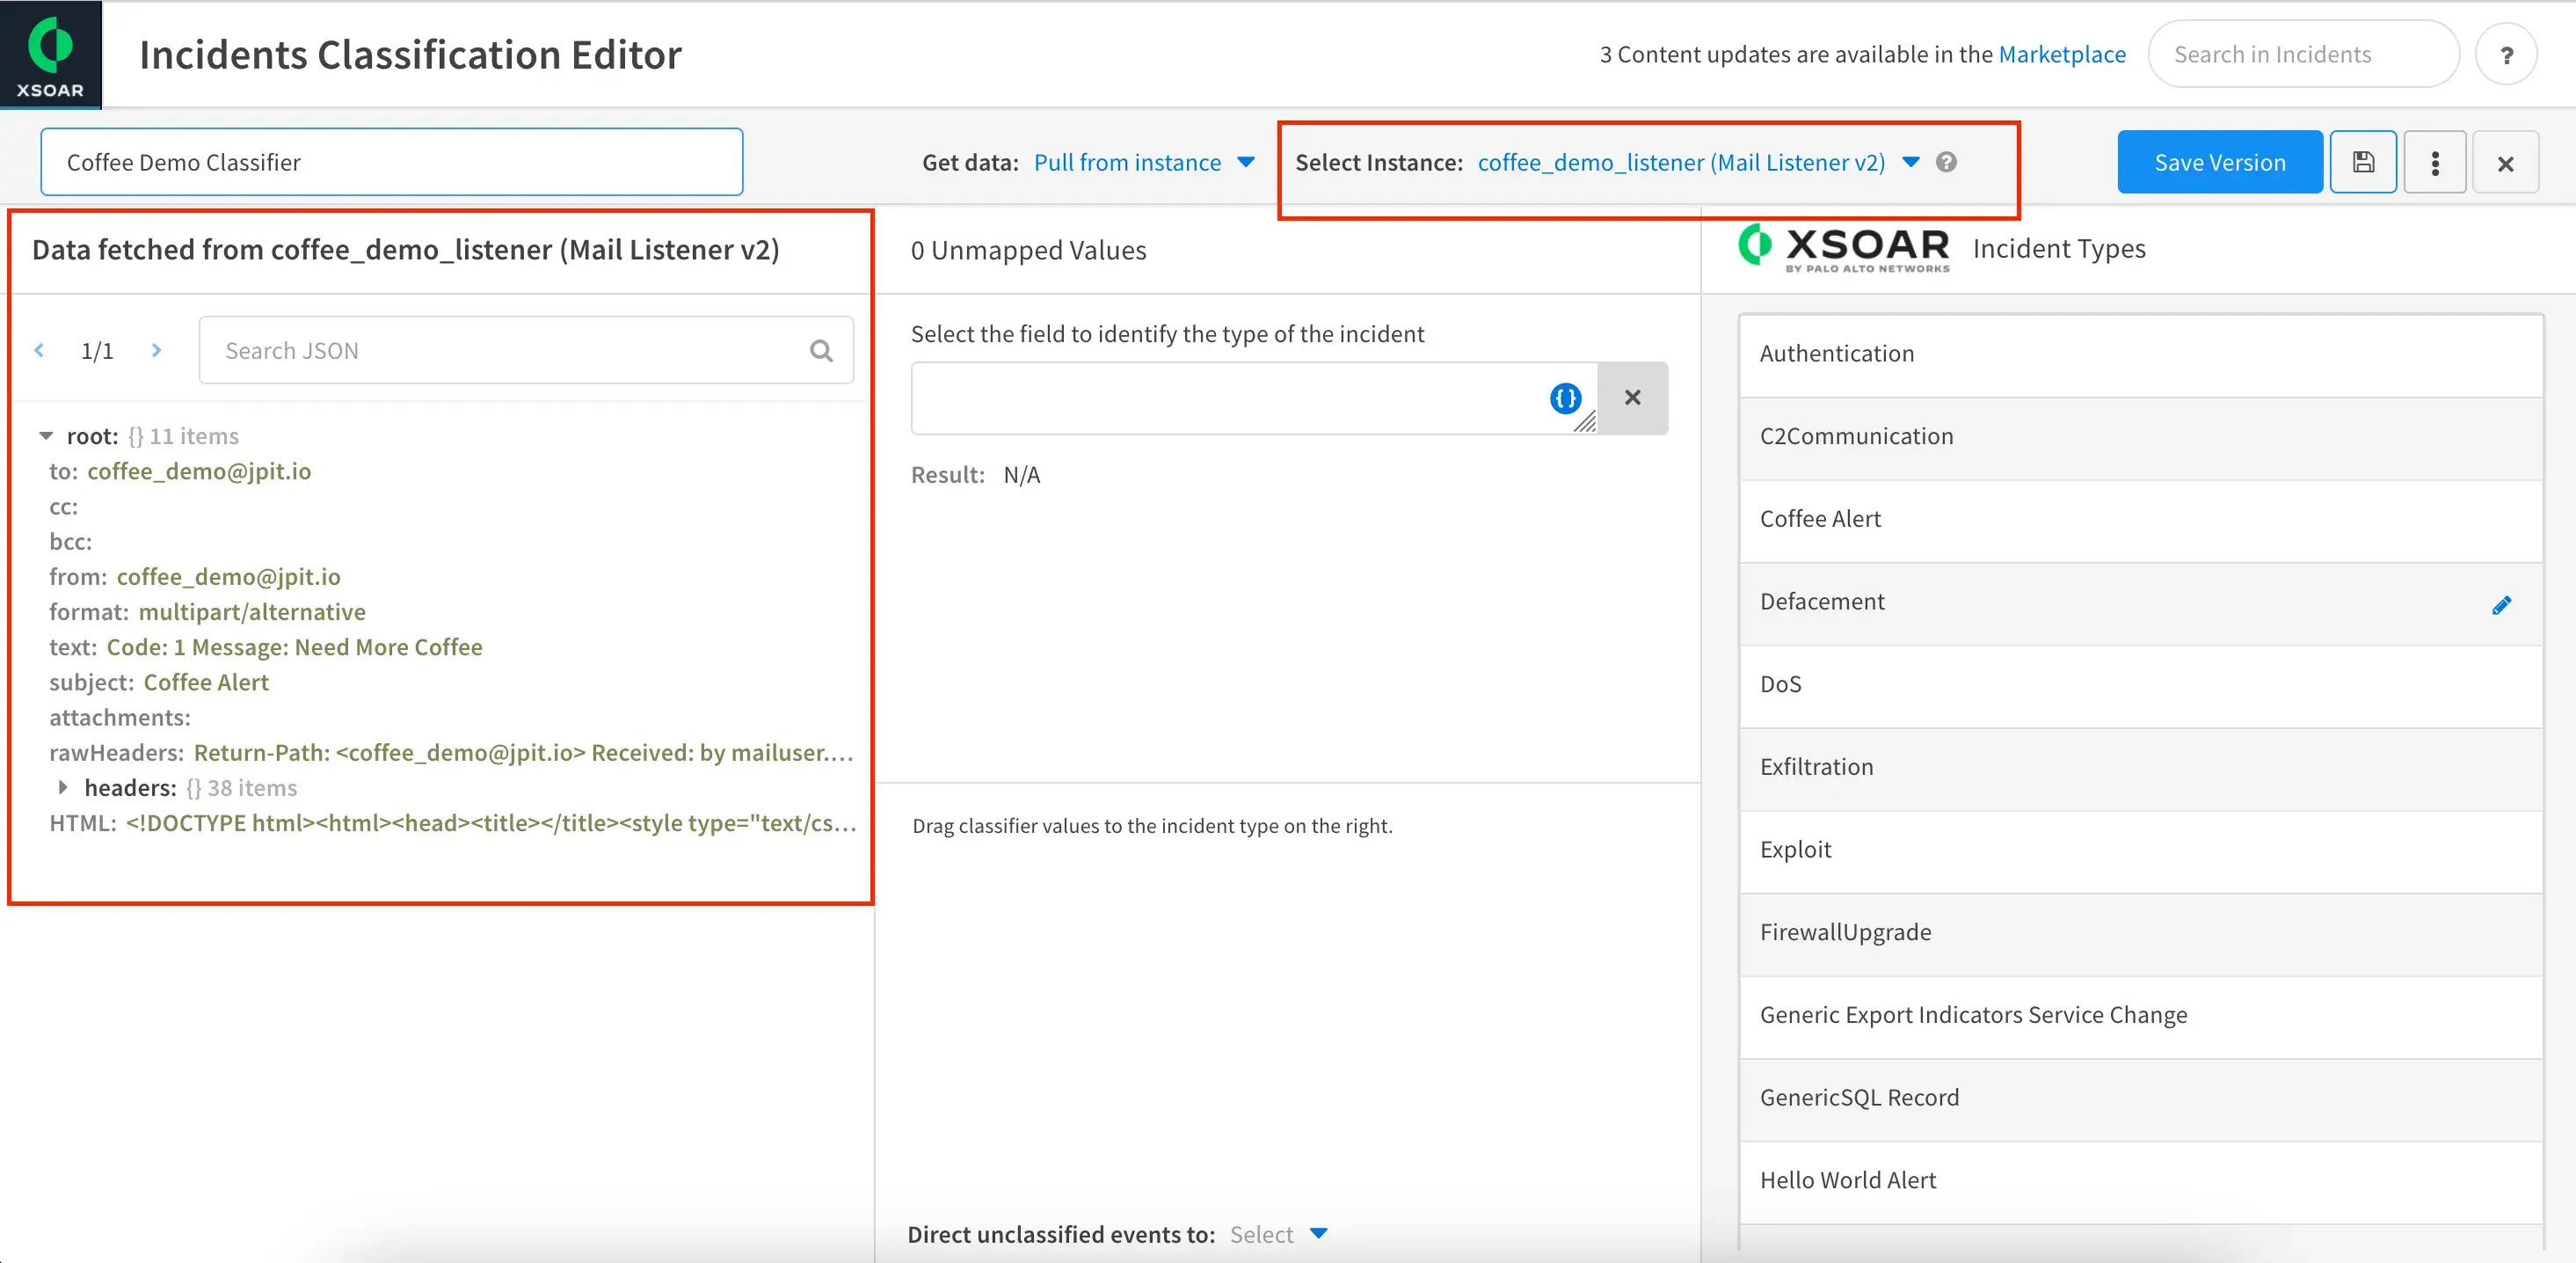
Ok so now you’re staring at a blank canvas… kinda scary but lets keep going. Give your classifier a name and then use the Select Instance drop down to select your Mail Listener v2 instance. You should then see some data populate in the left hand section. This is the data extracted from our test email we sent earlier.
In fact, I only had you send that test email so the data would show up here and make this a whole lot easier!
-
In the left section, click the field name subject to toggle it as the incident identifying field. Then Click and Drag the subject value (in our example its Coffee Alert) to the incident type we created (coincidentally) also called Coffee Alert. Finally, click Save Version.
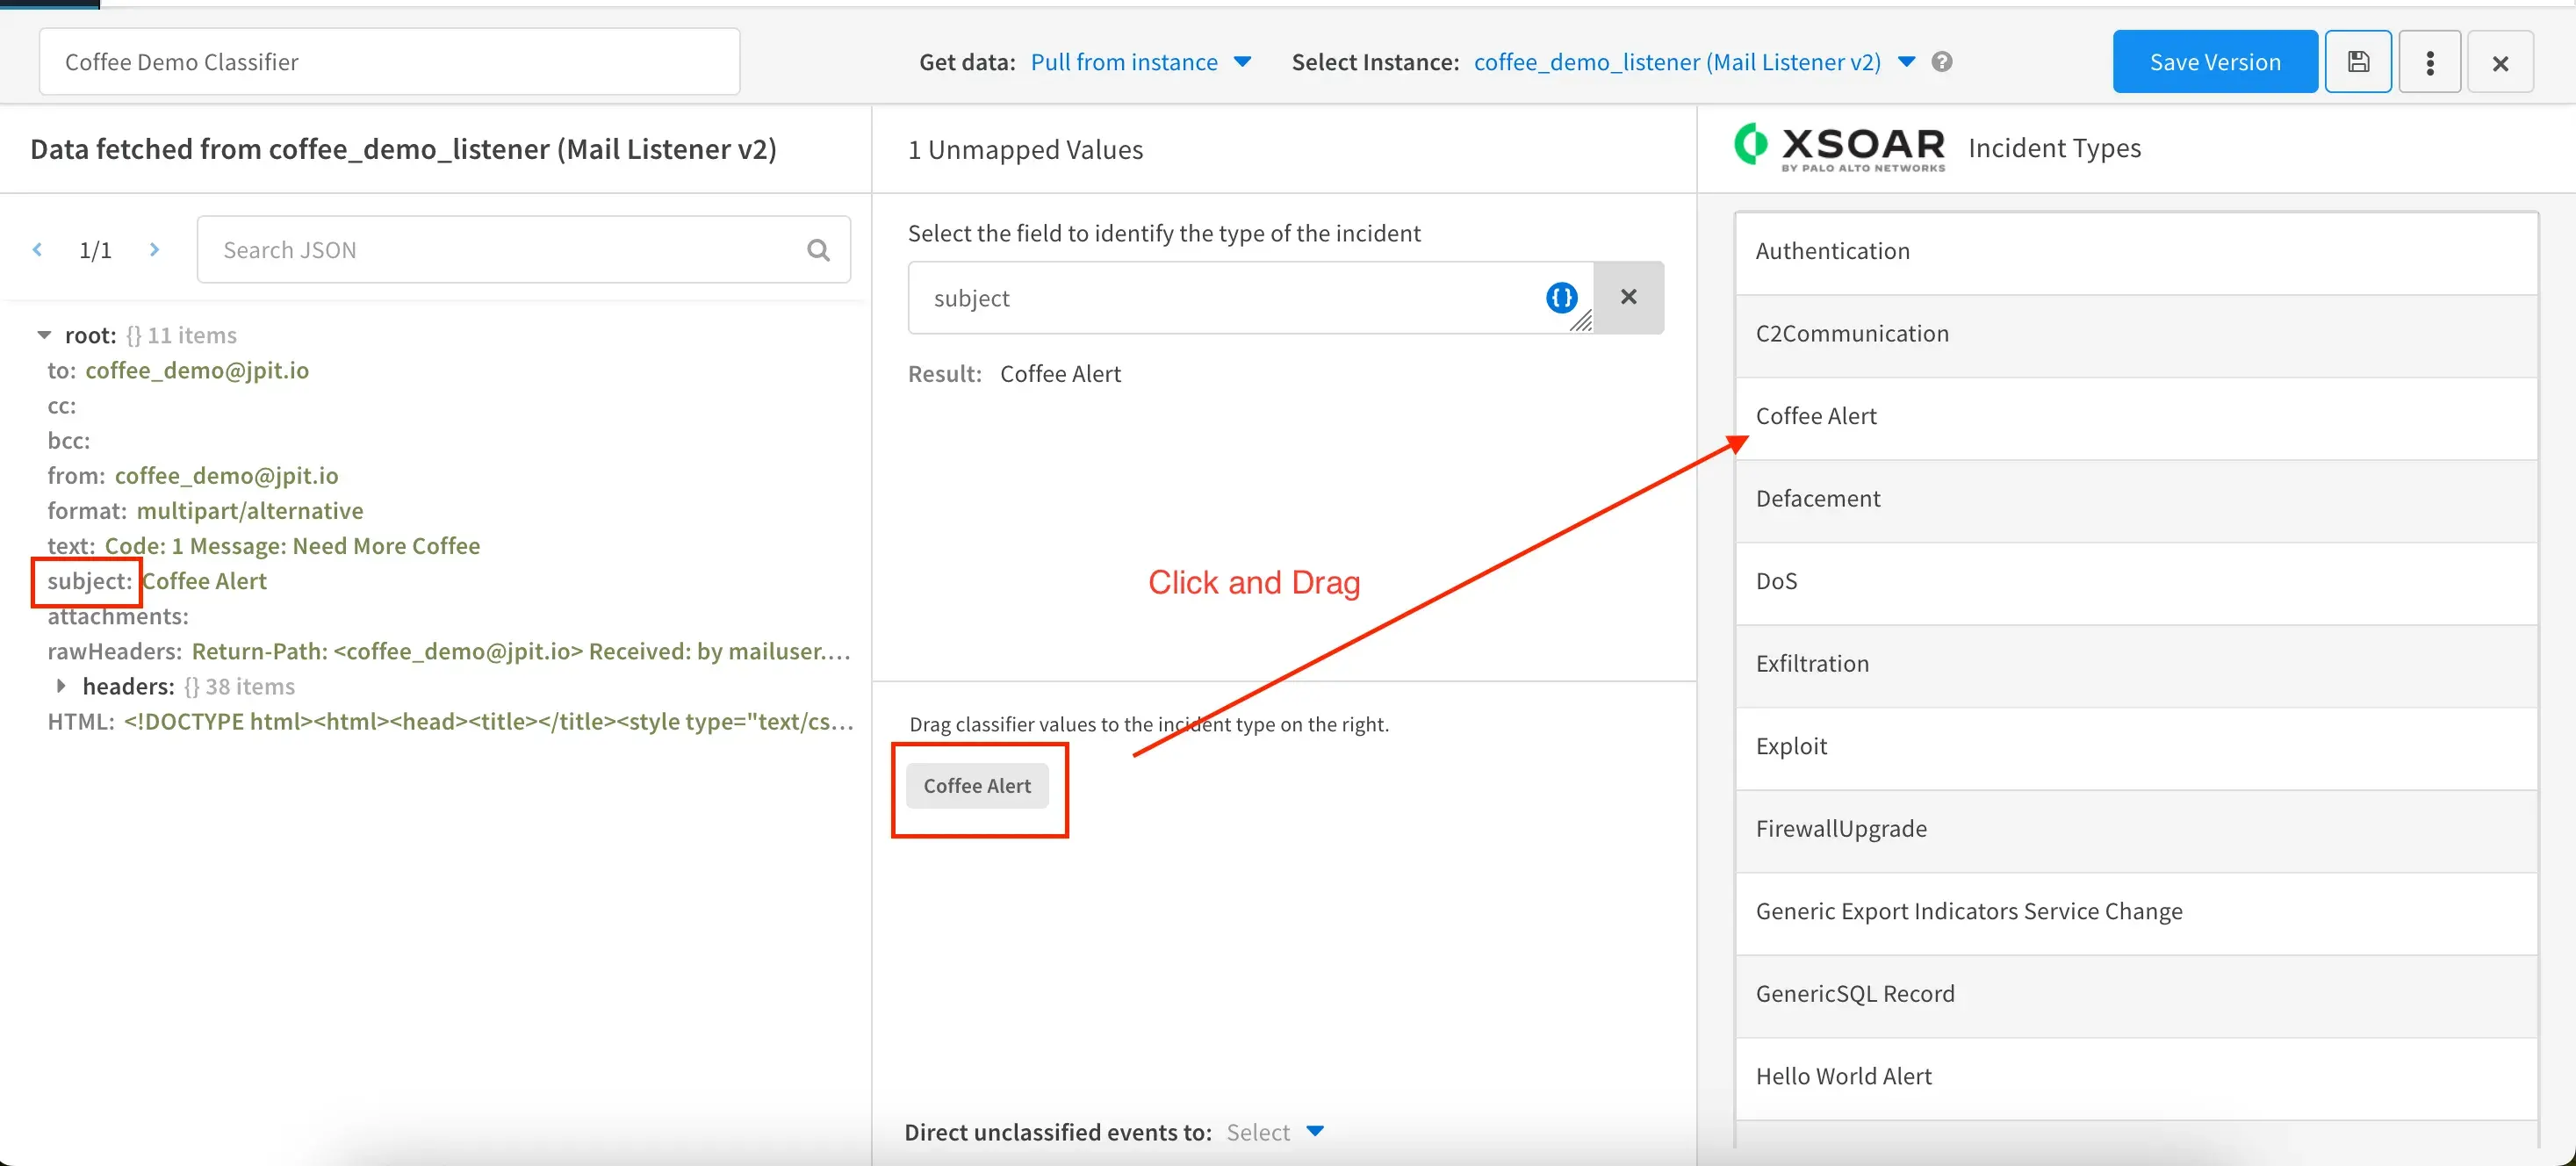
To be clear, we’re using the email’s subject line as the identifier to determine what incident type to create. For example, if we had a smart dishwasher that sent emails with subject line
Dishwasher Alert, we could click and drag that value to a different custom incident type of your creation. This makes it possible to use a single classifier for many automation use cases. -
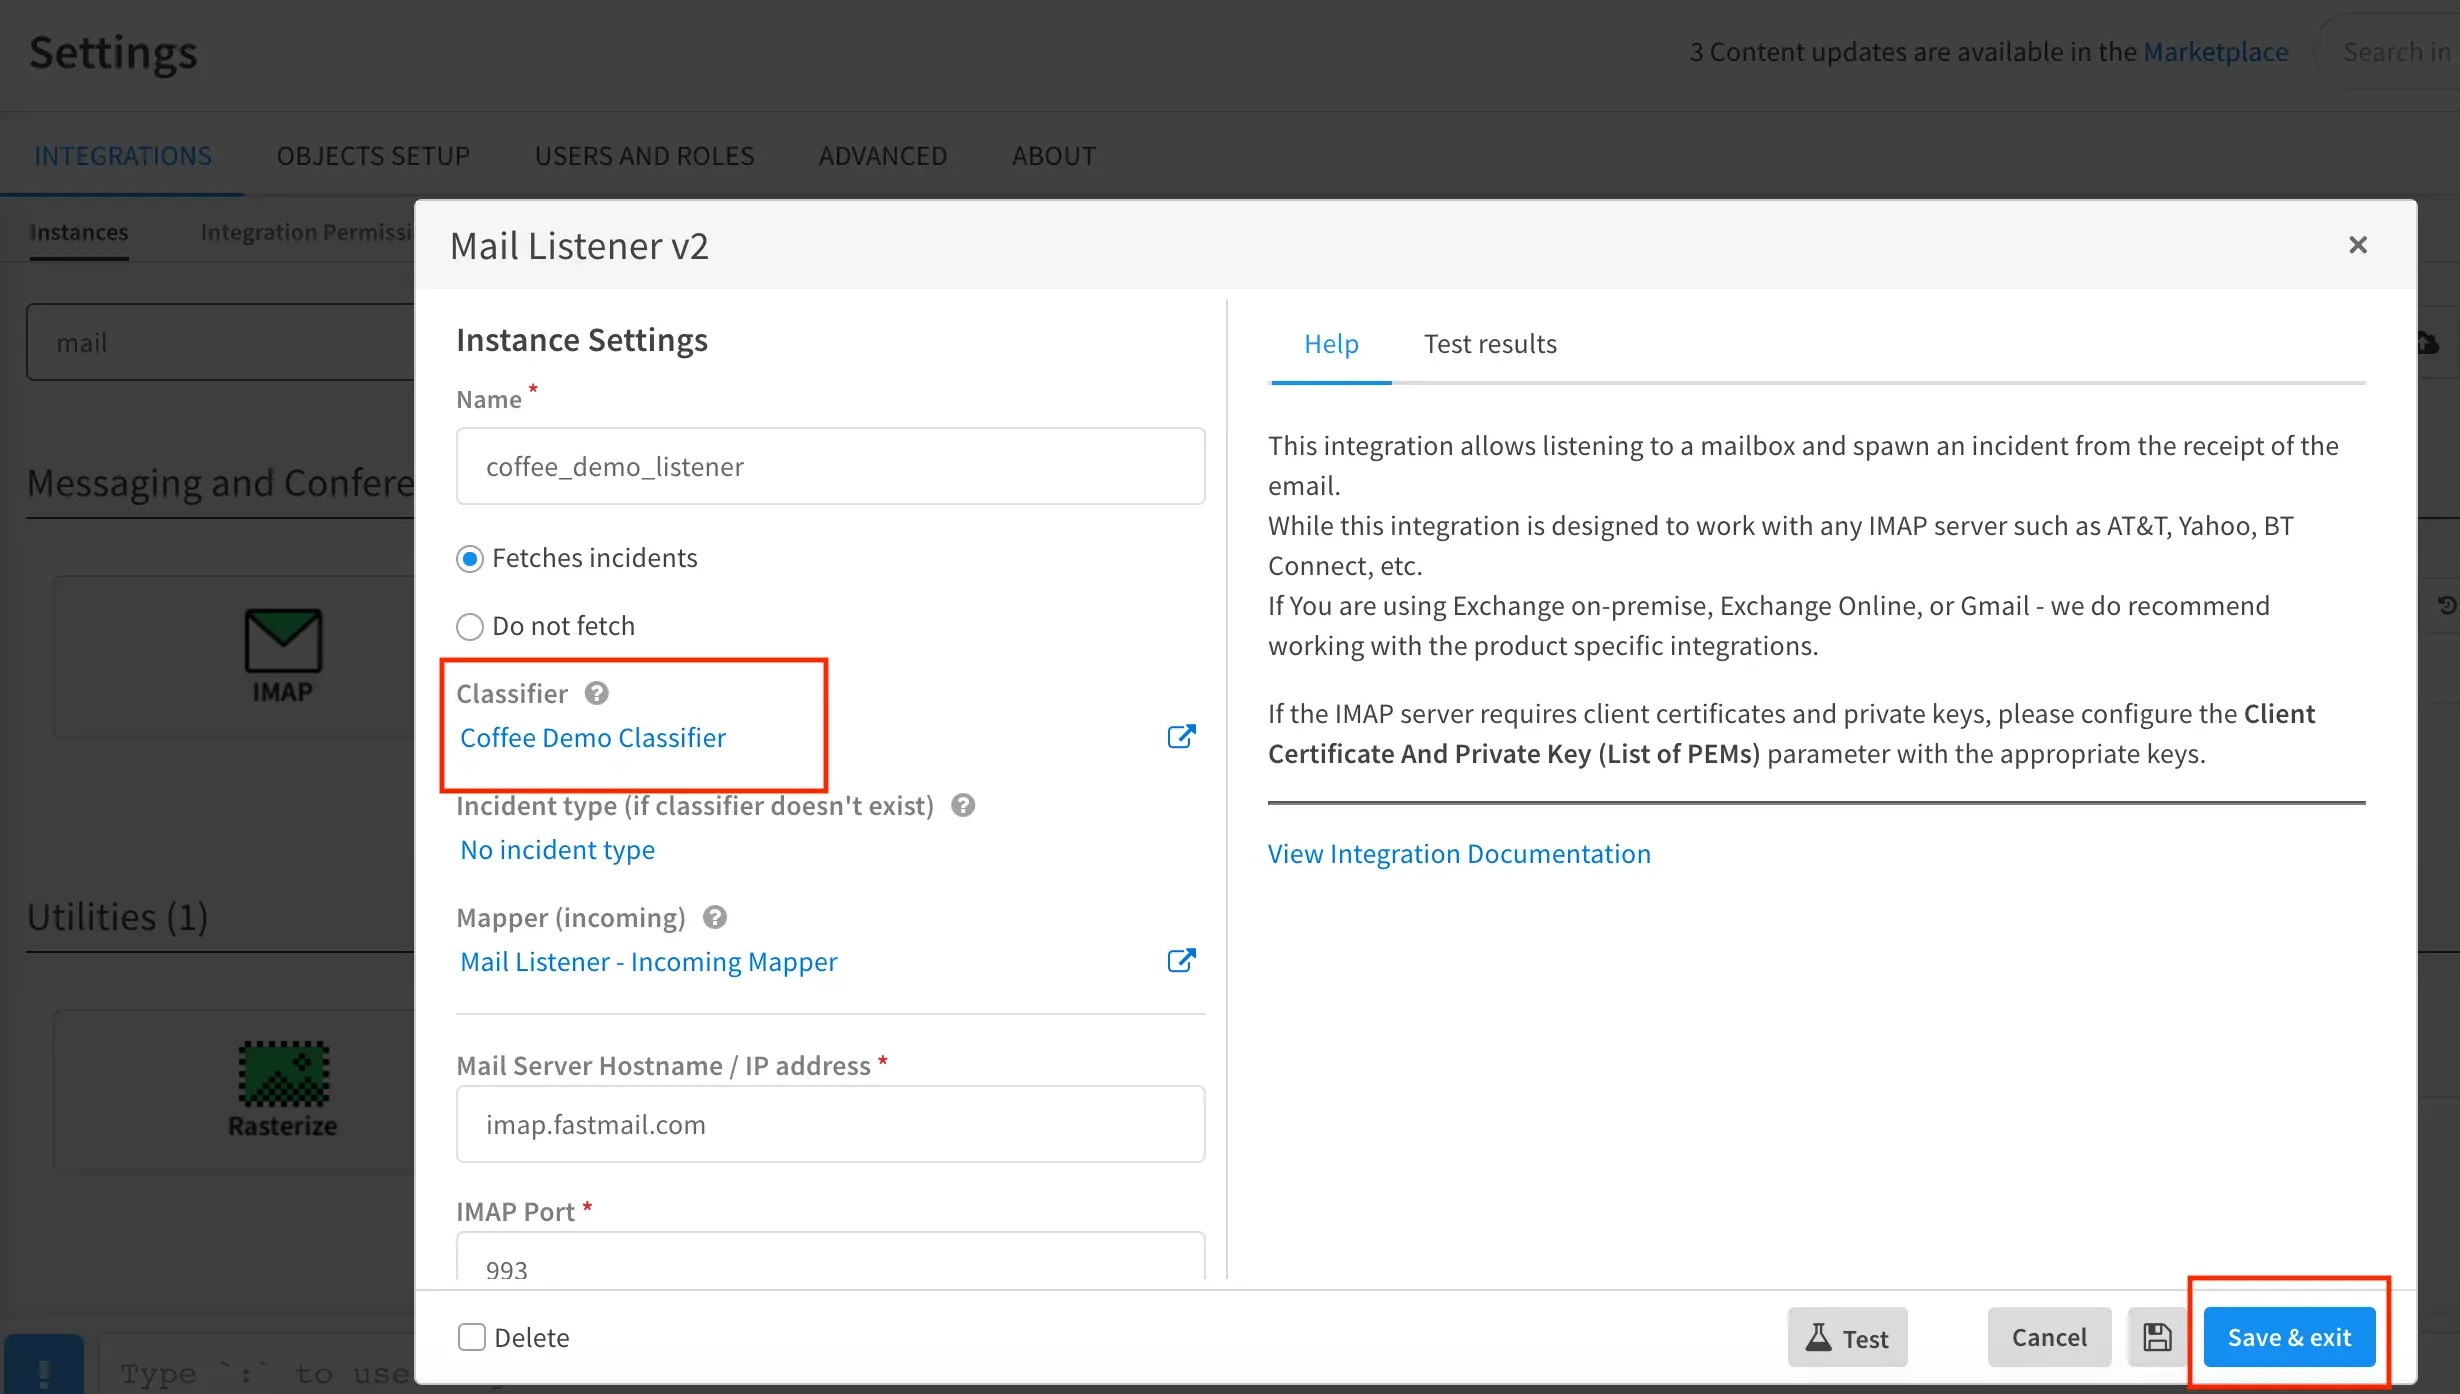
Now we need to tell our Mail Listener v2 instance to use the classifier we just created. Head back to the instance settings and then use the drop down to select your classifier.
-
Because we’re thorough, let’s go ahead and send another test email just to double check our classifier is working properly. After we send the test email, we should see XSOAR create a new incident of type
Coffee Alert. -
Send the test email pretending to be our coffee maker… Yes I do find this humourous.
-
Success!!! We now have a new incident of type
Coffee Alert. This means our classifier is working as intended.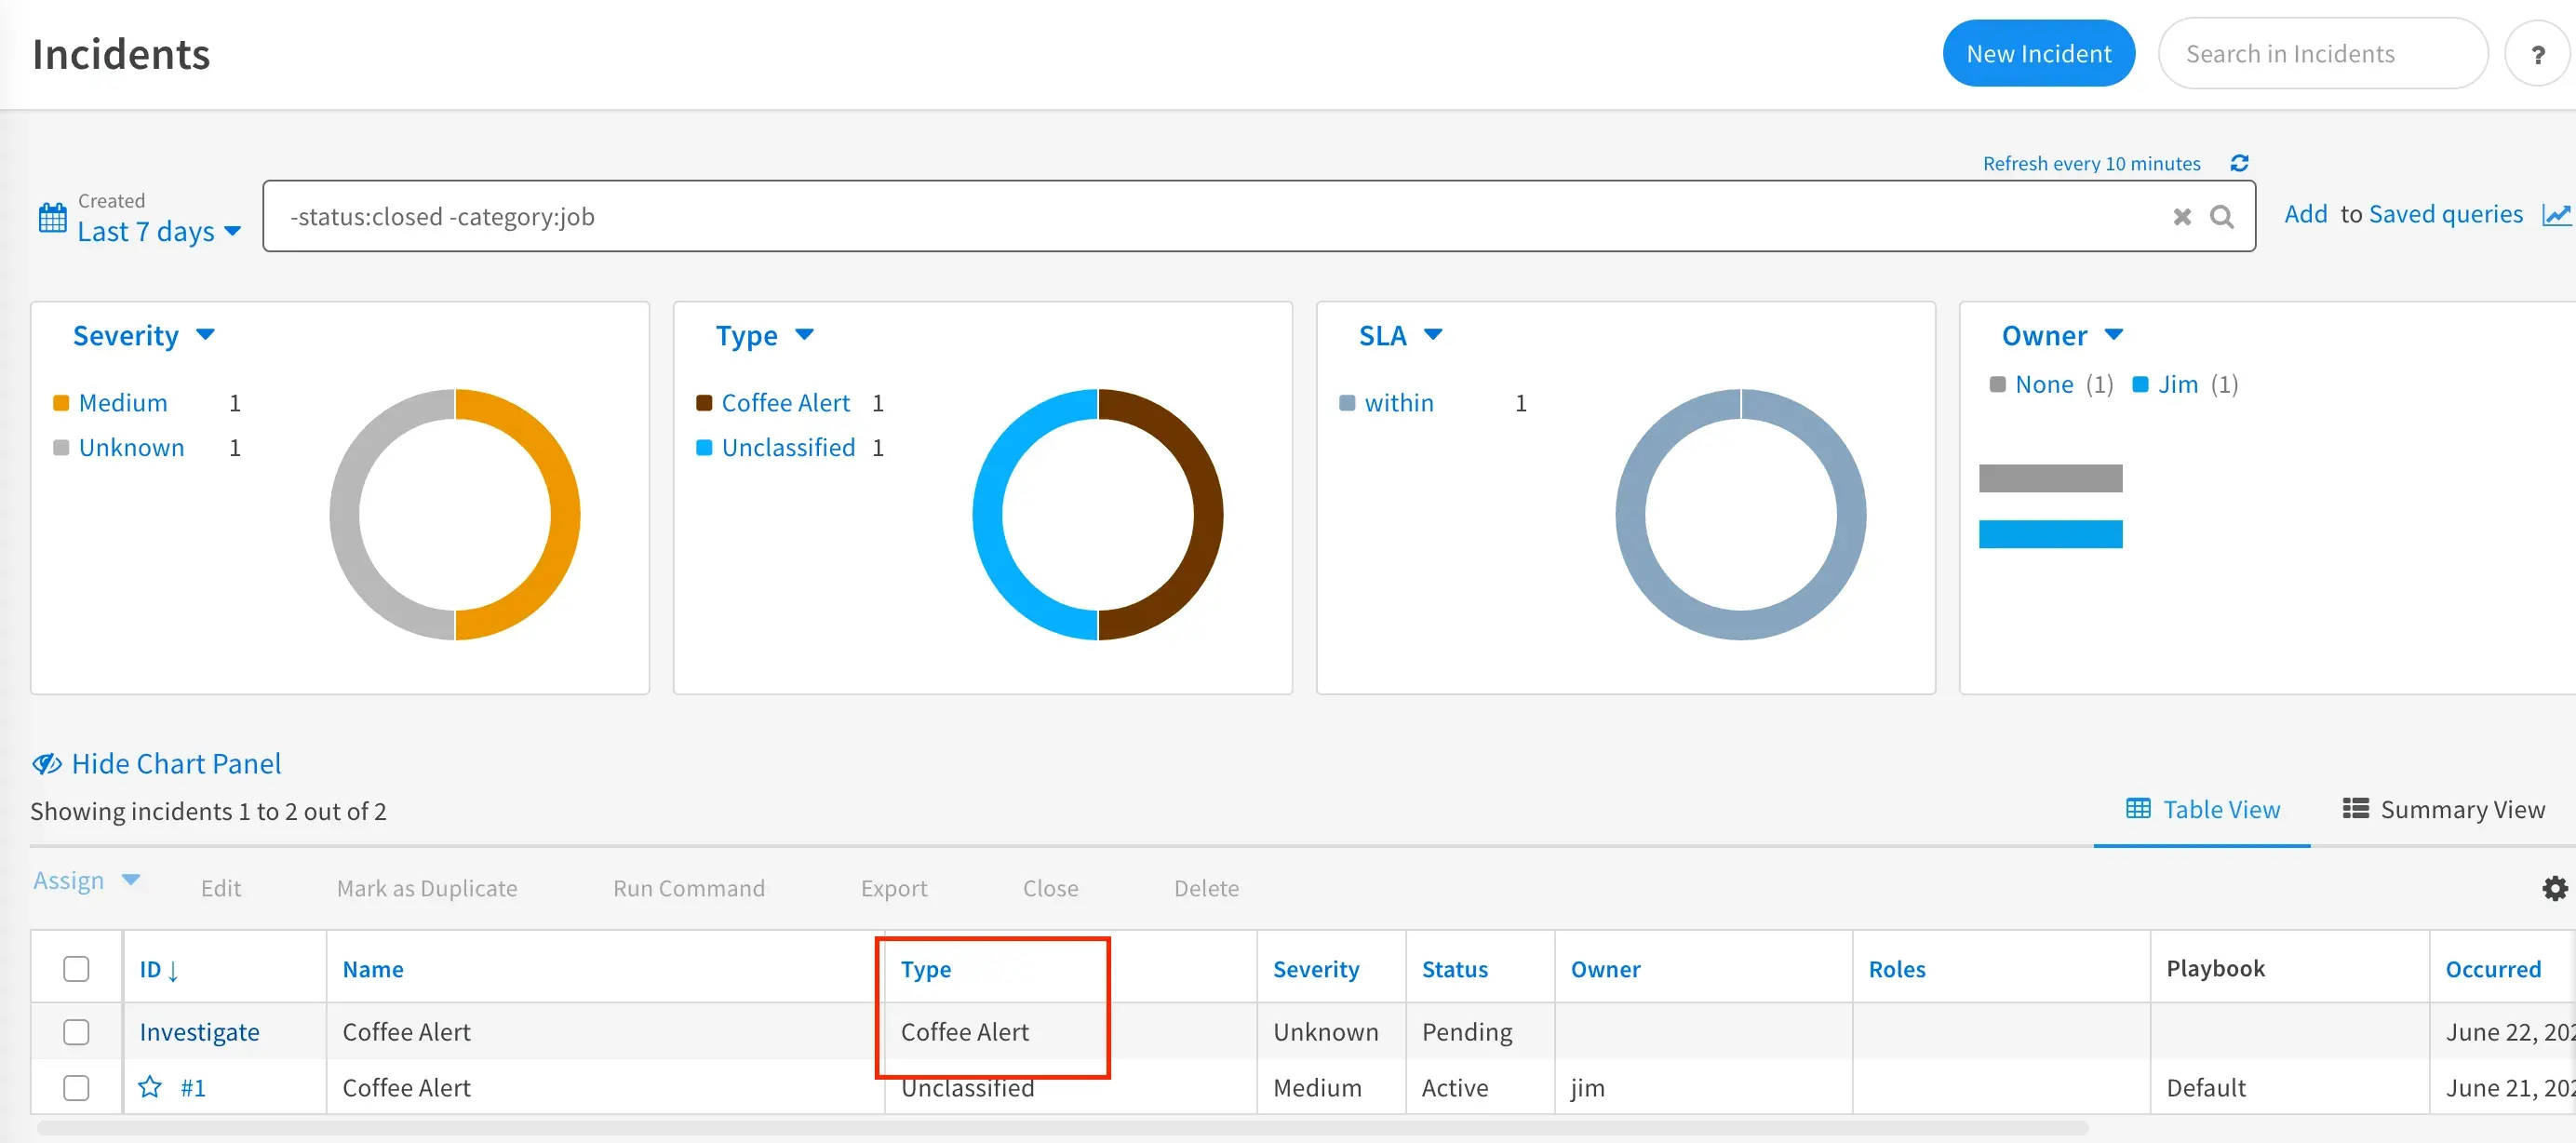
-
Feel free to click into the incident to view details about it. You may notice some basic data extraction took place such as Timeline Information and Investigation Data. This was default behavior but in the next section we’ll tailor this to our custom use case.
Creating Incident Fields and an Incoming Mapper
In this section we’ll learn how to extract data from our coffee maker’s email to store specific values from the email as special XSOAR variables called Incident Fields. To do this we’ll first define those incident fields and then create an incoming mapper so those fields get populated automatically whenever an email is received.
-
Every email the coffee maker sends has 2 attributes we’re interested in capturing.
- Code
- Message
Let’s create some incident fields to store those attributes in.
-
Go to Settings -> Objects Setup -> Incident Fields -> New Field
-
Set Field Type to
Short textand in Field Name putCoffee Alert Code -
Click Attributes and then uncheck Add to all incident types. This will reveal a drop down to select specific incident types. Use the dropdown to select
Coffee Alert(the incident type we made earlier). Leave everything else default and then click Save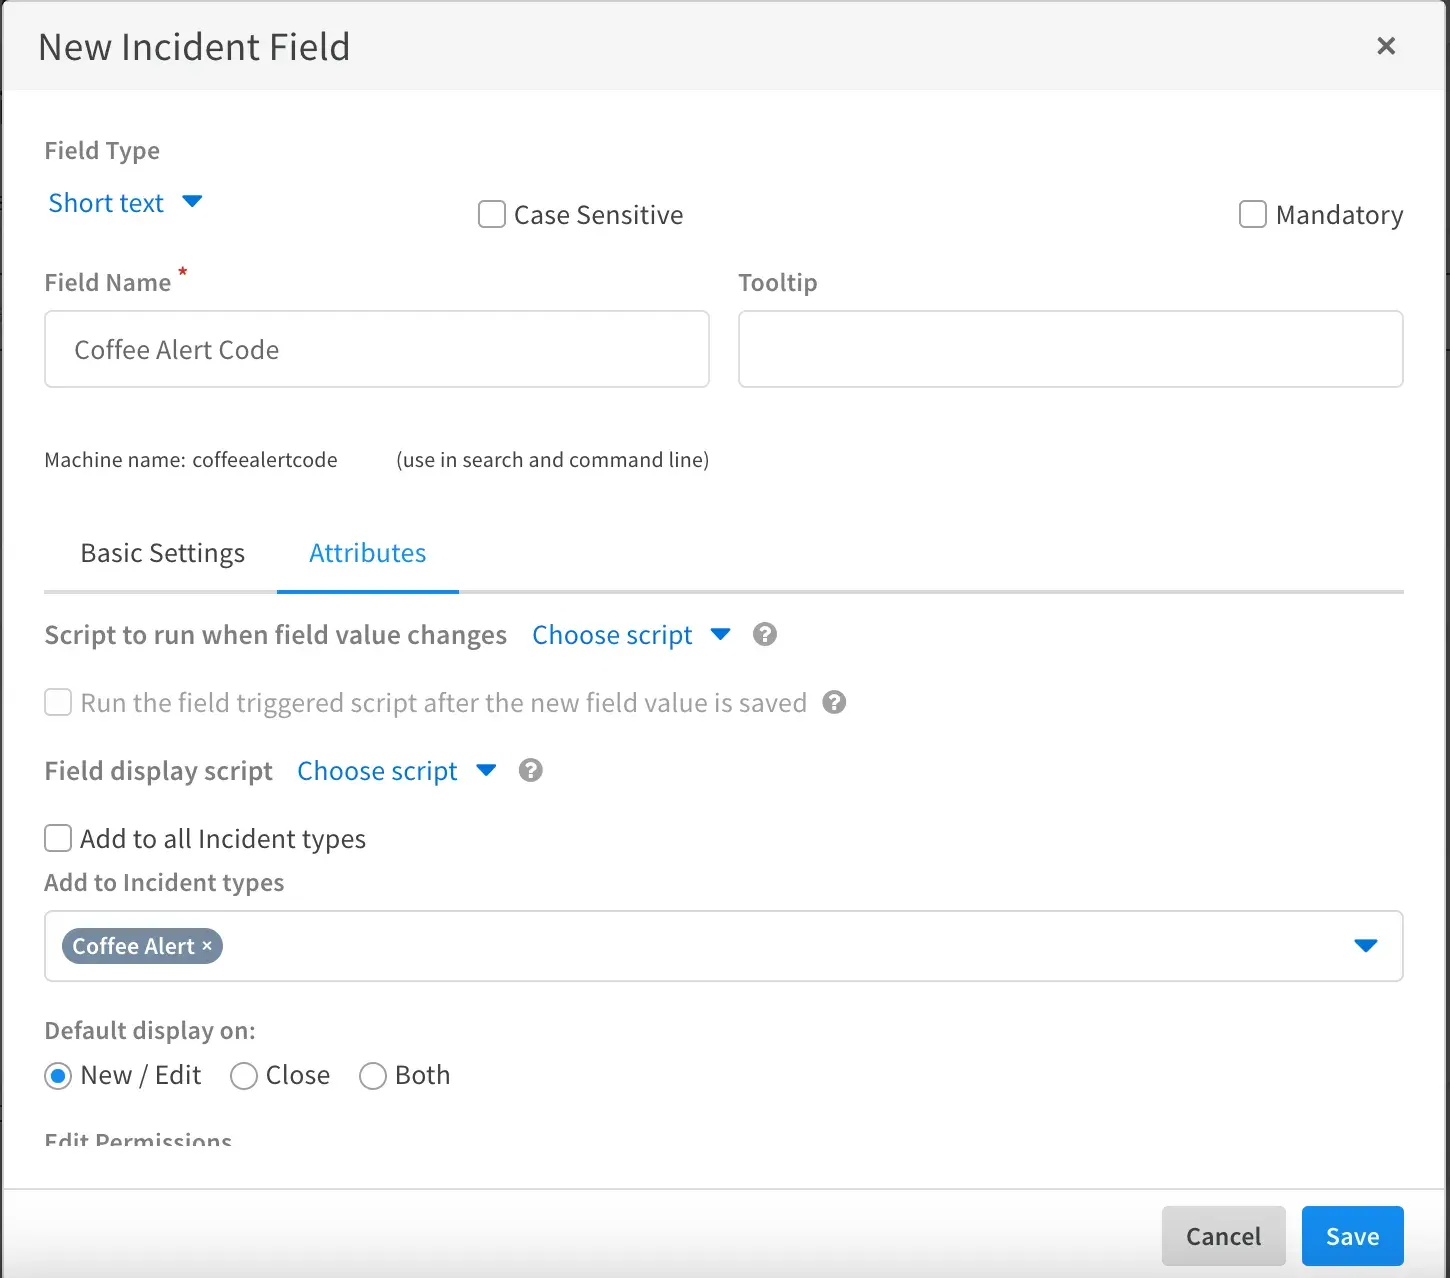
-
Repeat steps 2-4 for our second incident field but name it
Coffee Alert Message -
You should now have 2 new incident fields ready to use!
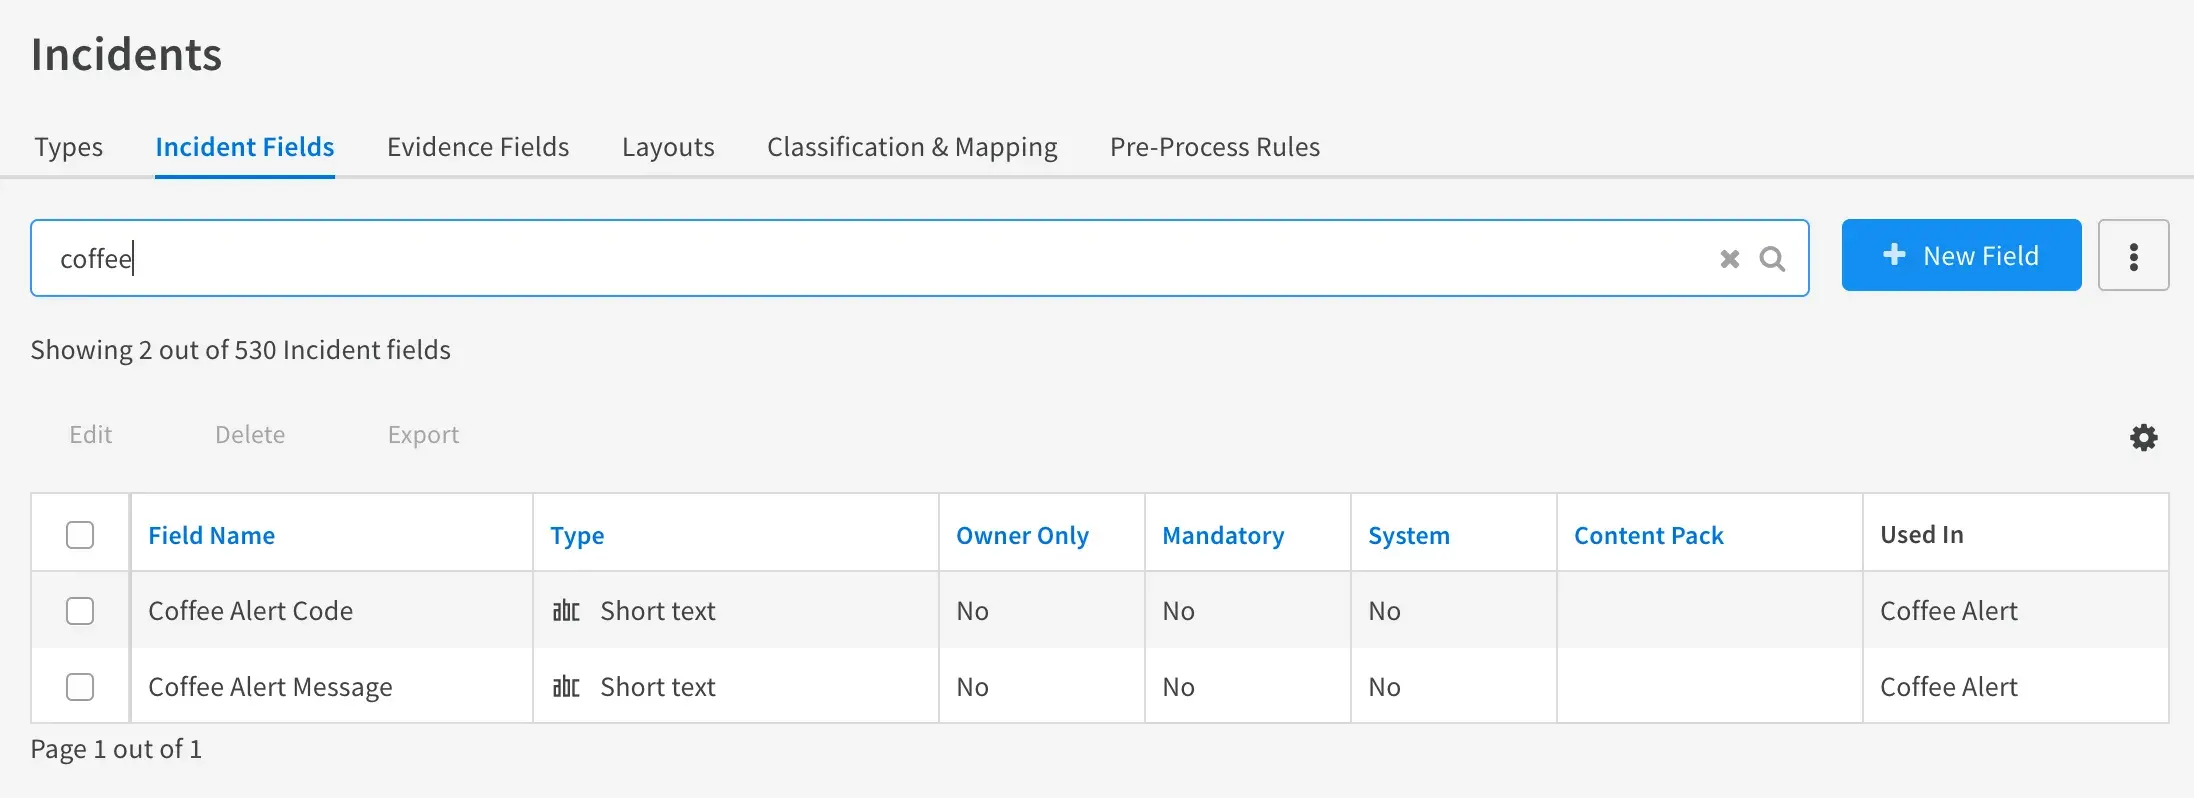
-
Next we need to tell XSOAR how to extract the contents of the coffee maker’s email to store the
codeandmessagefrom the email body into our new incident fields. We do this in something called an Incoming Mapper -
Go to Settings -> Objects Setup -> Classification & Mapping -> New -> Incident Mapper (incoming)
-
Oh sheeesh! Another blank canvas. That’s ok, we’ll get through this together.
-
First of all, give your incoming mapper a name. I’ll go with
Coffee Demo Incoming Mapper. -
Where it says Get Data ensure
Pull From instanceis selected. Then in the dropdown forSelect instance, select your coffee demo mail listener v2 instance. This should populate the right hand side with data from our test email! Once again its paid off to send those test emails ;) If we hadn’t done that, then there’d be no data to work from and this would be a lot harder. -
Last step before we start actually mapping data… Use the Incident Type dropdown on the right to select
Coffee Alert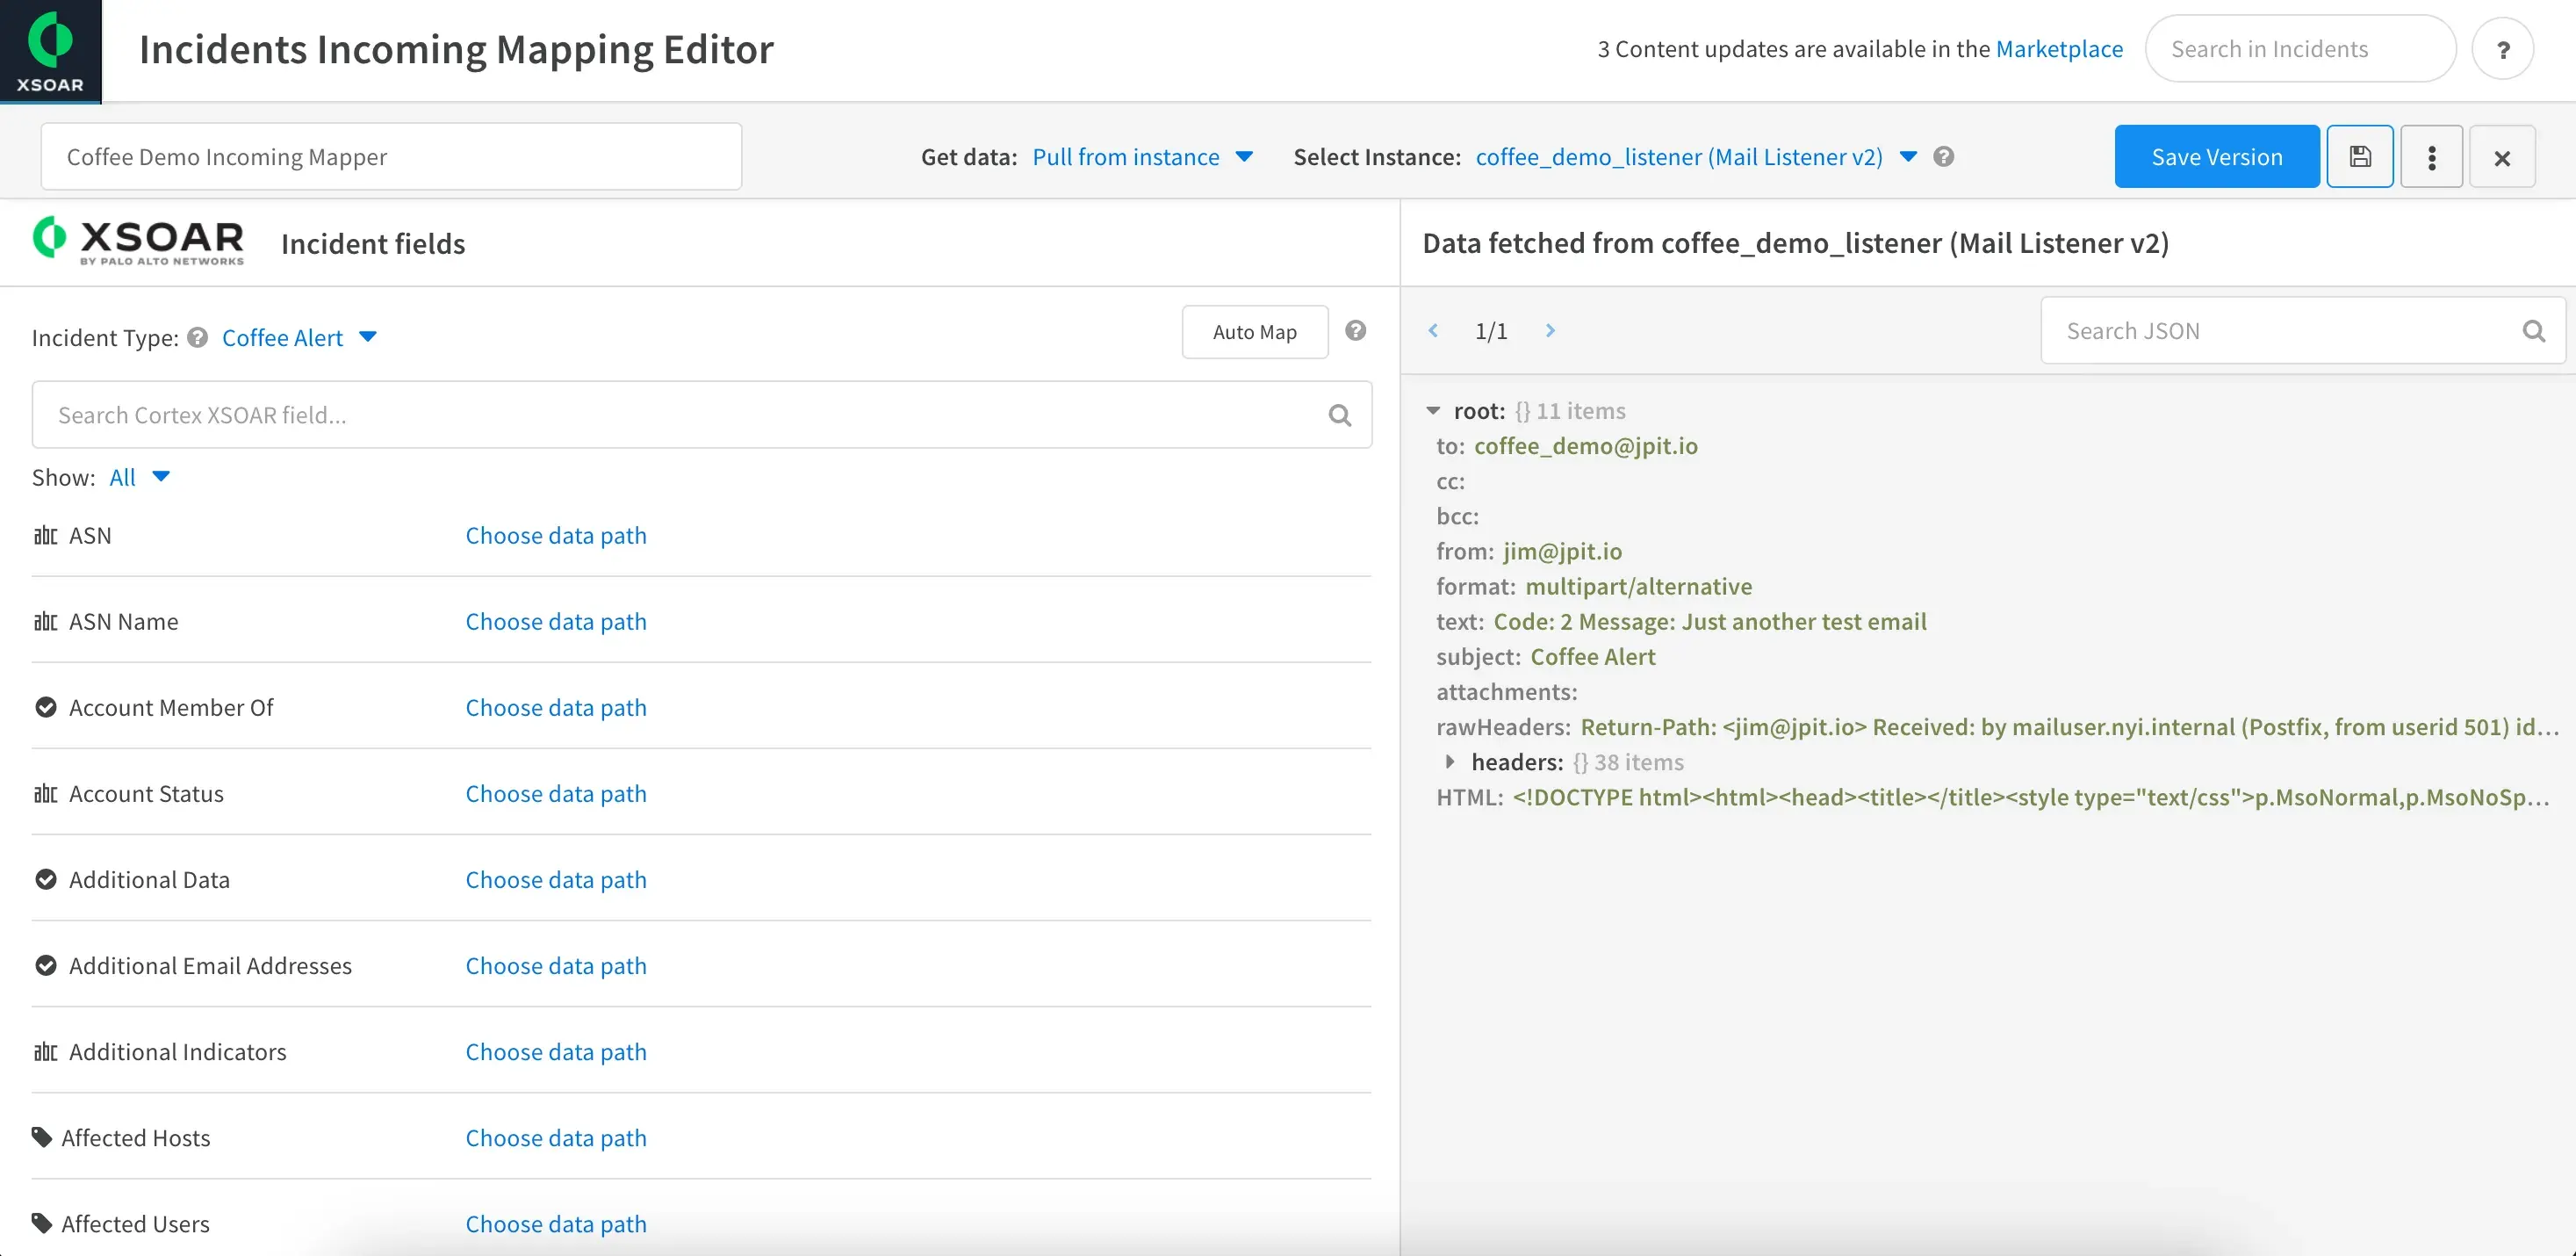
-
Ok let’s get our hands dirty. On the left are our incident fields. On the right is the data coming in from our coffee maker’s email. Our goal is to populate the 2 incidents fields we created with the Code and Message from the data on the right.
Houston we have a problem! The Code and Message from the email is mushed together in a single field called text.

Don’t worry, we’ll do some data manipulation to extract just the bits we want :)
- Let’s start with mapping the Coffee Alert Code field to the email data. Use the search to filter for the field if you haven’t done so already and then select Choose Data Path and then the {} to bring up an additional window.
- In the Get section, select the {} and then expand Keys. There you will find the text key that contains the data we’re after. Select it.
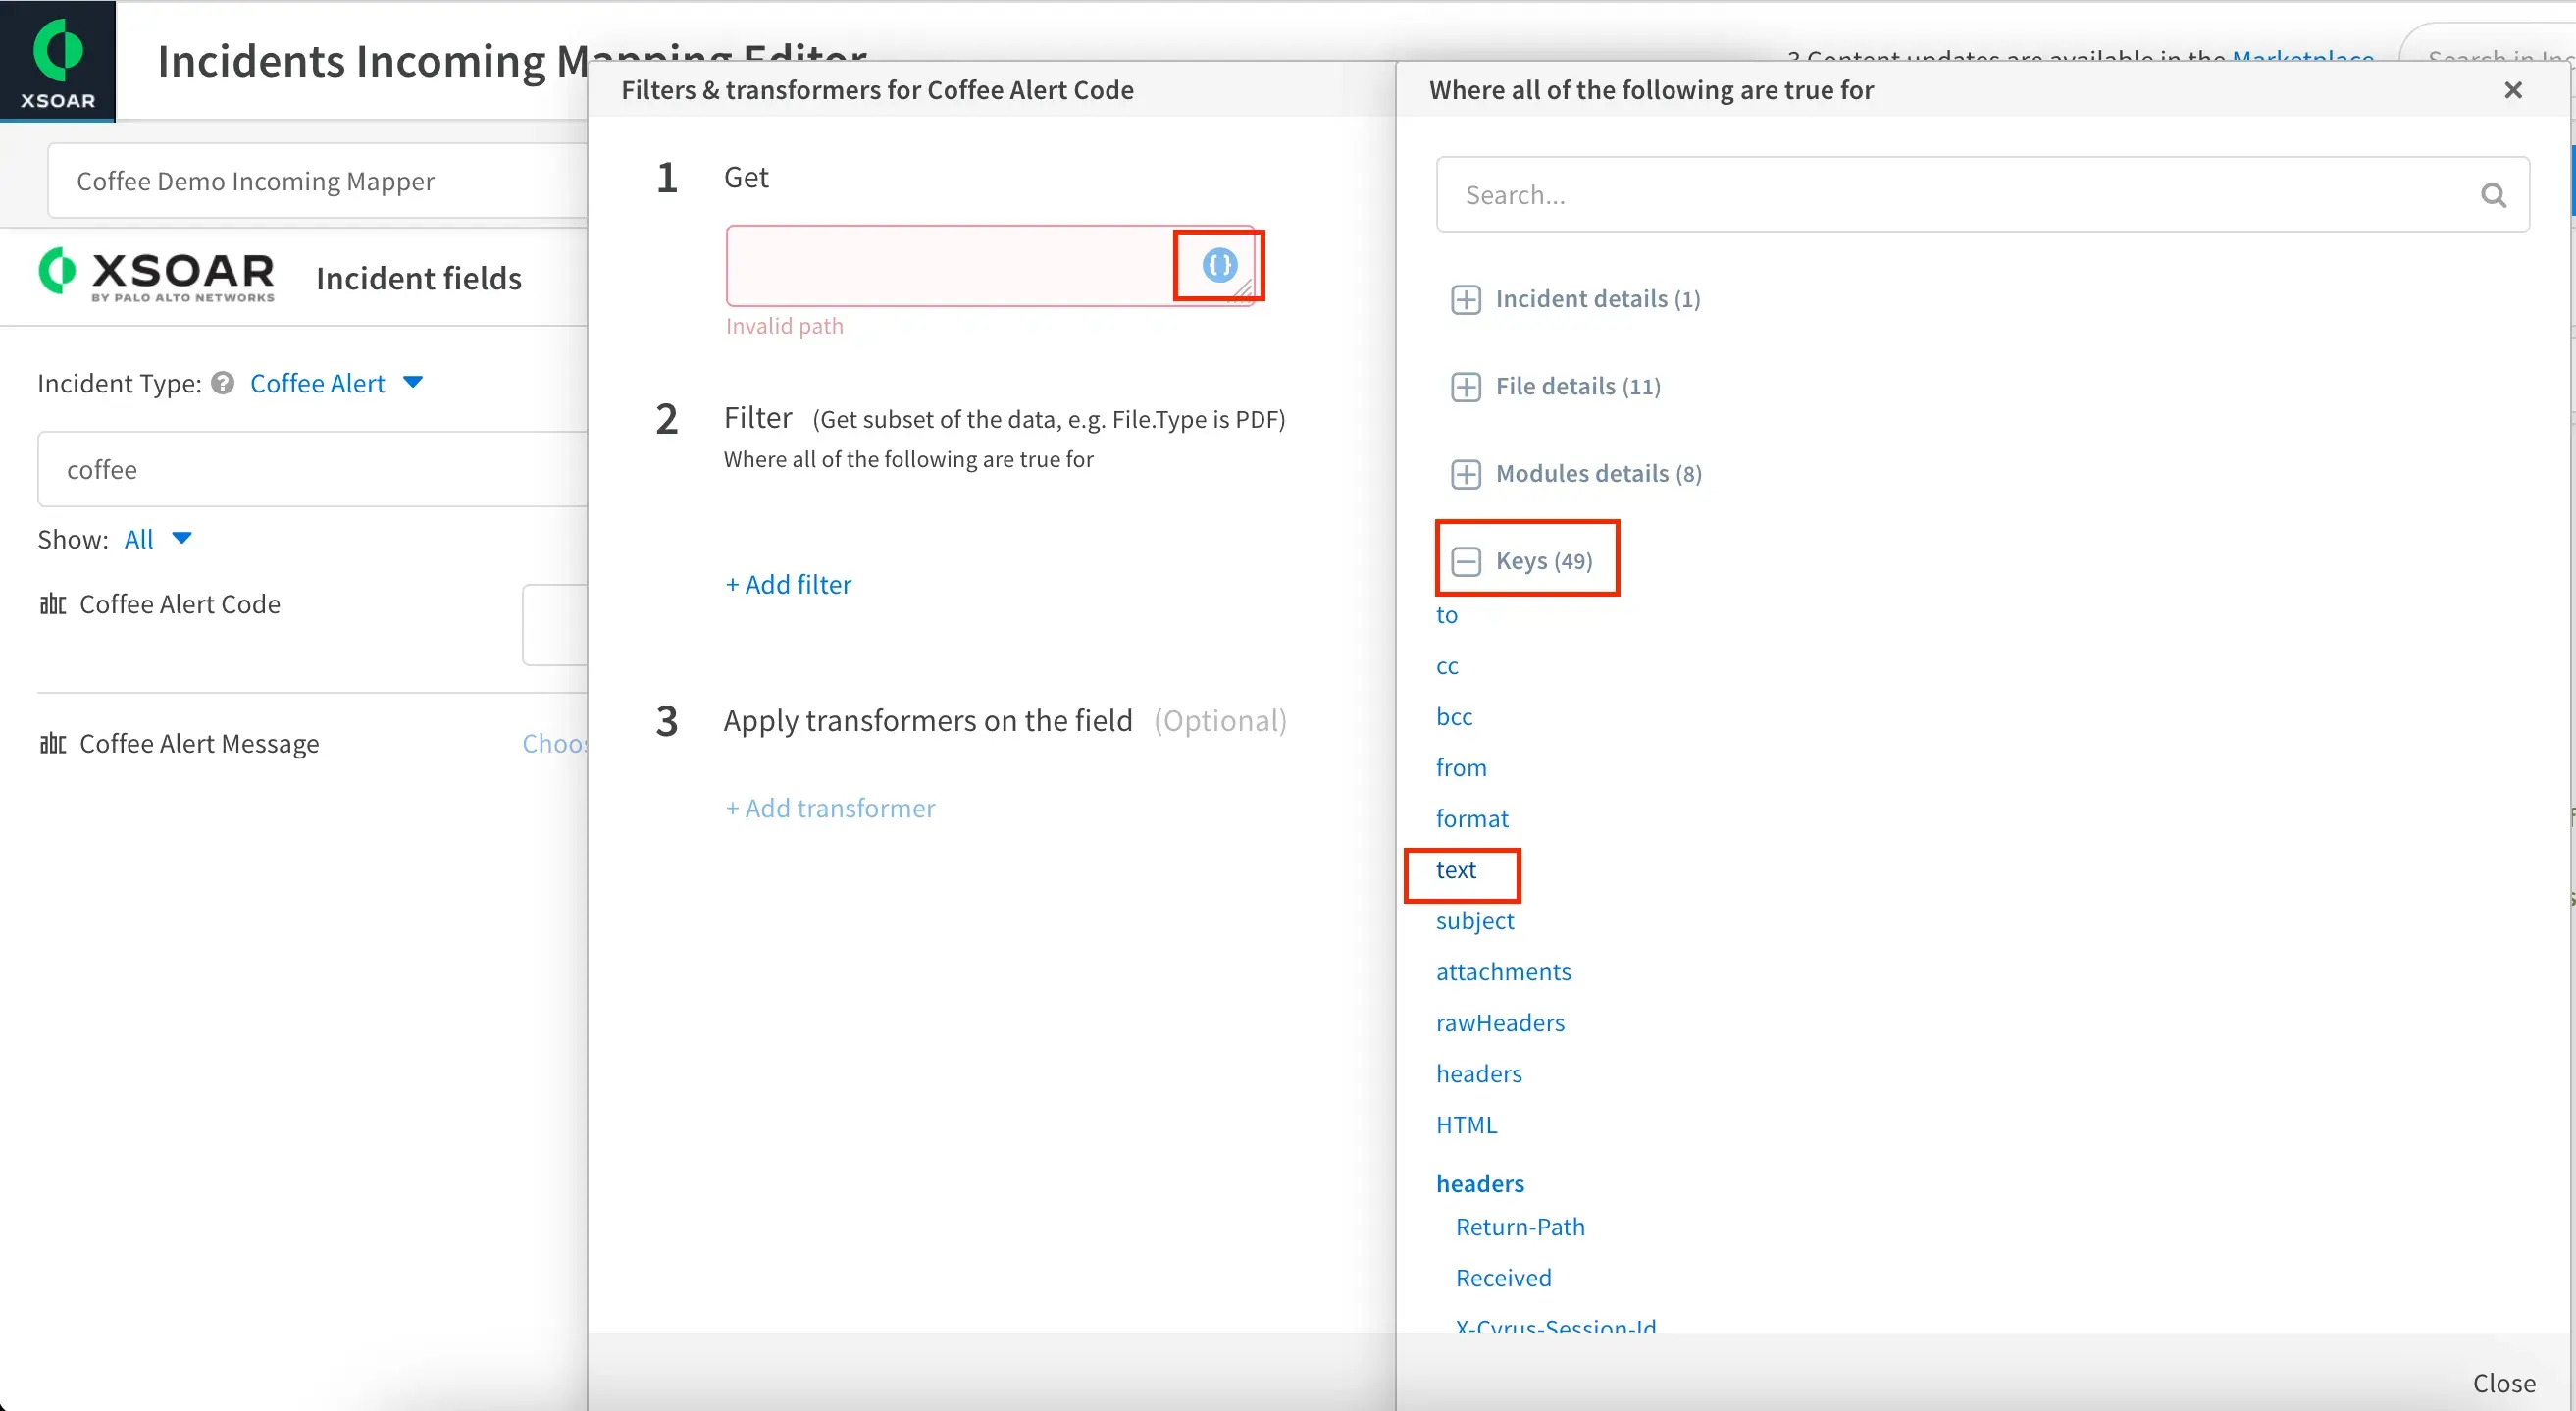
- Next, Click Test to bring up the test window and then Click Test. We use the test window to frequently check what data we’re currently extracting. Its a great tool!
- You should notice our test results currently indicate we’re extracting everything from the text key. What we really want is the single digit following
Code: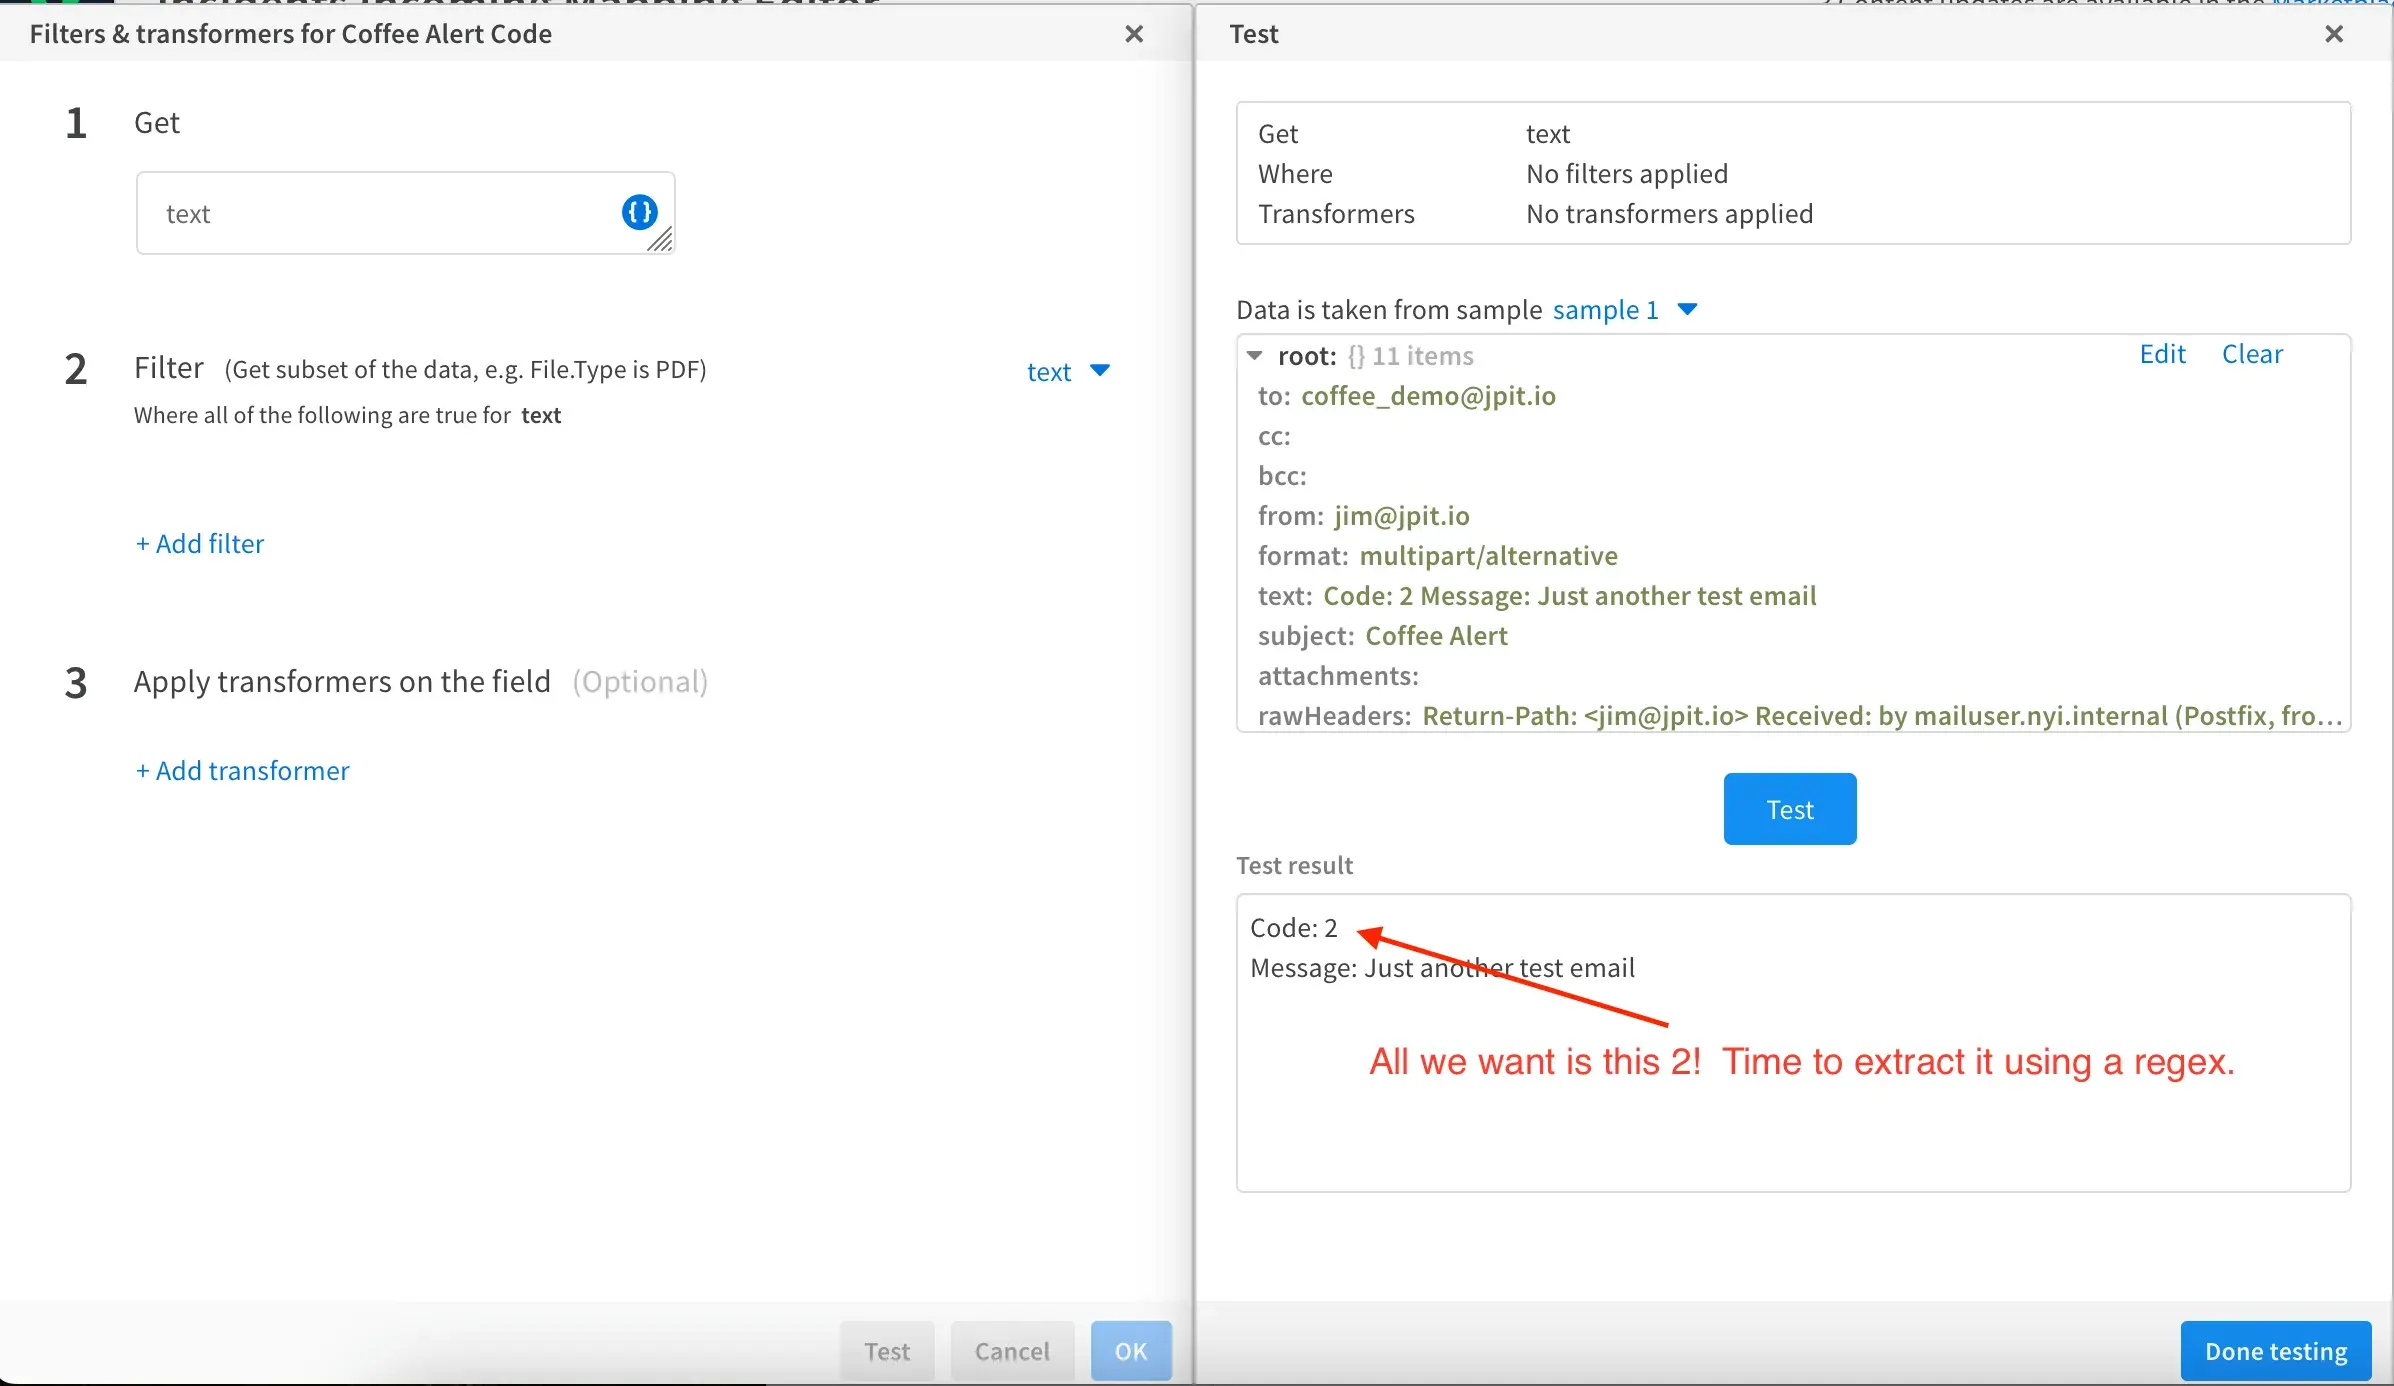
- We need to apply a Regex Transformation in order to capture just the Digit after
Code:To do this, Click Add Transformer on the left, then use the dropdown to select the RegexGroups transformation. - In Regex field copy and paste
Code: (\d).*and then click the green check to apply it. - Click Test once more to see that your transformation worked! Now we’re only capturing the digit following
Code:from the email’s text field.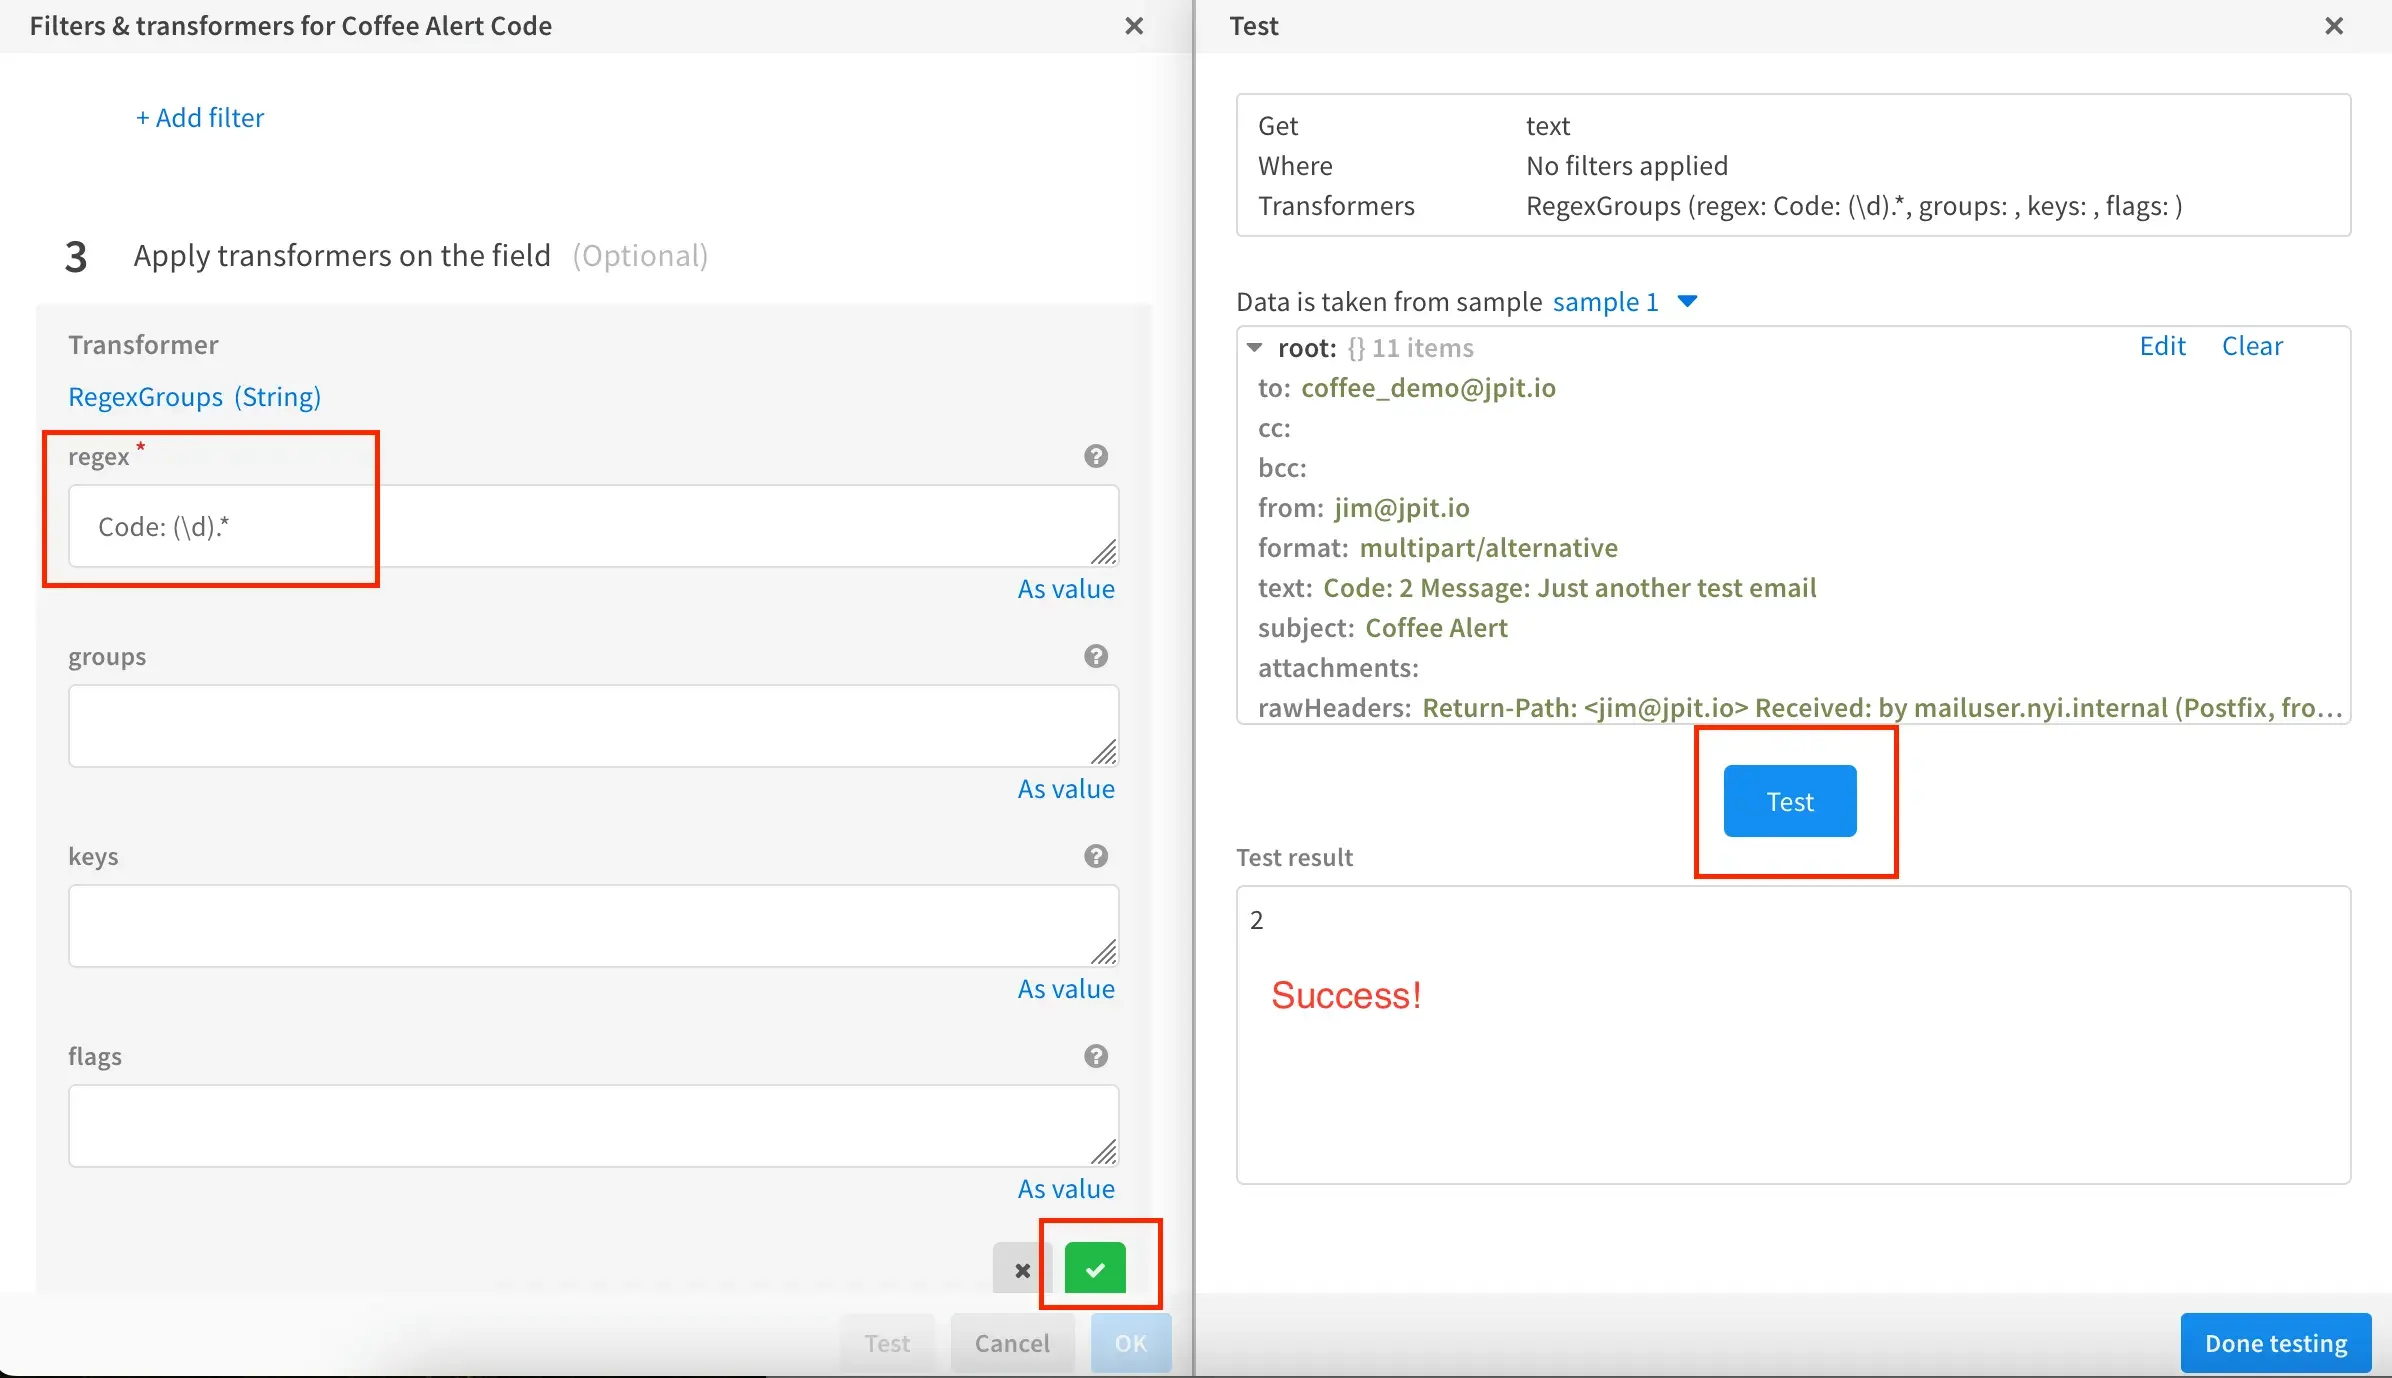
If you’re not familiar with Regular Expressions, its a great skillset to pick up. They let us specify a pattern to look for in a string and extract it.
https://regexone.com/references/pythonis a great resource to learn more. - Repeat steps 14-20 for the Coffee Alert Message field except this time use
Message: (.*)as your regex - Once complete, your Incoming Mapper should look similar to the screenshot below. Once all set, click Save Version:
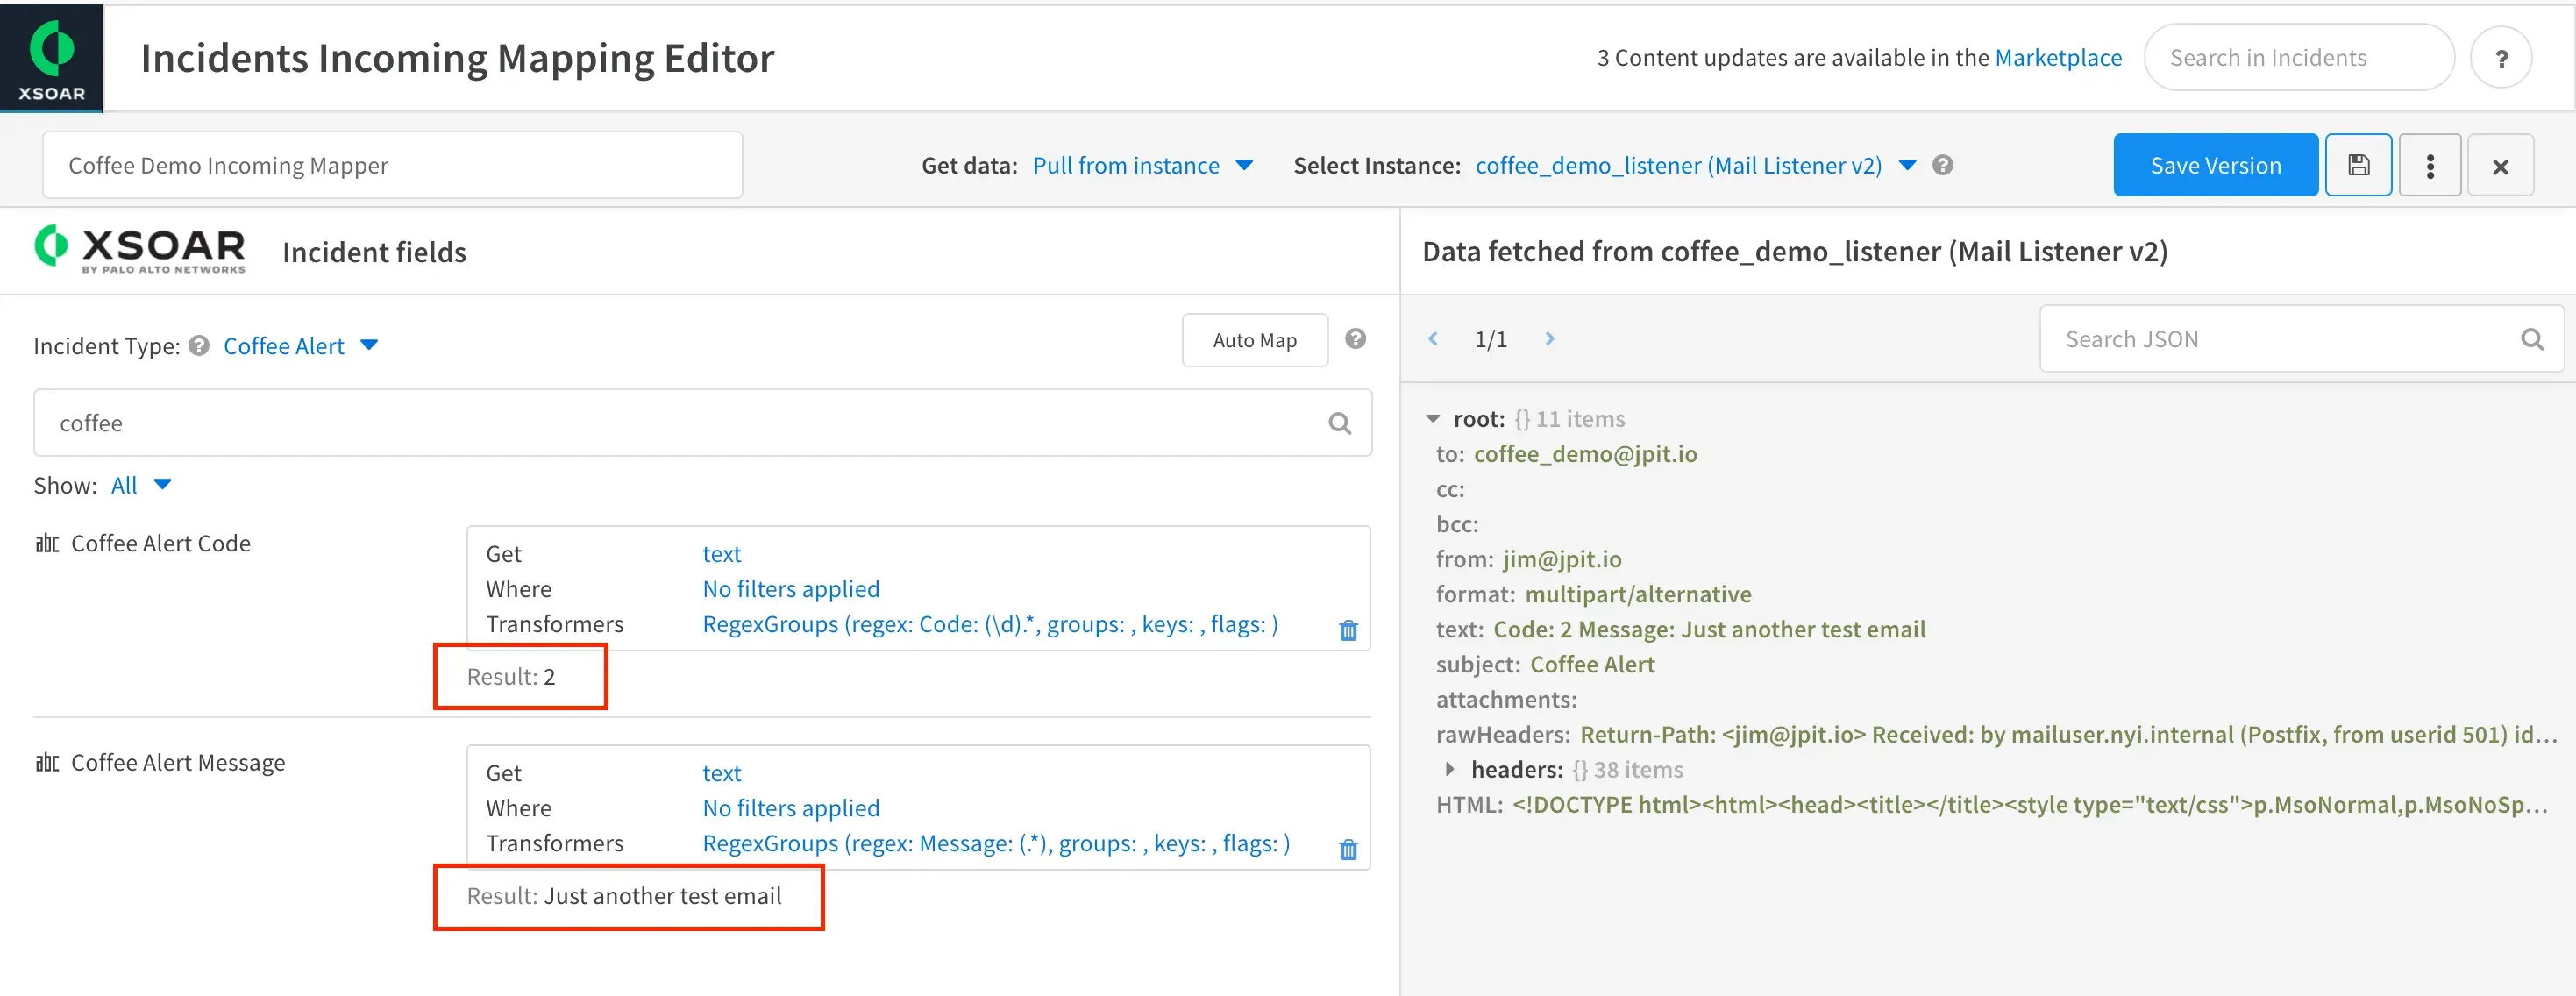
- The final step is to configure your Mail Listen v2 instance to use the Incoming Mapper we just created. Head back to the instance settings and use the drop down under Mapper (Incoming) to select it.
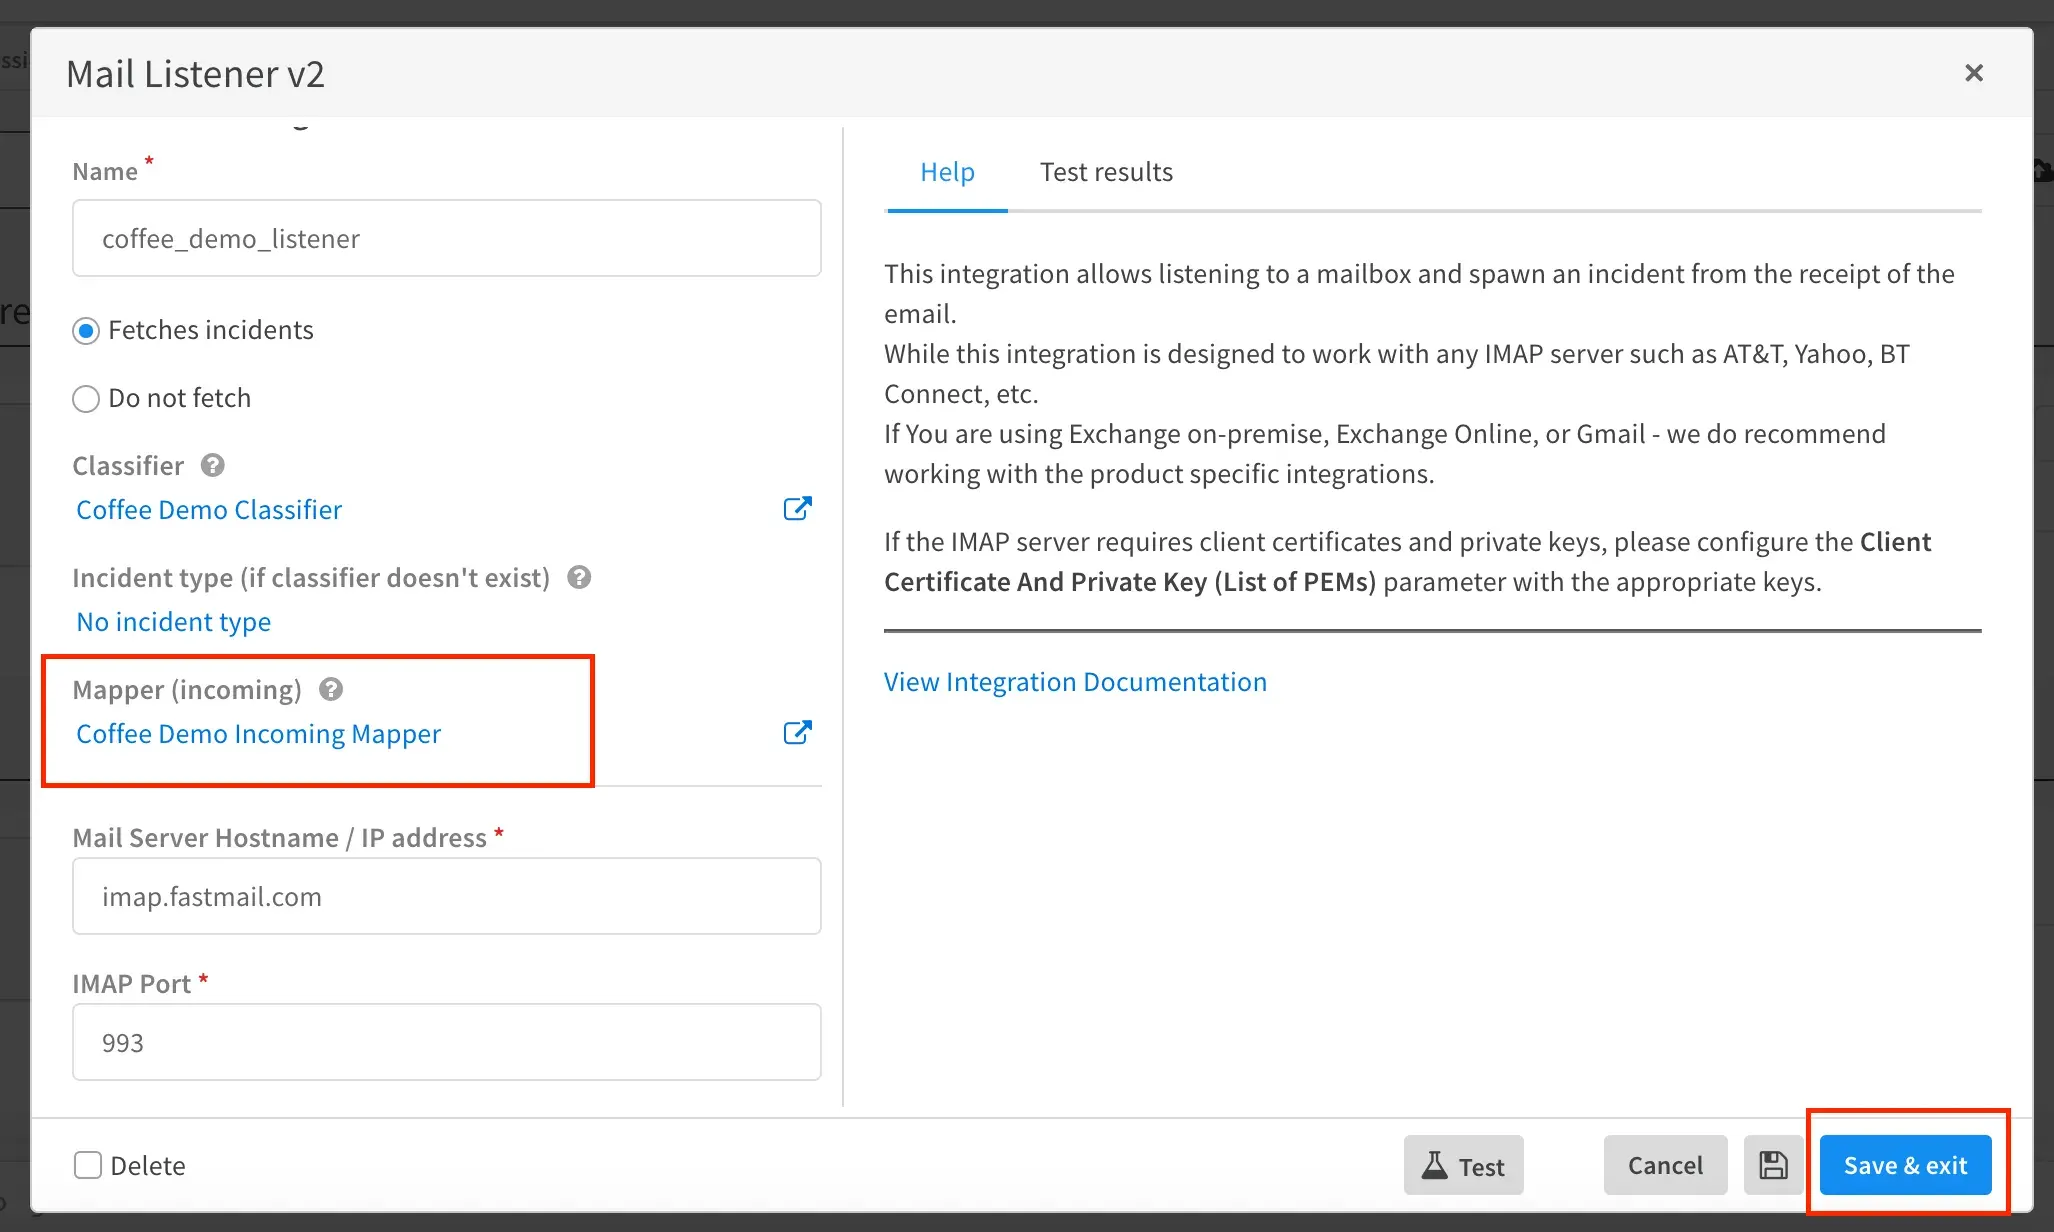
- Let’s fire off another test email pretending to be our Coffee Maker to ensure everything worked.
- After XSOAR sucks in the email and a ticket is created, try using the incident search feature to find incidents with the specific Coffee Alert Code you sent in the email. Since my email contained
Code: 3, I’ll typecoffeealertcode:3into the search.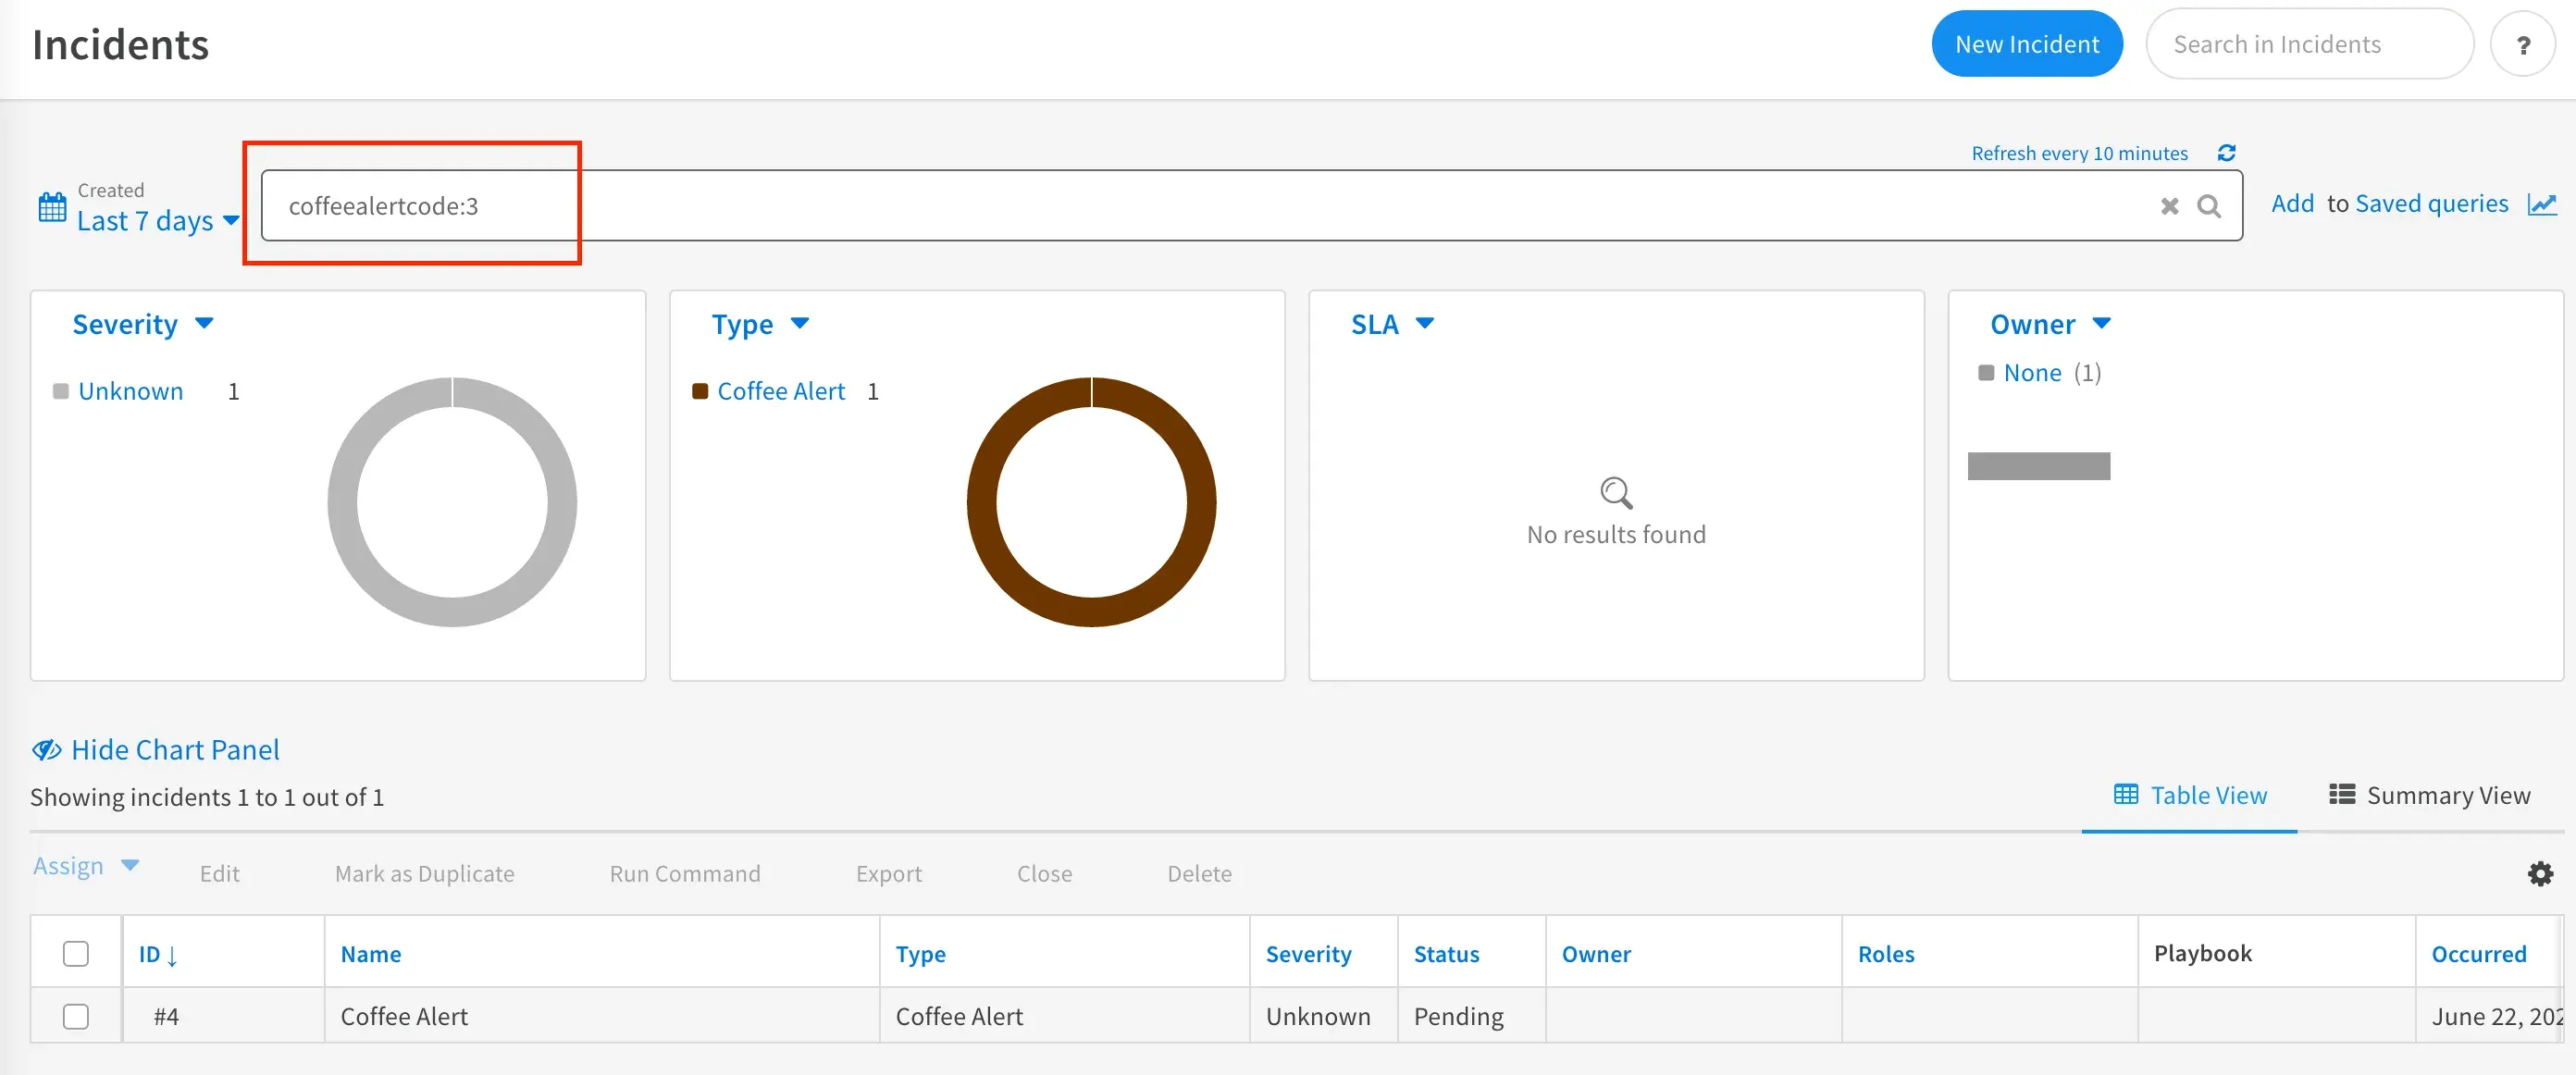 Woah! Our it worked! And more over, we were only able to search for the incident in this way because we successfully mapped the content of the email to the Coffee Alert Code incident field. Nice!
 - Click into the incident and then click the vertical … in the top right. In the dropdown, select Context data. Search for
coffeeand you should see the two incident fields correctly populated with the data we extracted from the email.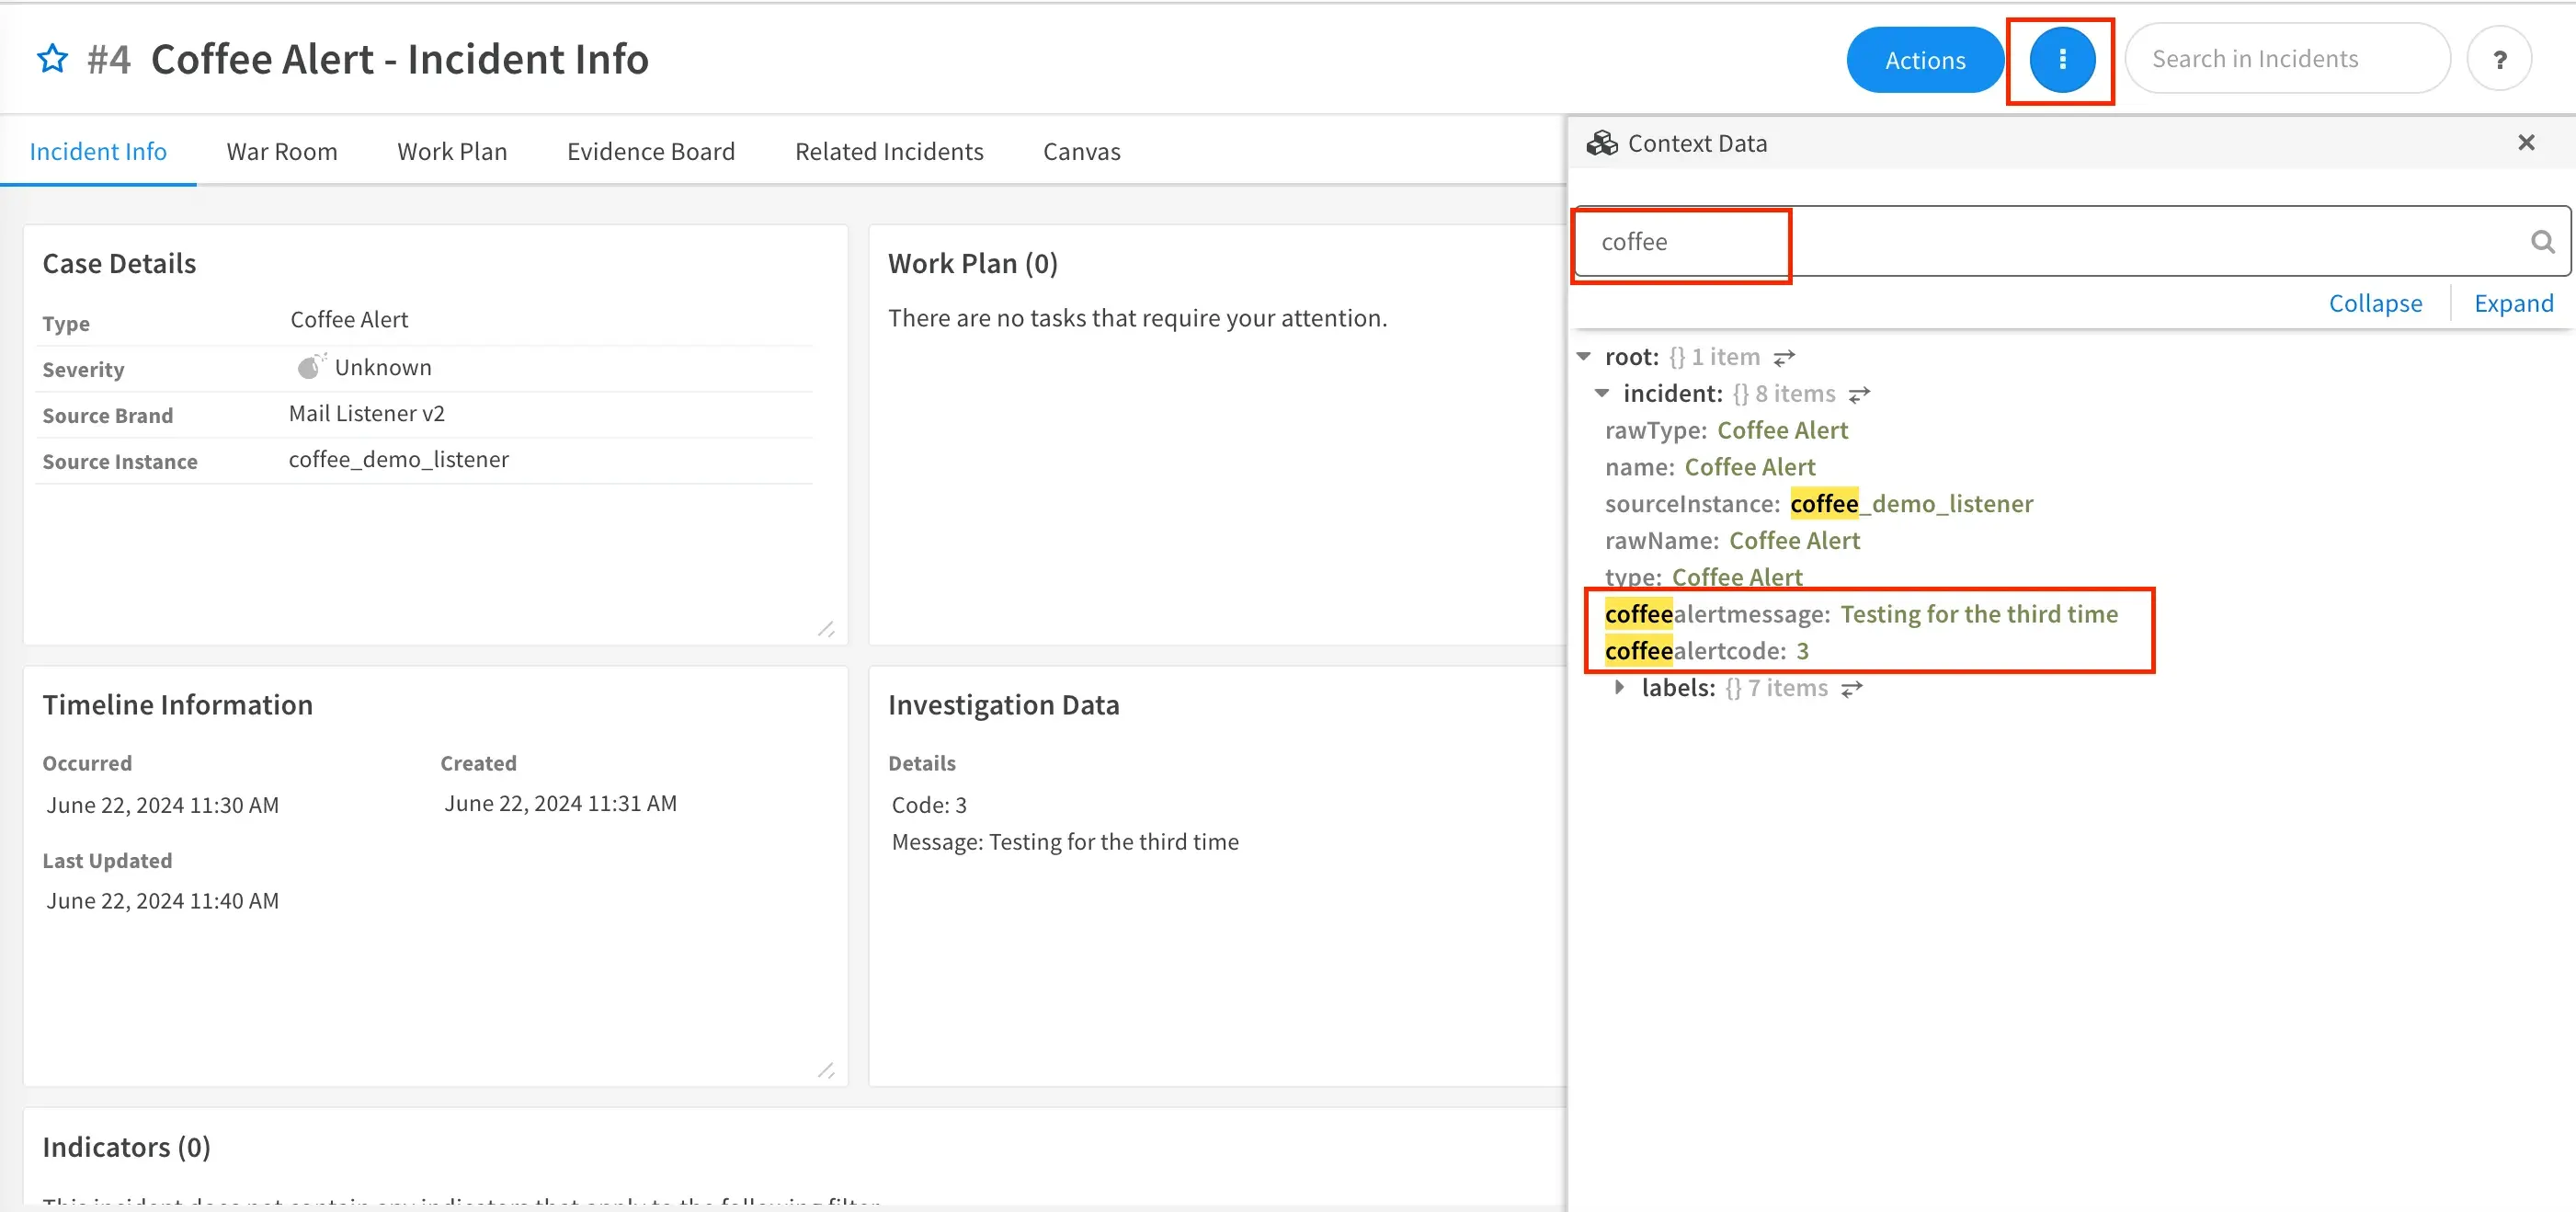
I’m glossing over the Context Data a bit here (it deserves a separate blog post altogether), but for now just know that the Context Data contains all the meta data about the XSOAR incident ticket.
- Excellent! With those incident fields set correctly, we’re now able to perform automation against them in the form of a Playbook.
Creating a Playbook
Well well well… You’ve made it this far. Your hard work is about to pay off because making playbooks is the fun part! First off, what is a playbook? Well, its basically like writing a program using a bunch of drag and drop tiles and dropdown options lol. If you’ve used Microsoft’s Power Automate or other similar products you’ll be right at home.
Let’s quickly remind ourselves what we want this playbook to do:
- If the pot is empty, we want to assign the ticket to the intern telling them to make another pot
- If the coffee is ready, we’ll simply close the ticket
- If we get a system malfunction, we’ll raise the severity of the incident and tag the Coffee Maker’s message as evidence.
There’s also a few anecdotes you should be aware of about playbooks before we begin:
- We’ll configure the playbook to run automatically whenever a Coffee Alert Incident is created, but playbooks can also be manually triggered or even triggered by other playbooks.
- Playbooks run inside the context of the incident ticket that launched them. This means the playbook will have access to the data we stored in the Coffee Alert Code and Coffee Alert Message incident fields
- Each step in a playbook (referred to as “tasks”) are linked together by clicking and dragging between the tiles. This creates a sequential order in which the tasks are run.
- Standard tasks run automation scripts. The automations do the real work. Automations typically require inputs and produce outputs.
Let’s get started
-
Go to Playbooks -> New Playbook and name it
Coffee Demo Playbook -
Use the + to create a new task and toggle over to Conditional to make it a conditional task. Name it
Get Coffee Code. -
We’ll need a total of 3 Conditions (1 for each Code our Coffee Maker can send) so use the + Add Condition button to add them.
-
Rename each condition to match our coffee maker use case
Pot EmptyCoffee DoneMalfunction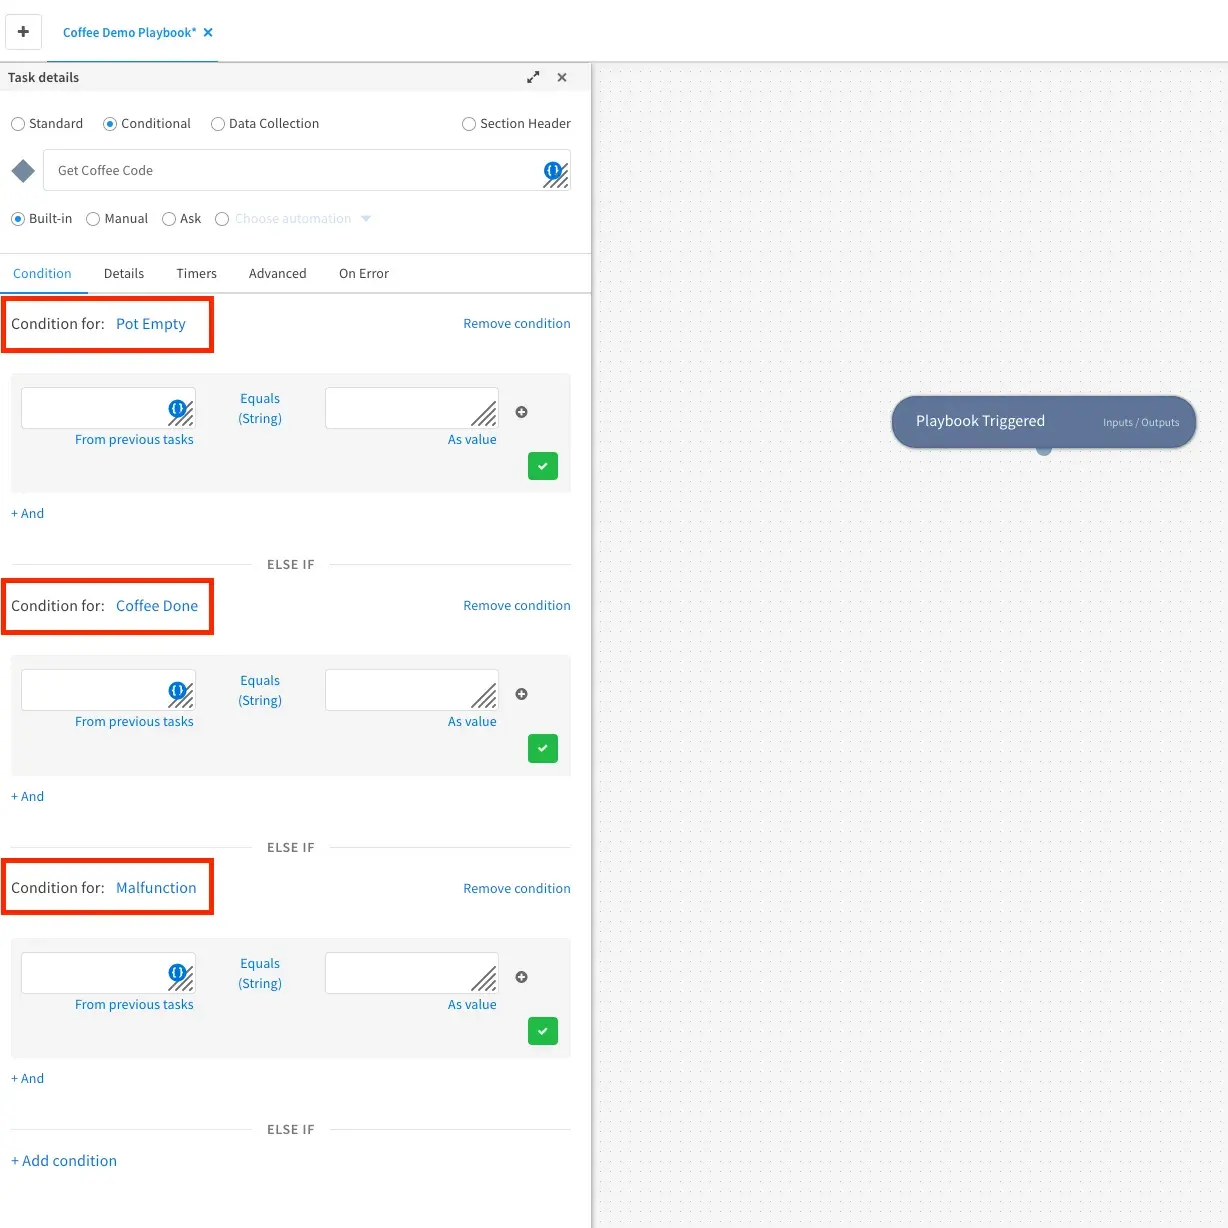
-
Now we need to specify what logical expression would satisfy each condition. This is where our Coffee Alert Code incident field comes into play right?
1=Pot Empty, 2=Coffee Done, 3=Malfunction -
Starting with whatever condition you specified first, click the {} under each condition and then search for
coffeein the pane that pops up. Select Coffee Alert Code and you’ll see the box was populated withincident.coffeealertcode. -
Do this for all 3 conditions.
-
Next, in the empty boxes on the right side of Equals (string), enter the digit (1,2, or 3) that corresponds to the respective coffee code.
-
Finally, check all 3 green check boxes and then click Save to create our first task!
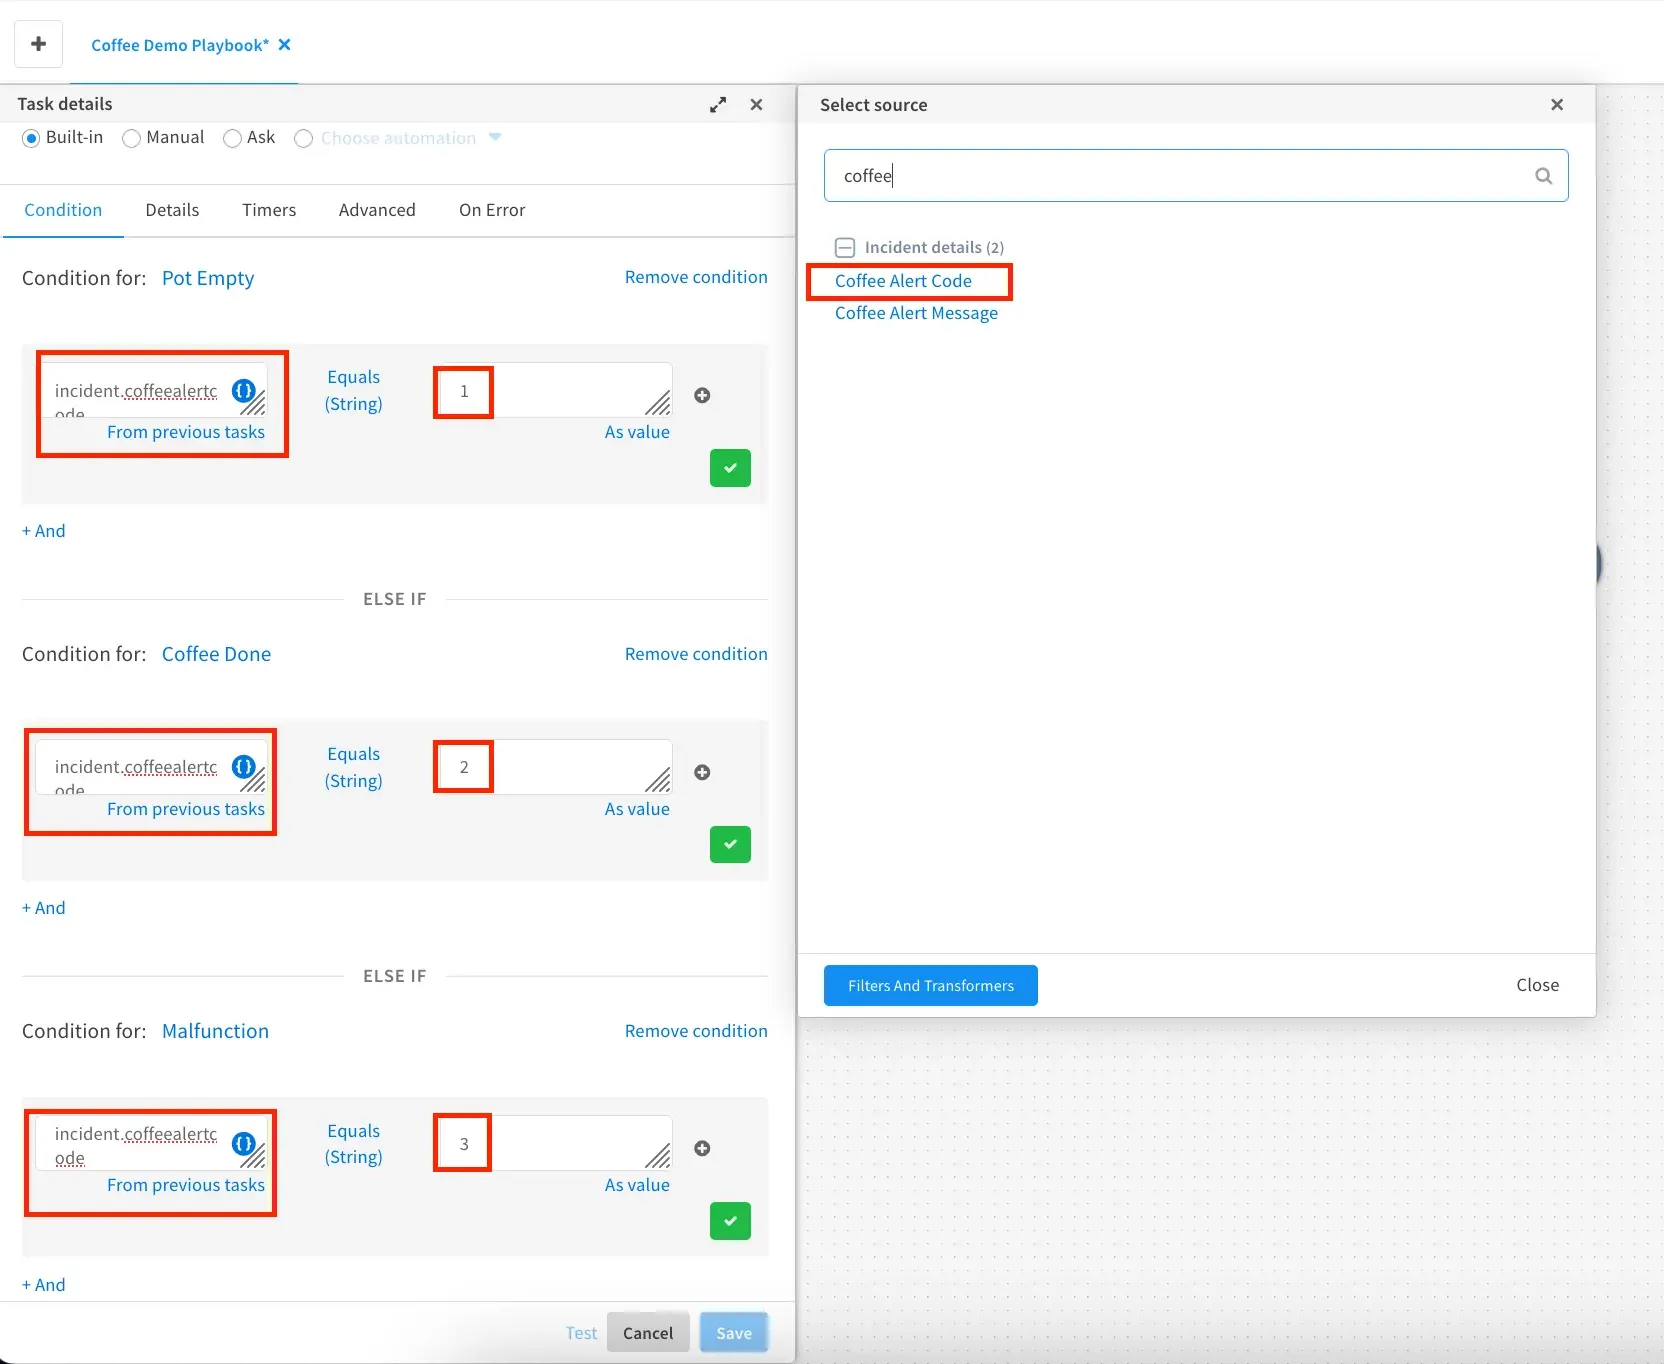
The conditional tasks in XSOAR are equivalent to an IF statement in any typical programming language. In this example we’re saying, “Is the Code=1? No? Well how about 2? Still no? How about 3?”
-
With your conditional task configured, we’ll now branch off it for each condition we just configured. Let’s start with the Coffee Done Condition since that’s the easiest.
- Click and drag from the bottom of the Get Coffee Code conditional task and then release your curser anywhere below that task. This will reveal a label selection menu. Select Coffee Done and then Save.
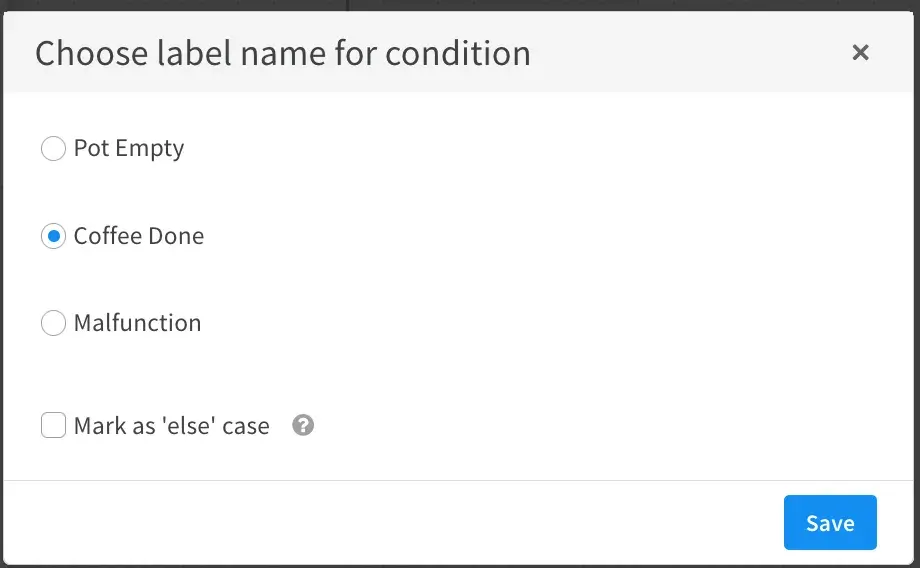
- This should have automatically created a new Untitled Task for you. Rename it to
Close Ticketsince the Coffee Brewing completed successfully and there’s nothing else to do! - Use the Choose Automation drop down to find/select the closeInvestigation (Builtin) automation.
- Under Inputs, set closeNotes to
Coffee Brew Completed Successfully, closing ticket.and set closeReason toResolved.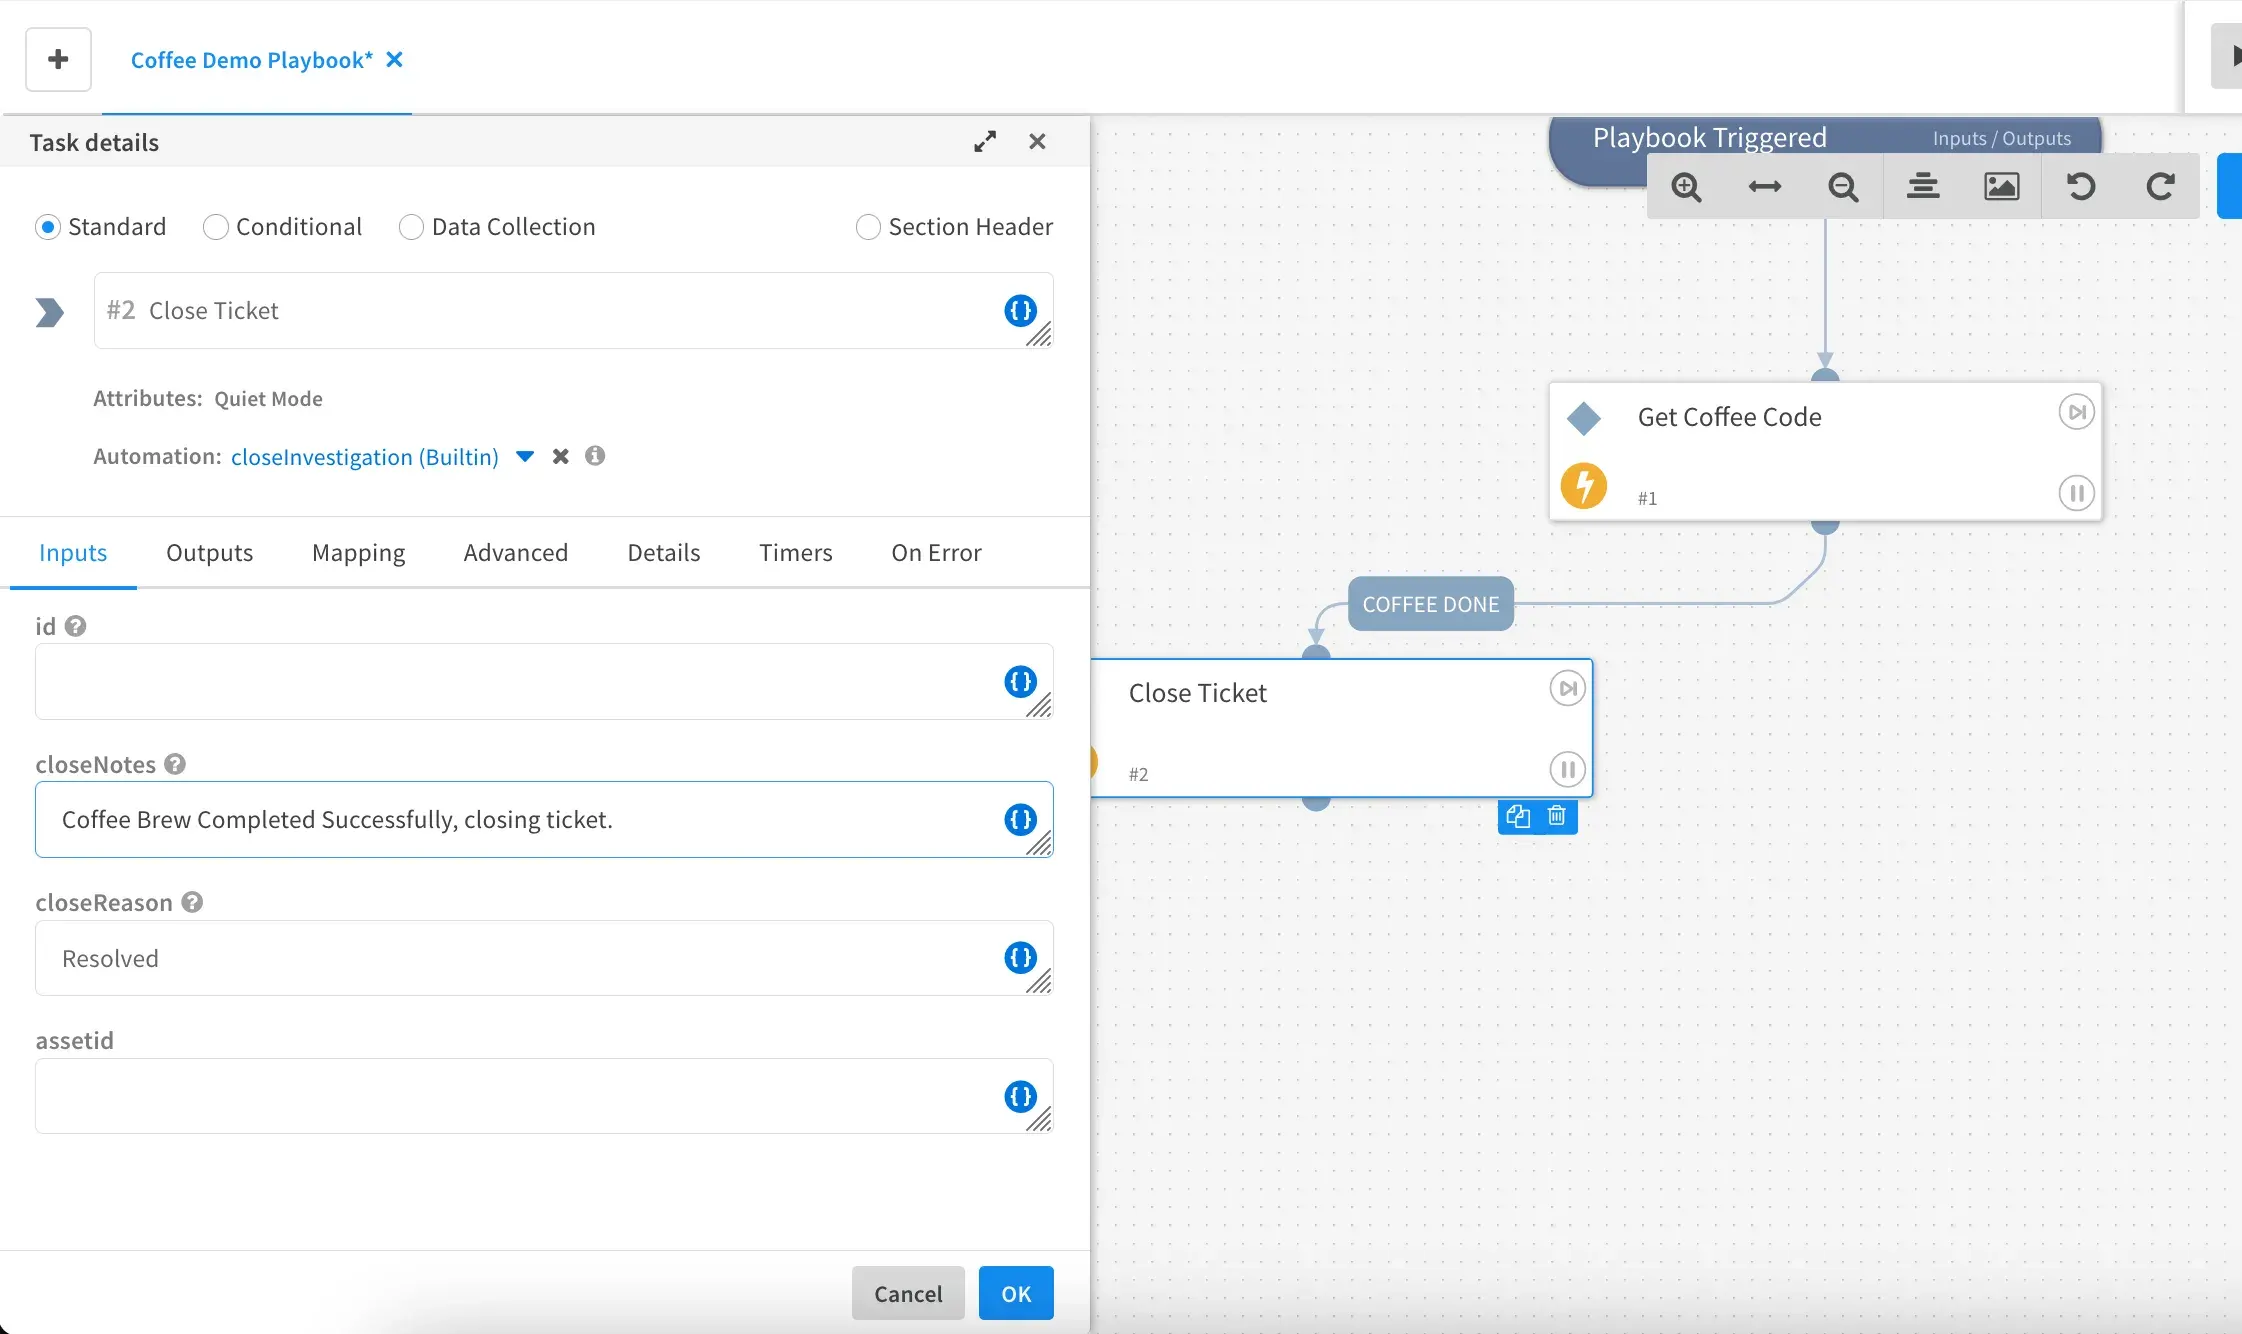
- Excellent, now when we get an email with
Code: 2the XSOAR ticket will automatically close.
- Click and drag from the bottom of the Get Coffee Code conditional task and then release your curser anywhere below that task. This will reveal a label selection menu. Select Coffee Done and then Save.
-
We’ll now move onto the Pot Empty condition where we’ll configure the playbook to assign the ticket to the intern and tell them to make more coffee >:)
- Again, click and drag from the bottom of the Get Coffee conditional task to reveal the label selection menu. Select Pot Empty and then Save.
- Rename the untitled task to
Assign Ticket to Internand use the automation drop down to select AssignAnalystToIncident - There are multiple ways to assign a ticket to a user, but i’ll use the username input. My intern’s username is appropriately just
internso i’ll type that in and then click OK.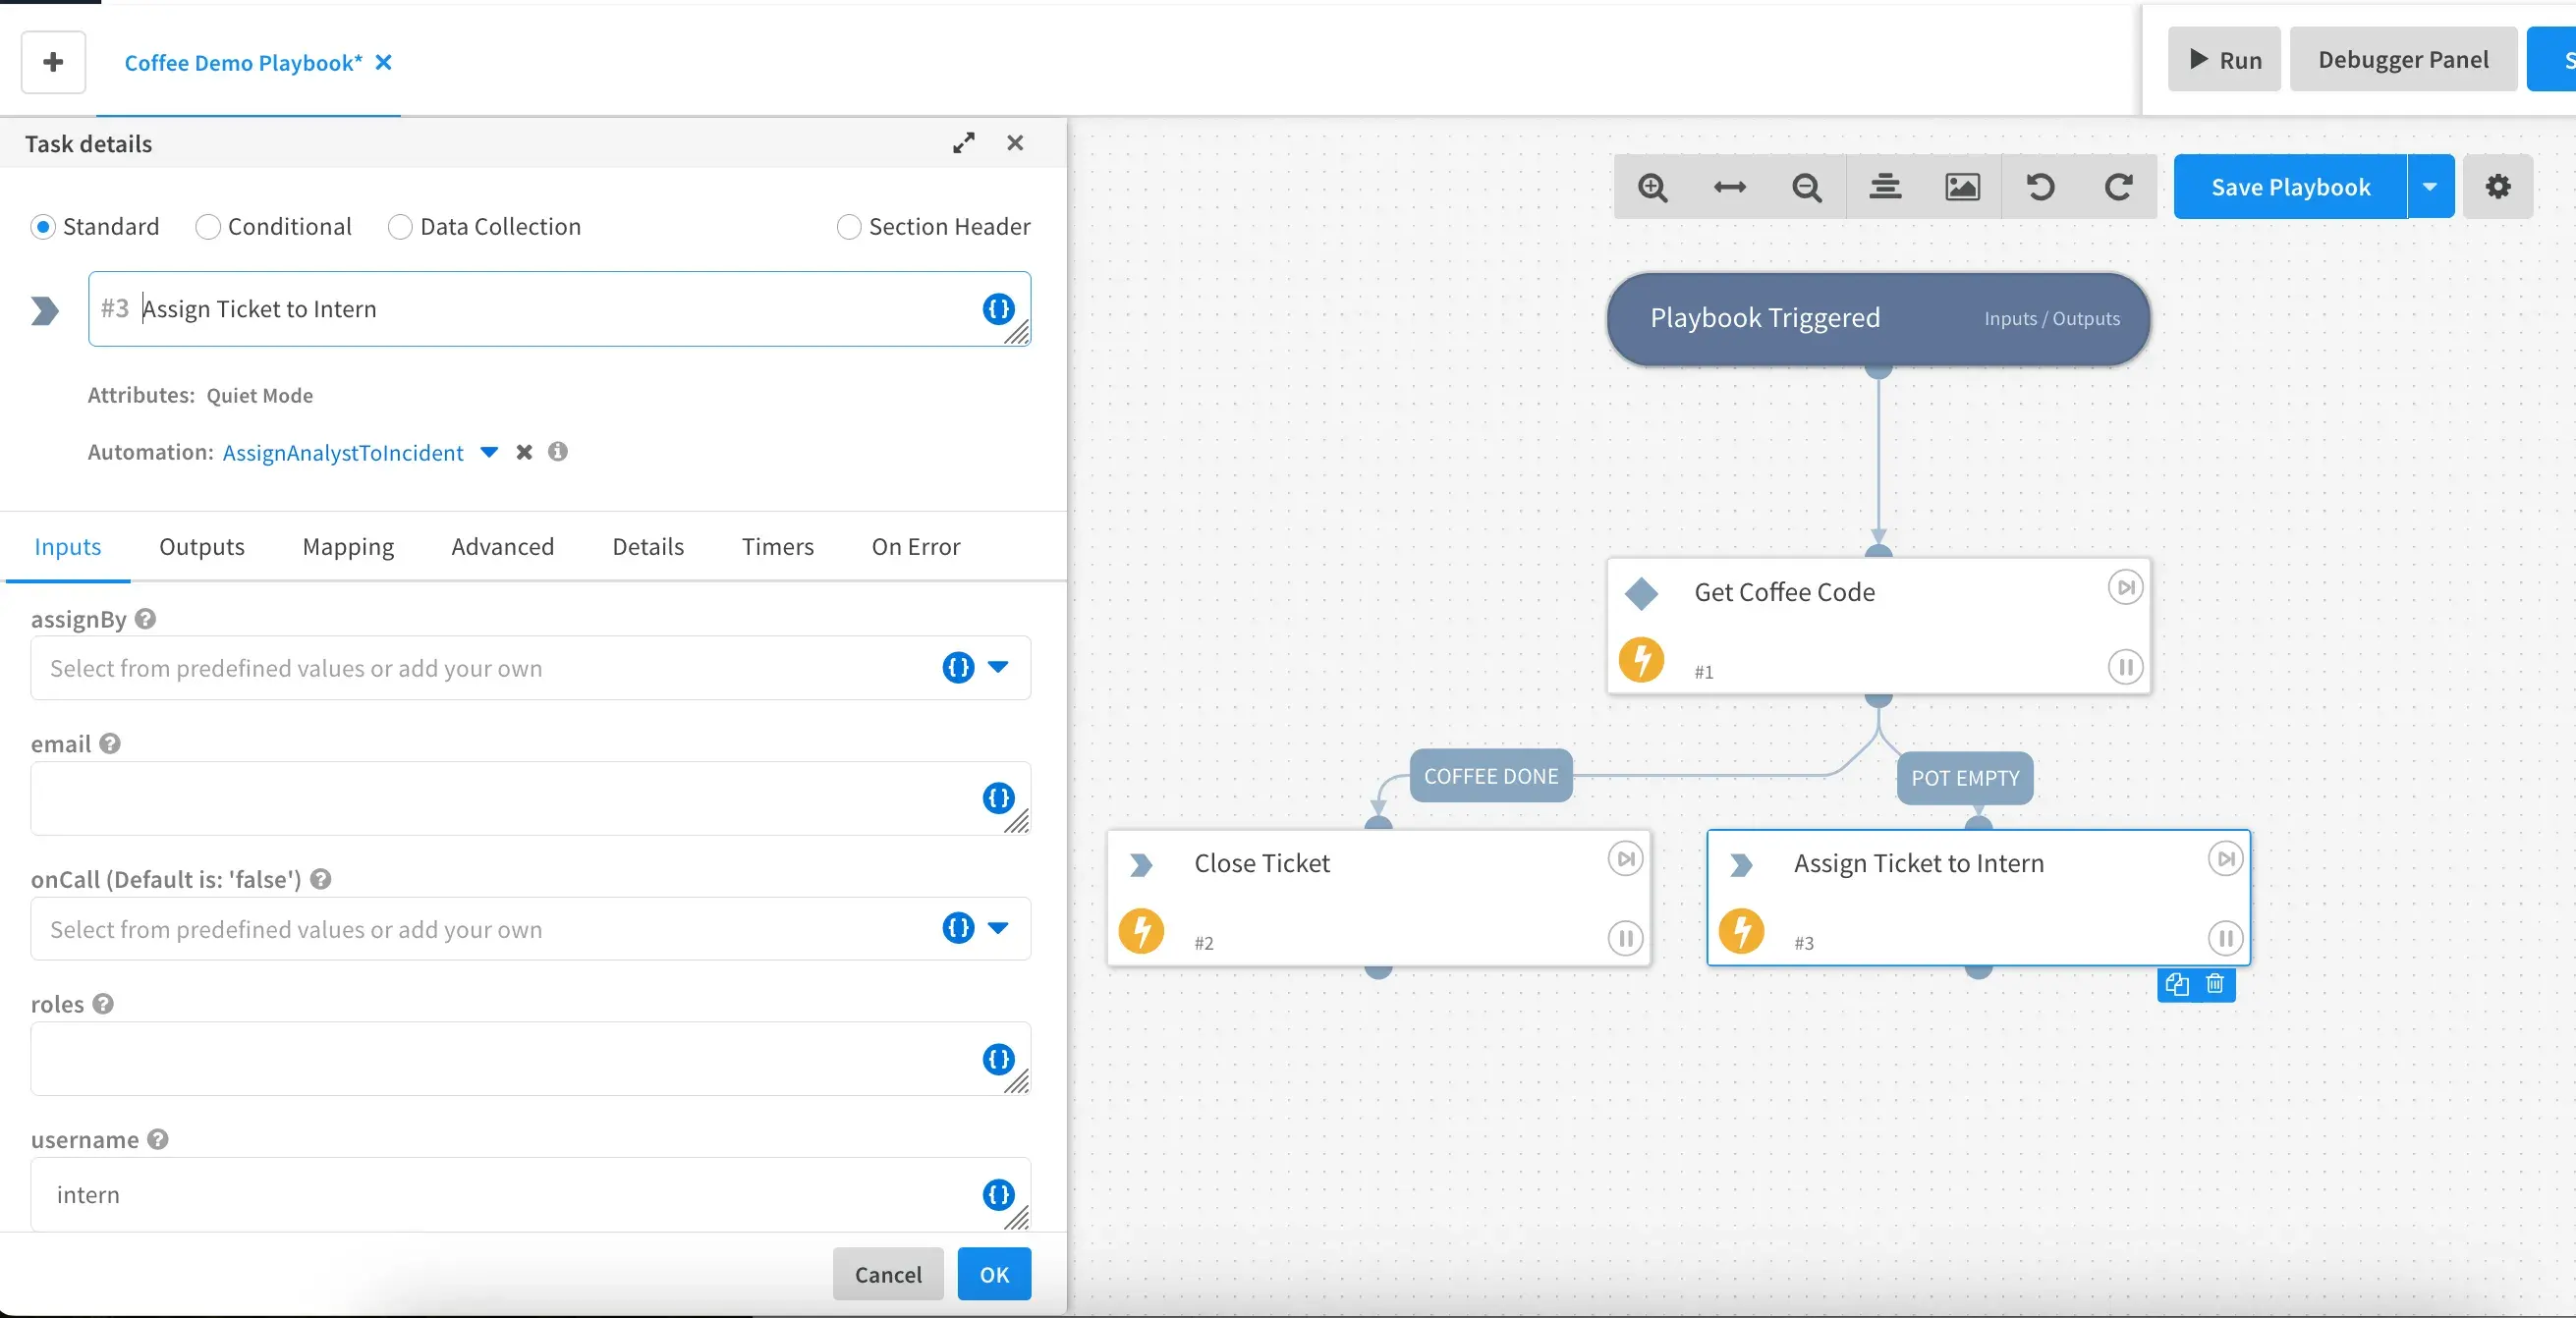
New users can be configured in Settings -> Users and Roles -> Invite User
- Next, create another Standard Task by clicking and dragging underneath the Assign Ticket to Intern Task
- Rename the untitled task to
Please go brew more coffeeand leave the Choose automation option blank. - In the default assignee drop down, select your intern and then click OK.
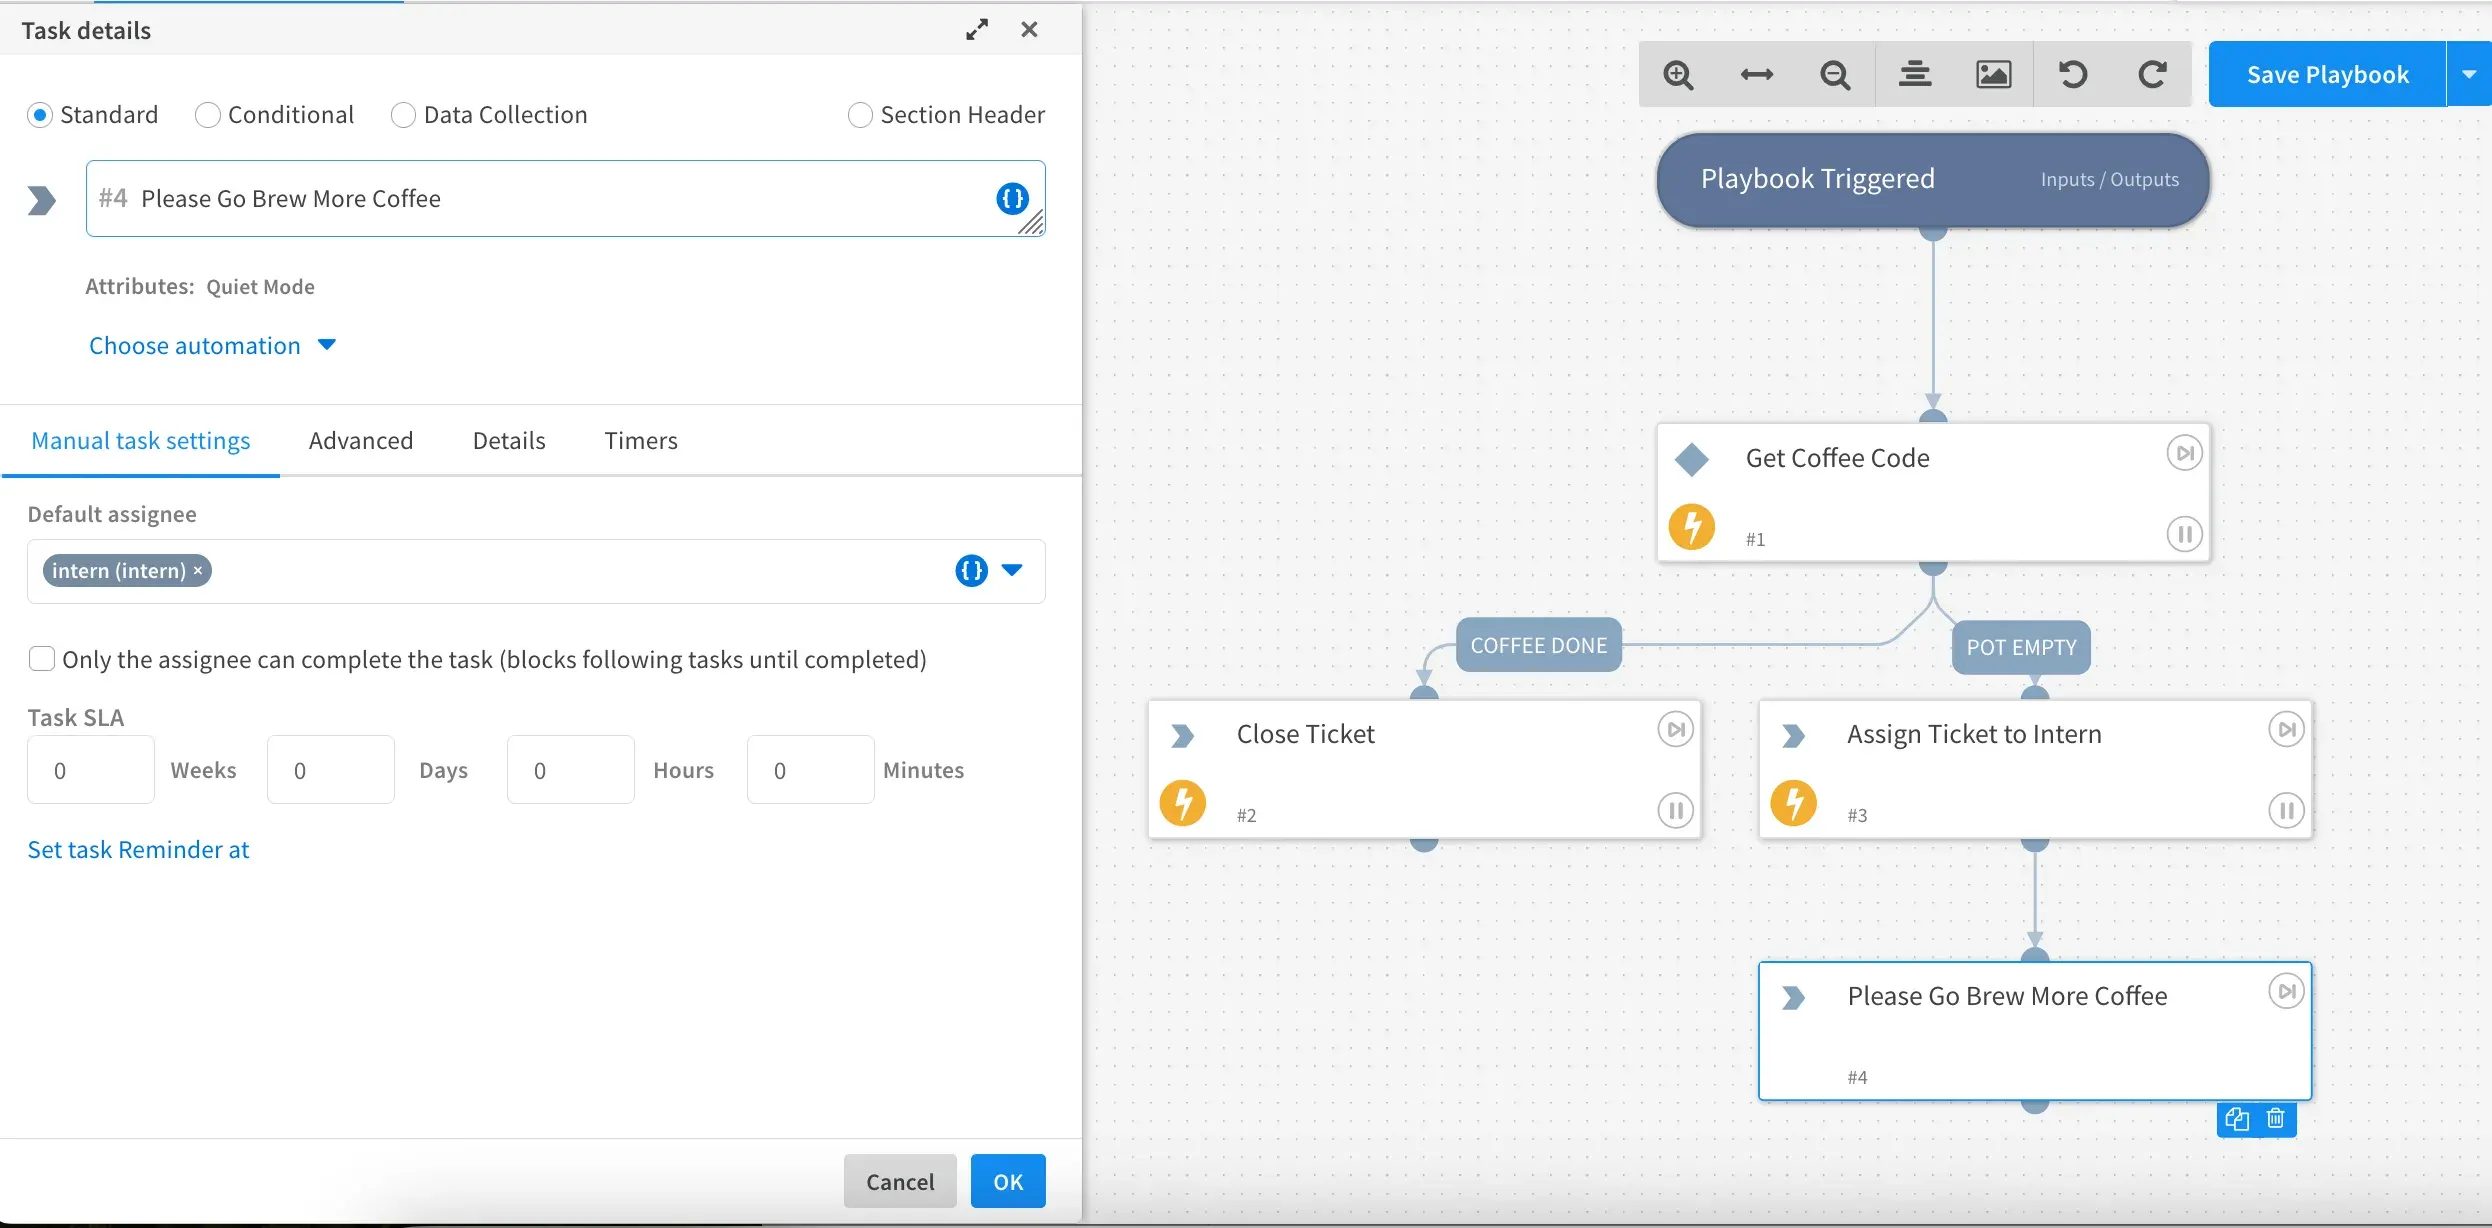
By not selecting an automation, the playbook will sit and wait on this task until the user (intern in this case) manually confirms the task is complete
- Lastly, let’s connect the Please go brew more coffee step to the already existing Close Ticket task so the ticket auto closes after the intern confirms they’ve started another pot of coffee.
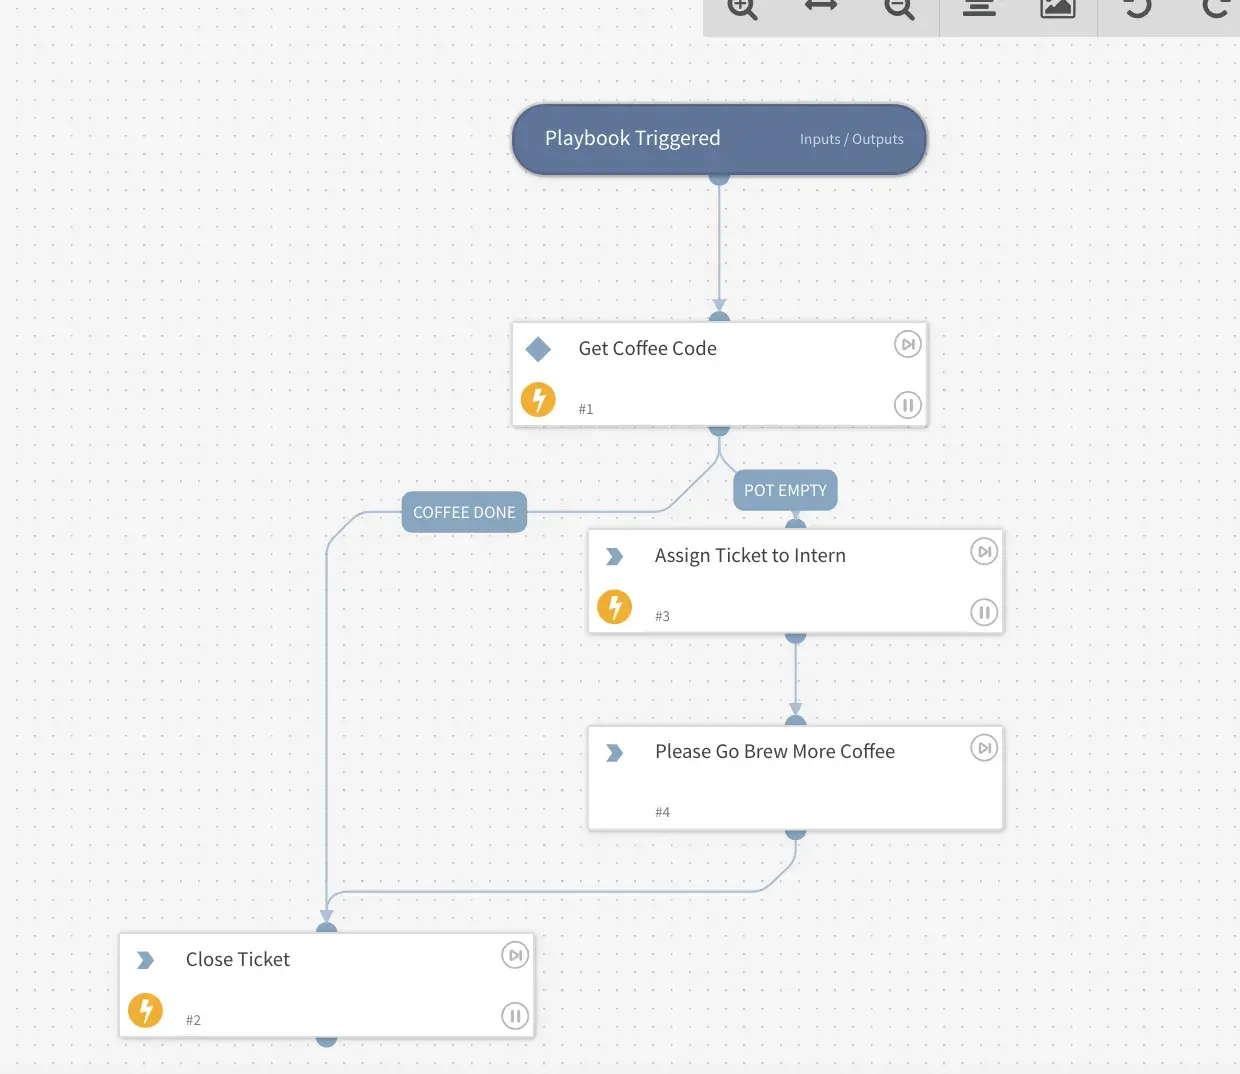
Reusing tasks where possible creates a nice and tidy looking playbook.
-
Alrighty, one last conditional branch to make. This Malfunction branch will increase the severity of the incident and then tag the
Message:(contained in the incident field named Coffee Alert Message) from the email as evidence- Once again, click and drag from the bottom of the Get Coffee conditional task to reveal the label selection menu. Select Malfunction and then Save.
- Rename the untitled task to
Increase Severity to Criticaland select the automation named setIncident (Built in) - Click Add input and use the dropdown to locate severity. Set the severity input value to
4.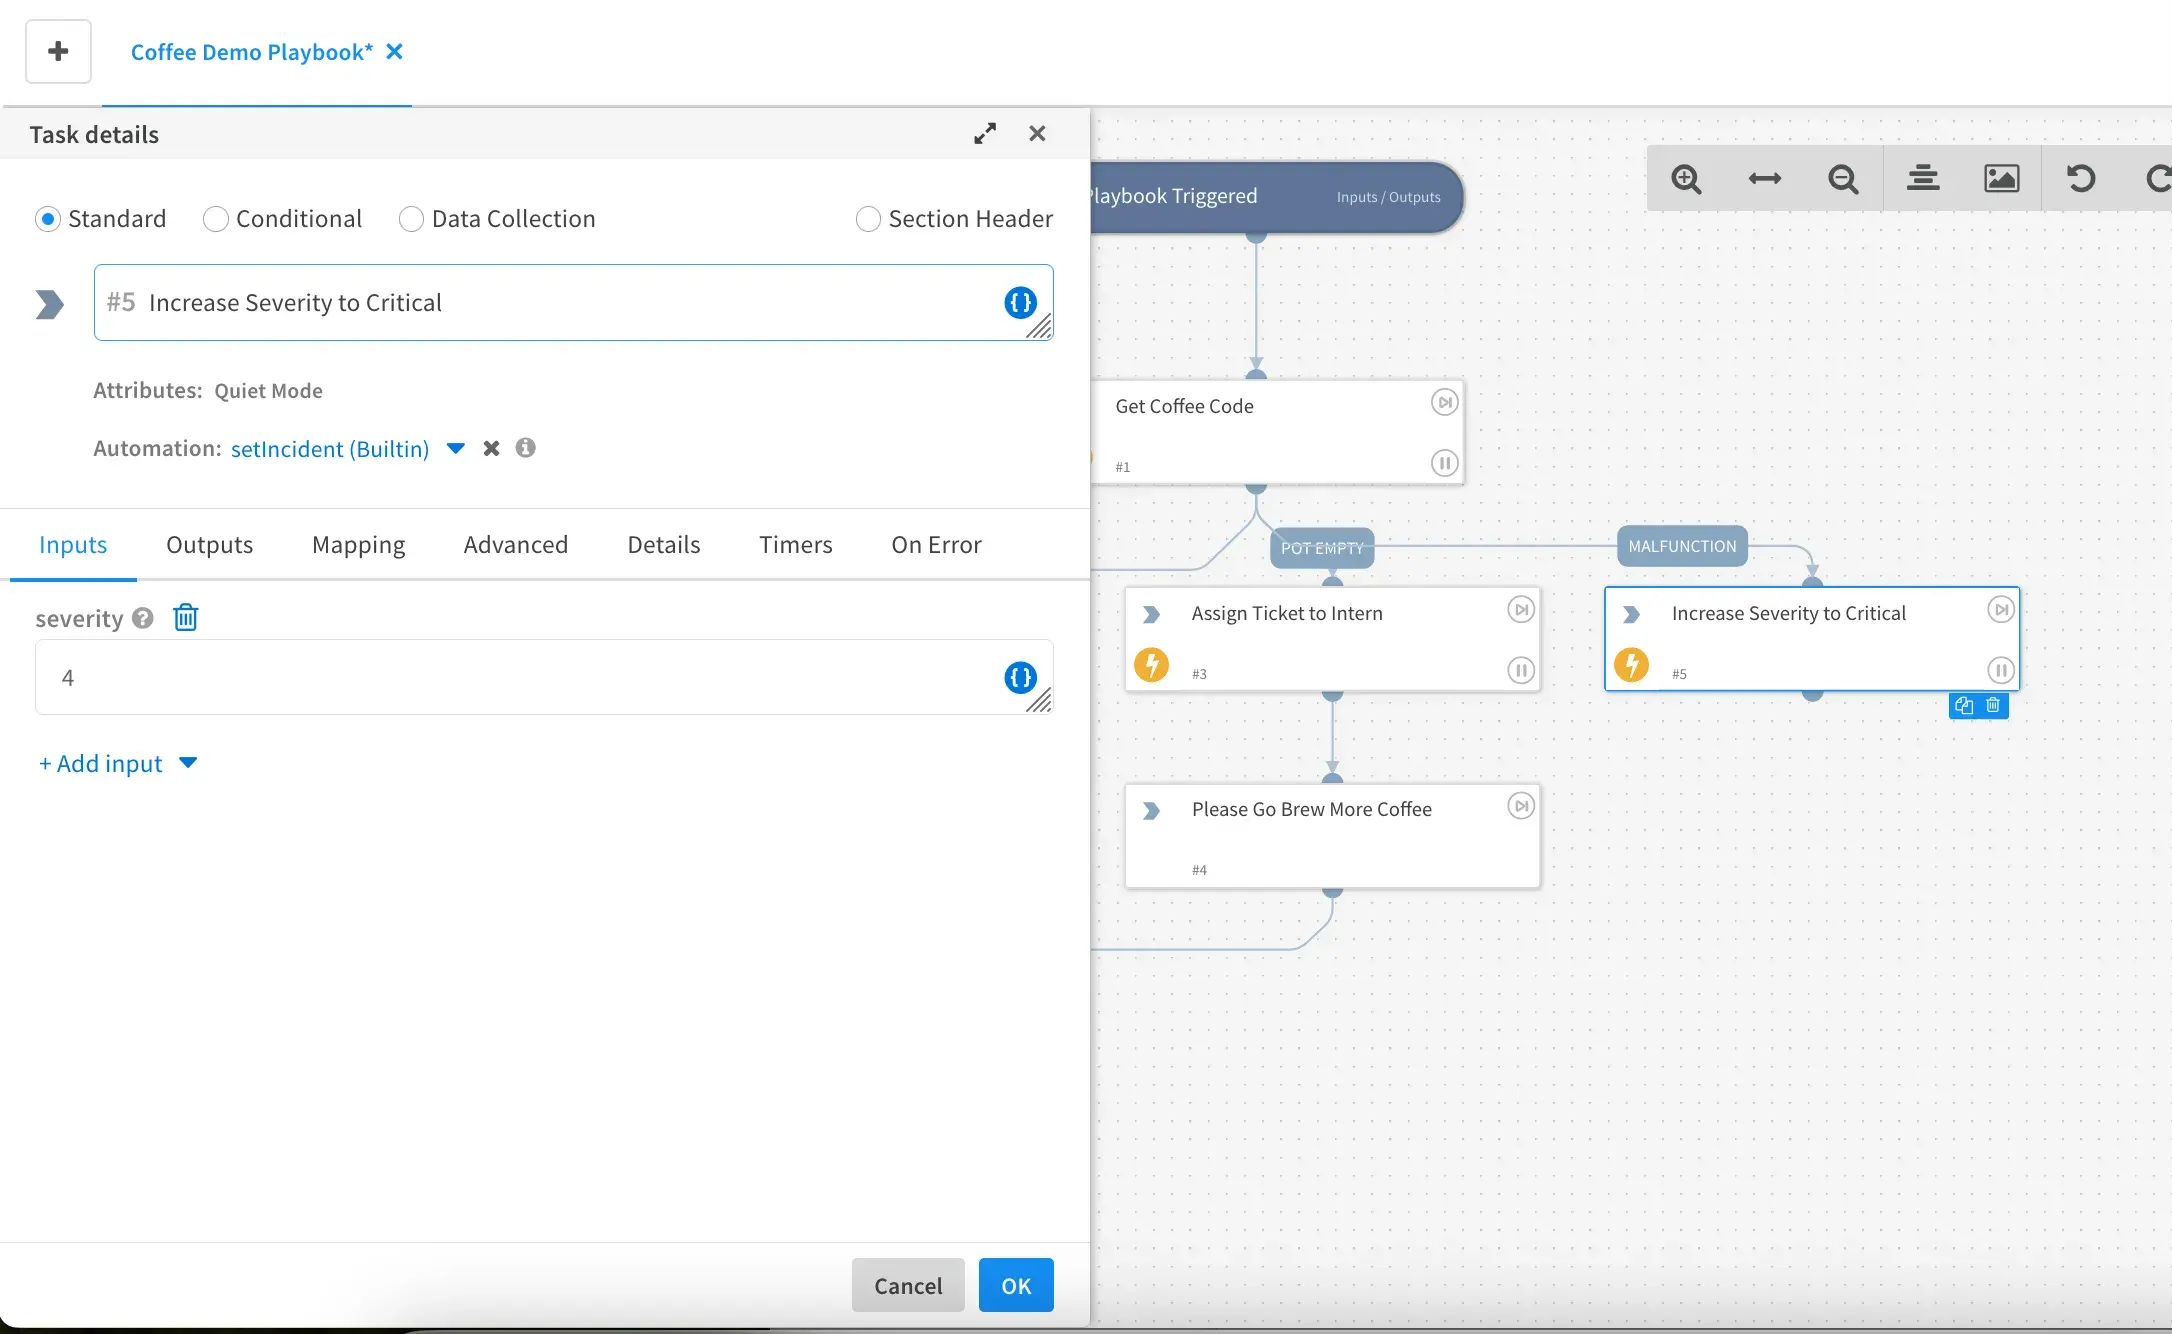
XSOAR will convert the
severity=4tocriticalautomatically when the incident is viewed. - Let’s add another task after Increase Severity to Critical by using the same click and drag method we’ve done a few times now.
- Rename the untitled task to
Print Coffee Maker Message and Tag as Evidenceand then select the Print automation. - For the Value input, enter
Coffee Maker Failed with Error: ${incident.coffeealertmessage}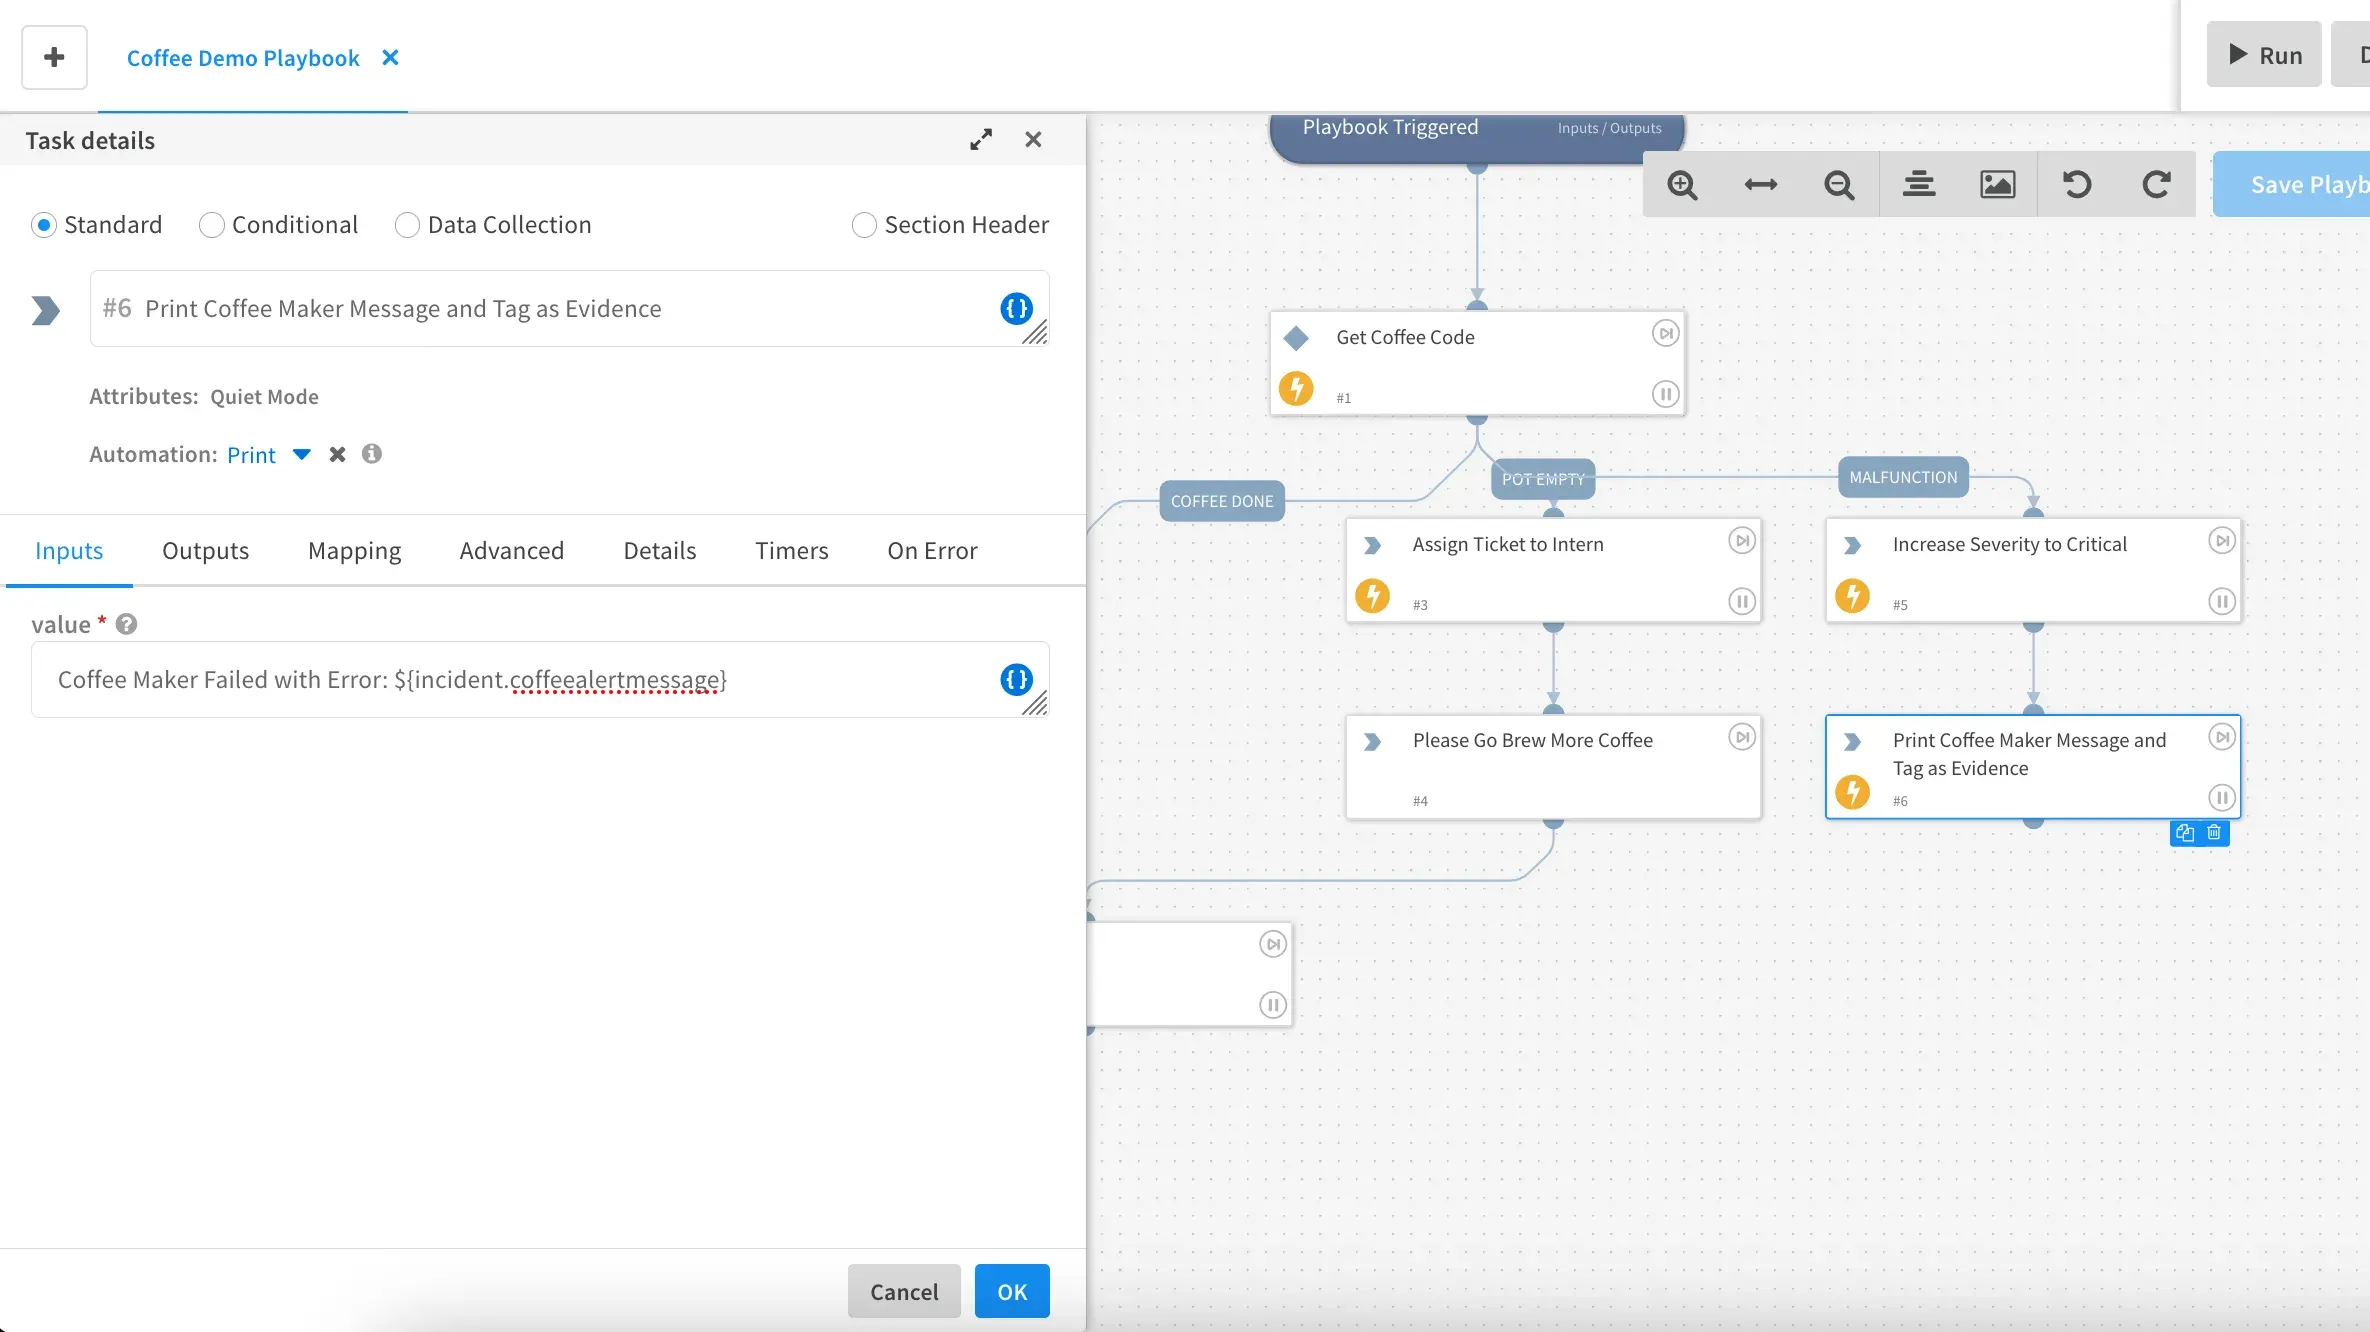
XSOAR uses the
${VARIABLE_NAME}syntax to reference variables in an automation input - Before pressing OK, click the Advanced tab and check the box for Mark results as evidence. This will require you to enter a description. You can put
Message from Coffee Maker.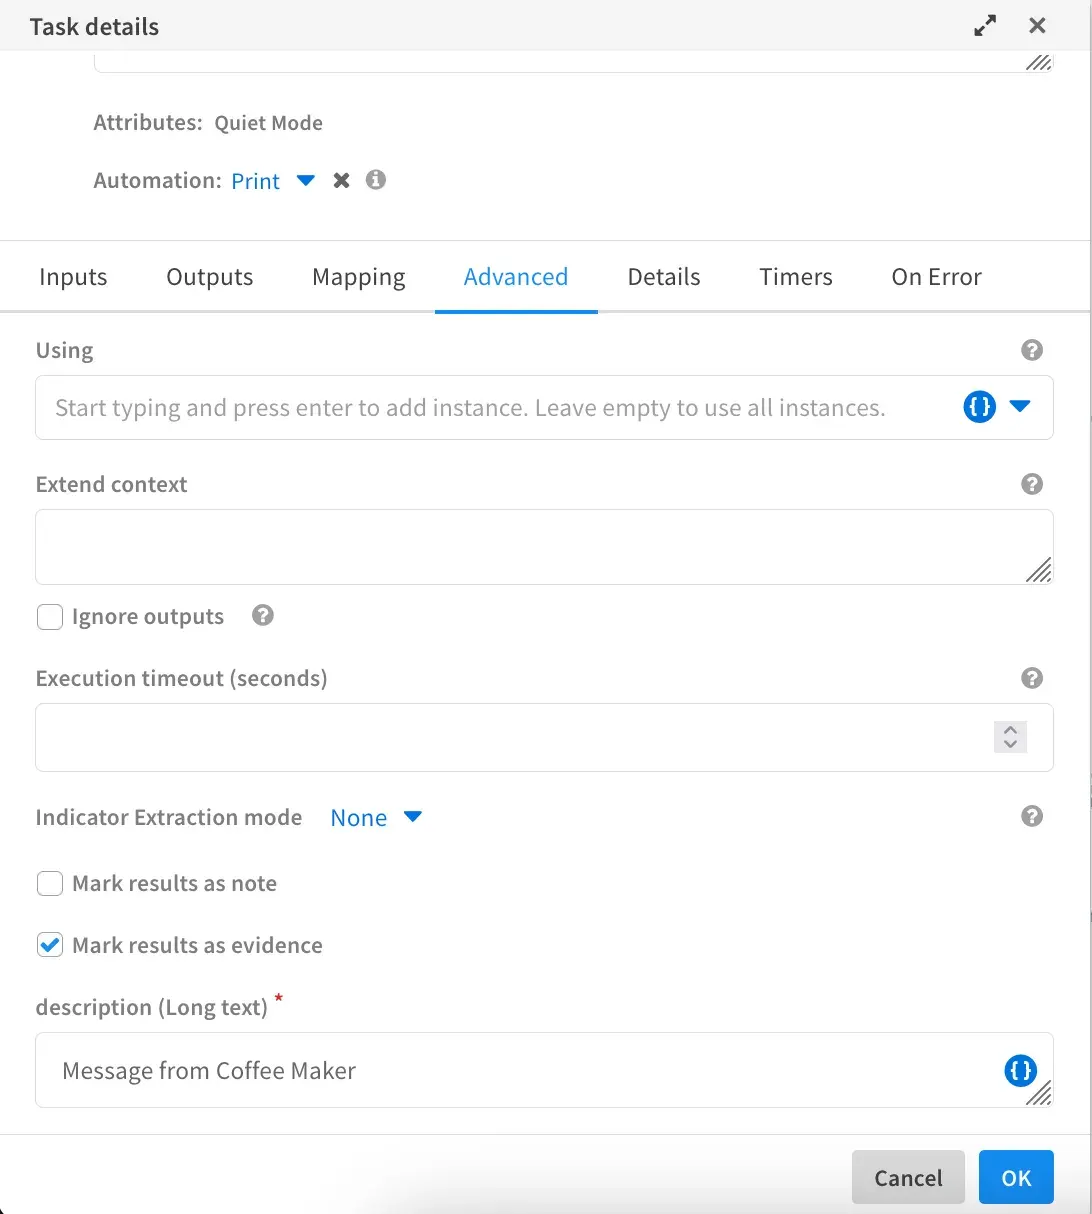
-
Woot! We are done making the playbook. Be sure to save before exiting.
-
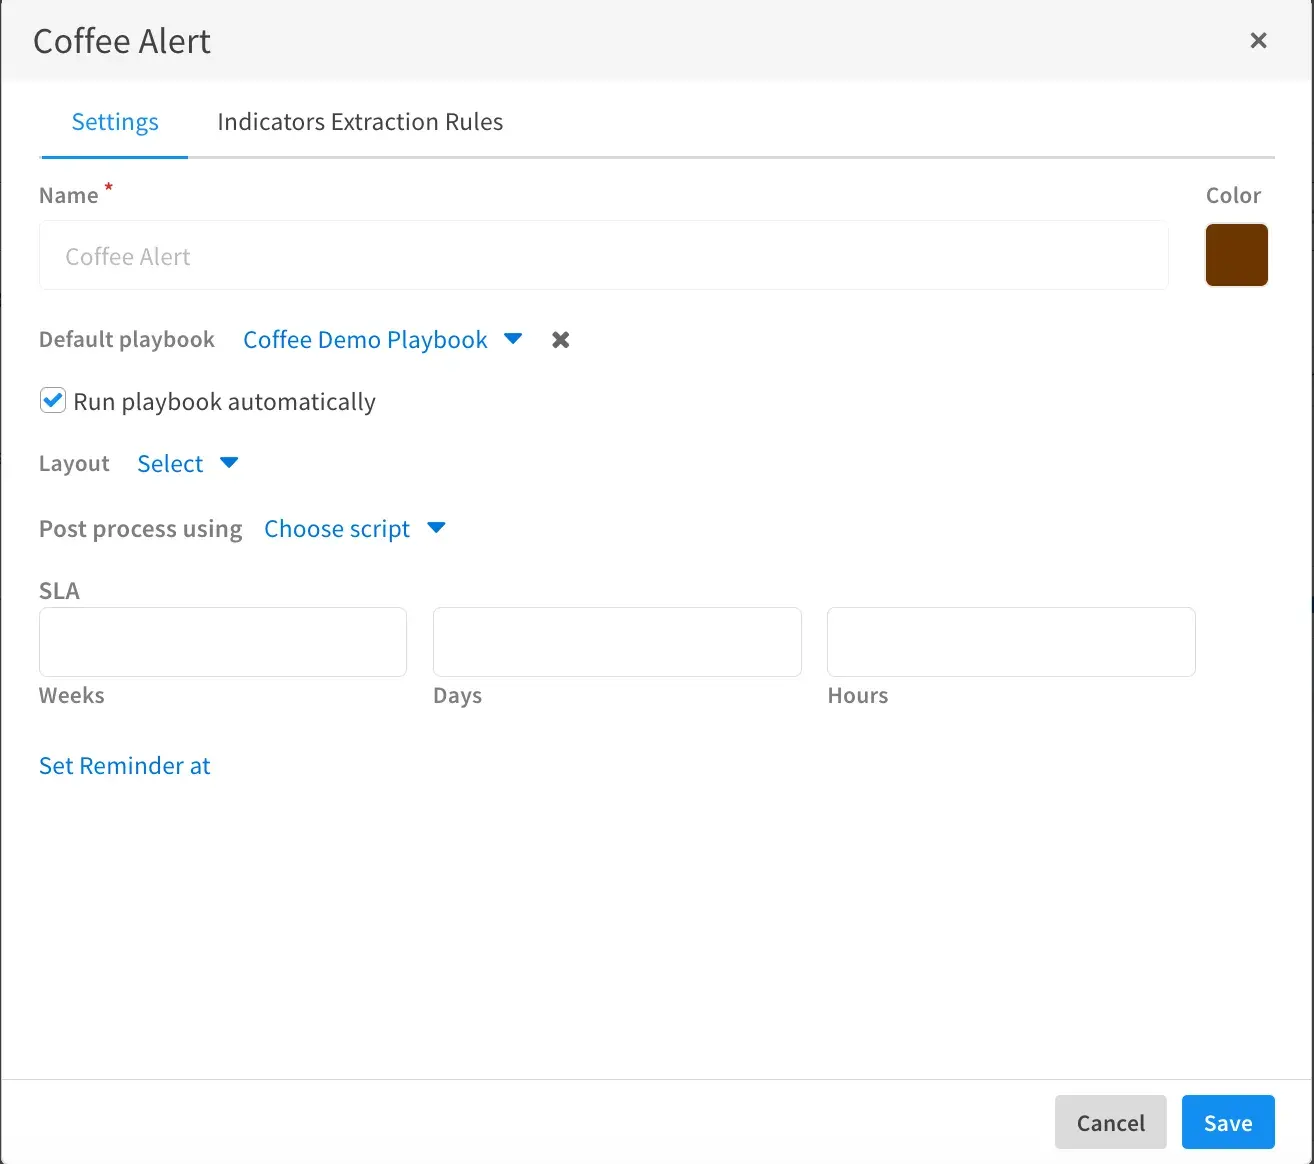
The final step is to configure our playbook to run whenever a new Coffee Alert incident is created. To do this go to Settings -> Objects Setup -> Types -> Coffee Alert -> Edit
-
Use the dropdown next to Default playbook to find our Coffee Demo playbook we just created. Then finally check the box next to Run playbook automatically and then click Save
Testing the Final Product
Congratulations! If you made it this far, you’ve successfully created your first XSOAR workflow and are well on your way to becoming an automation wizard! To ensure everything works as intended, lets craft one final email pretending to be our smart coffee maker.
Send the email with the following content:
Subject: Coffee Alert
Body:
      Code: 3
      Message: I completed my first XSOAR workflow and this should be tagged as evidence!
After a minute or so you should get a new XSOAR Coffee Alert incident:
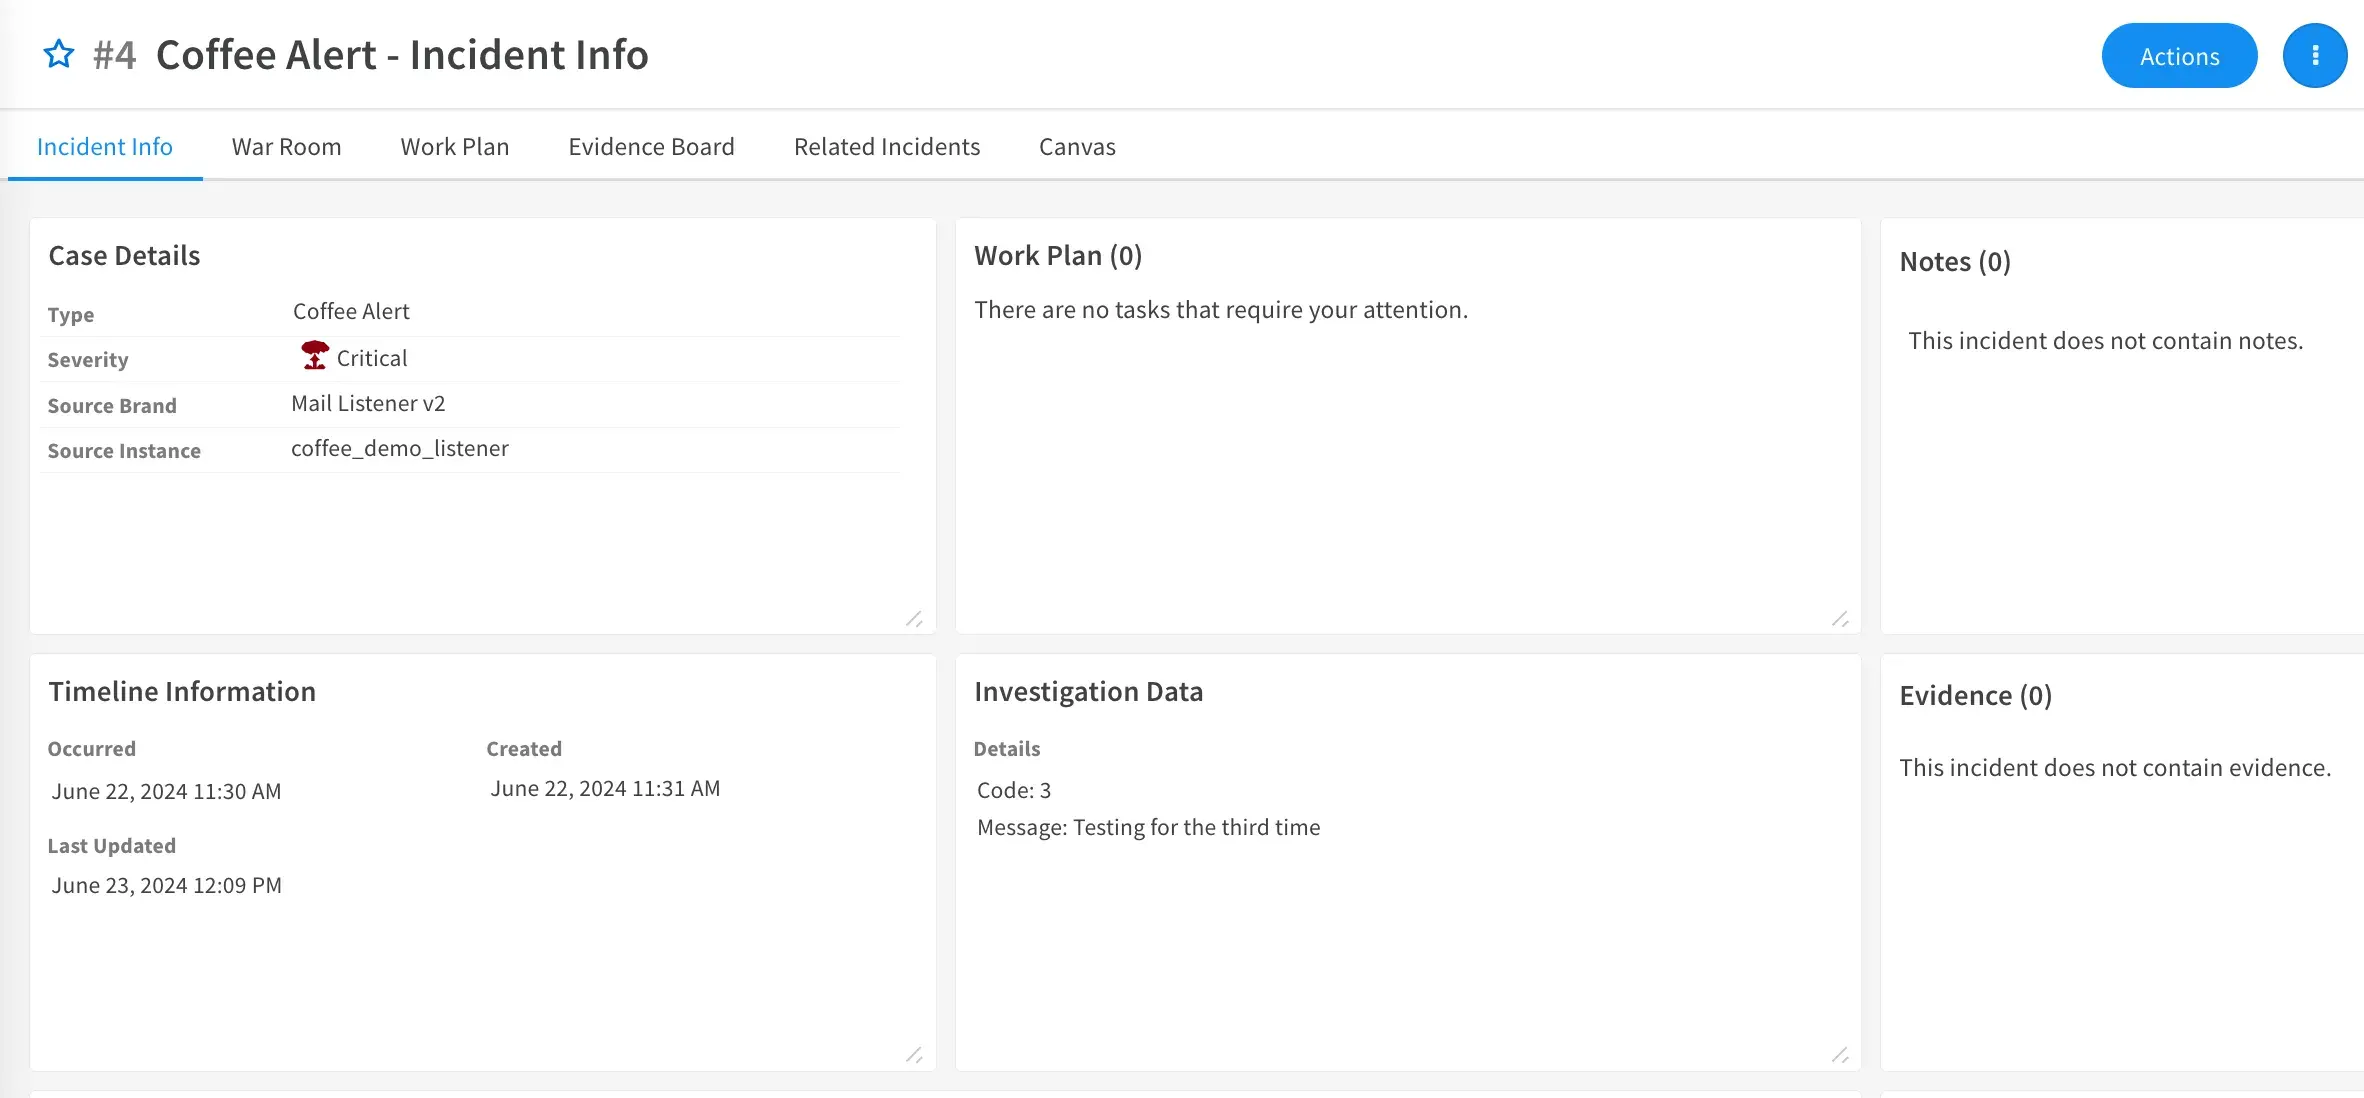
Notice how the severity was automatically set to critical
Click the Work Plan tab to view the playbook:
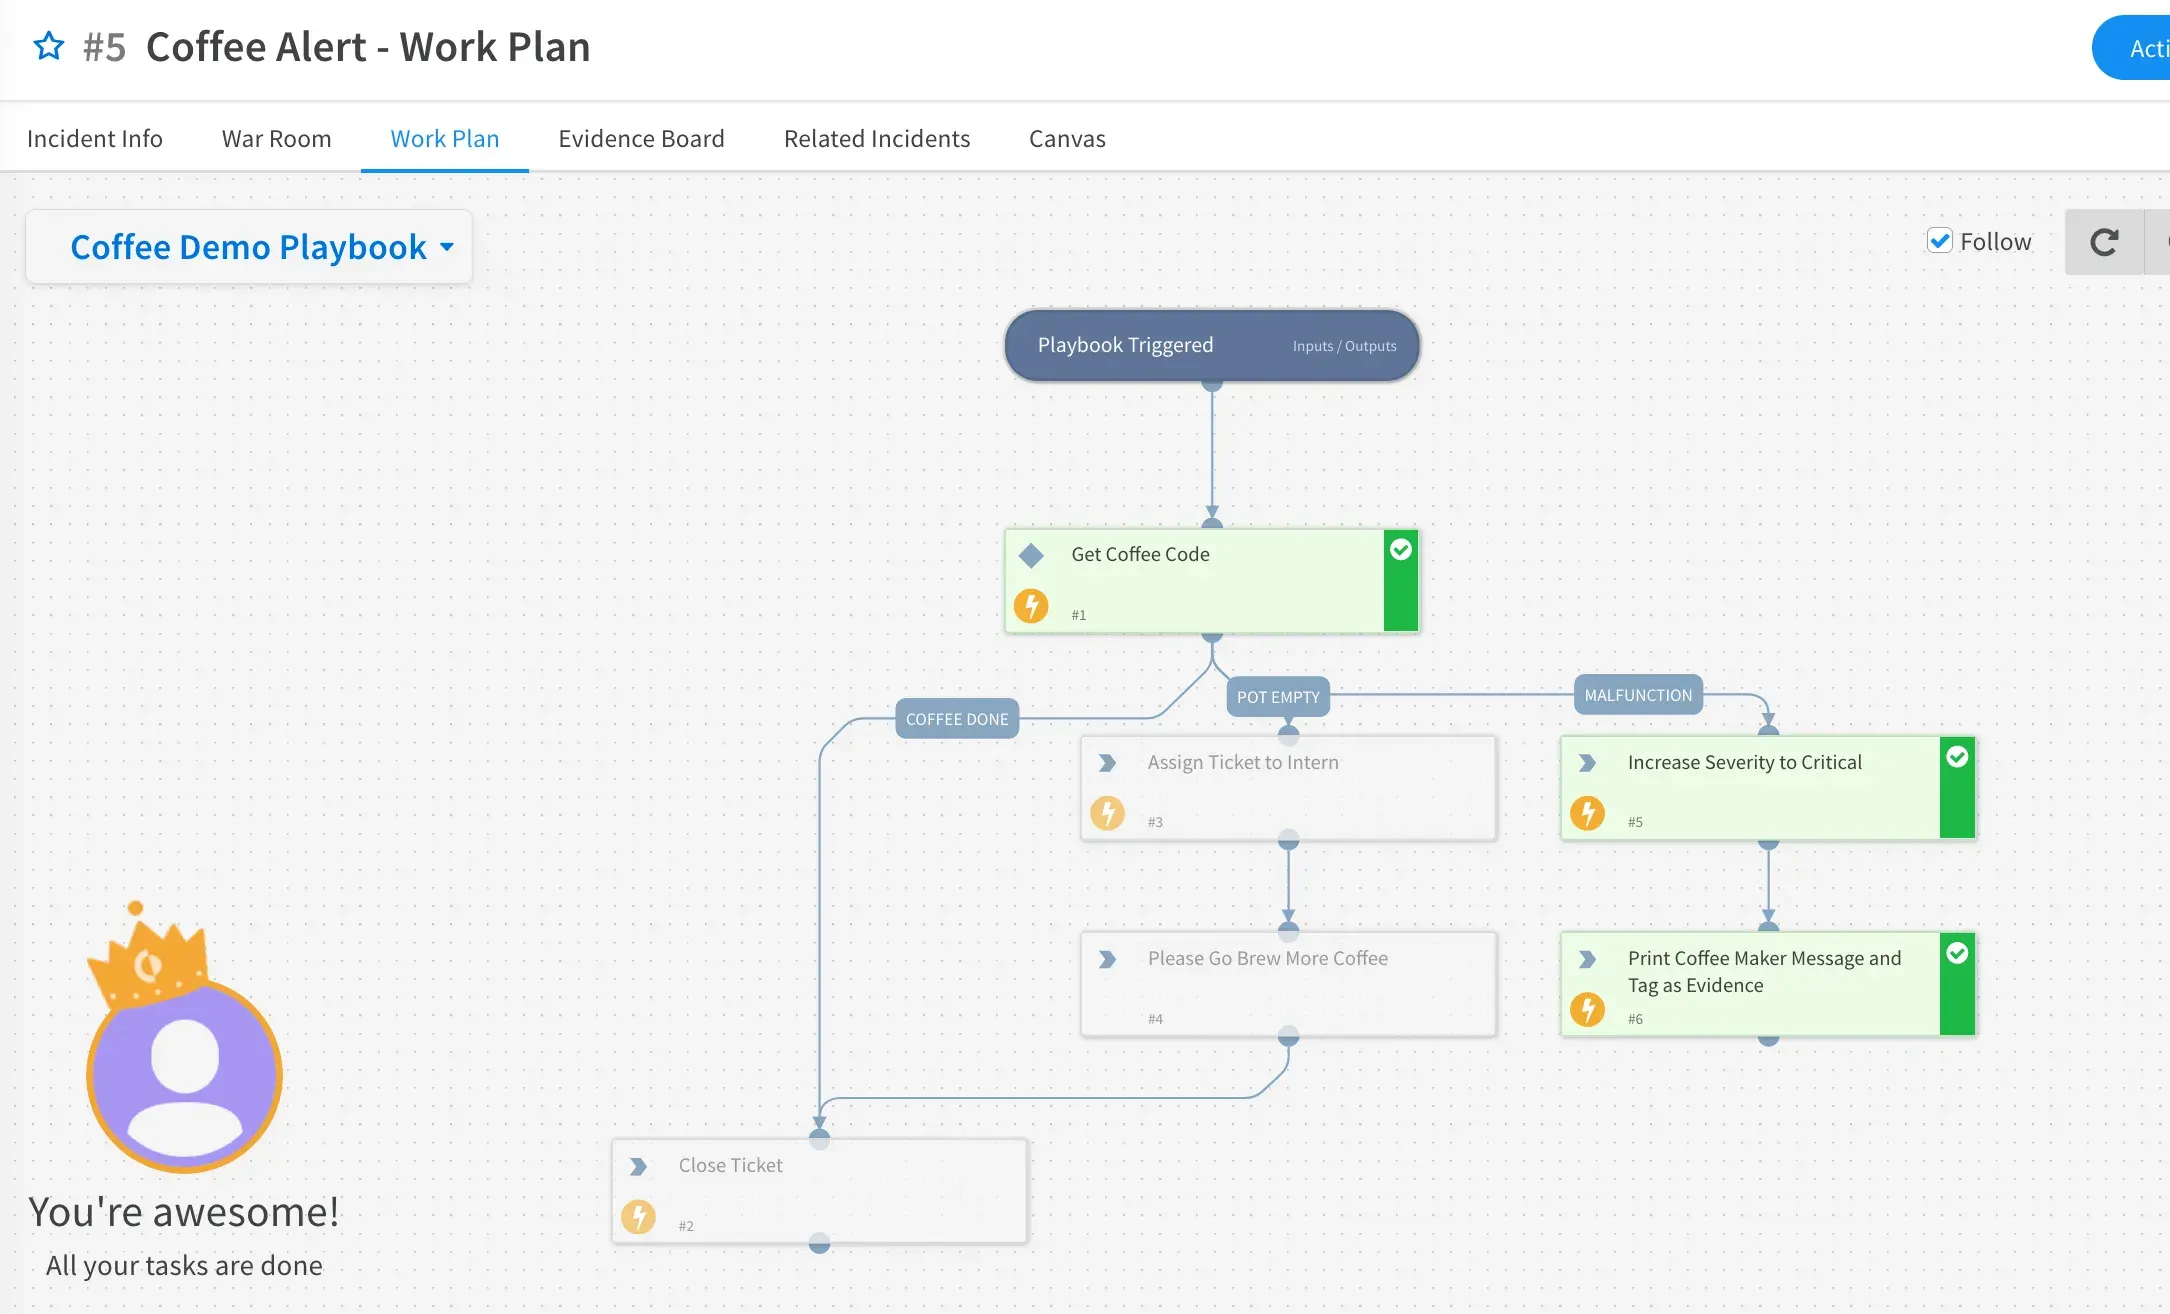
Click the Evidence Board tab to view that our Coffee Alert Message was successfully added:
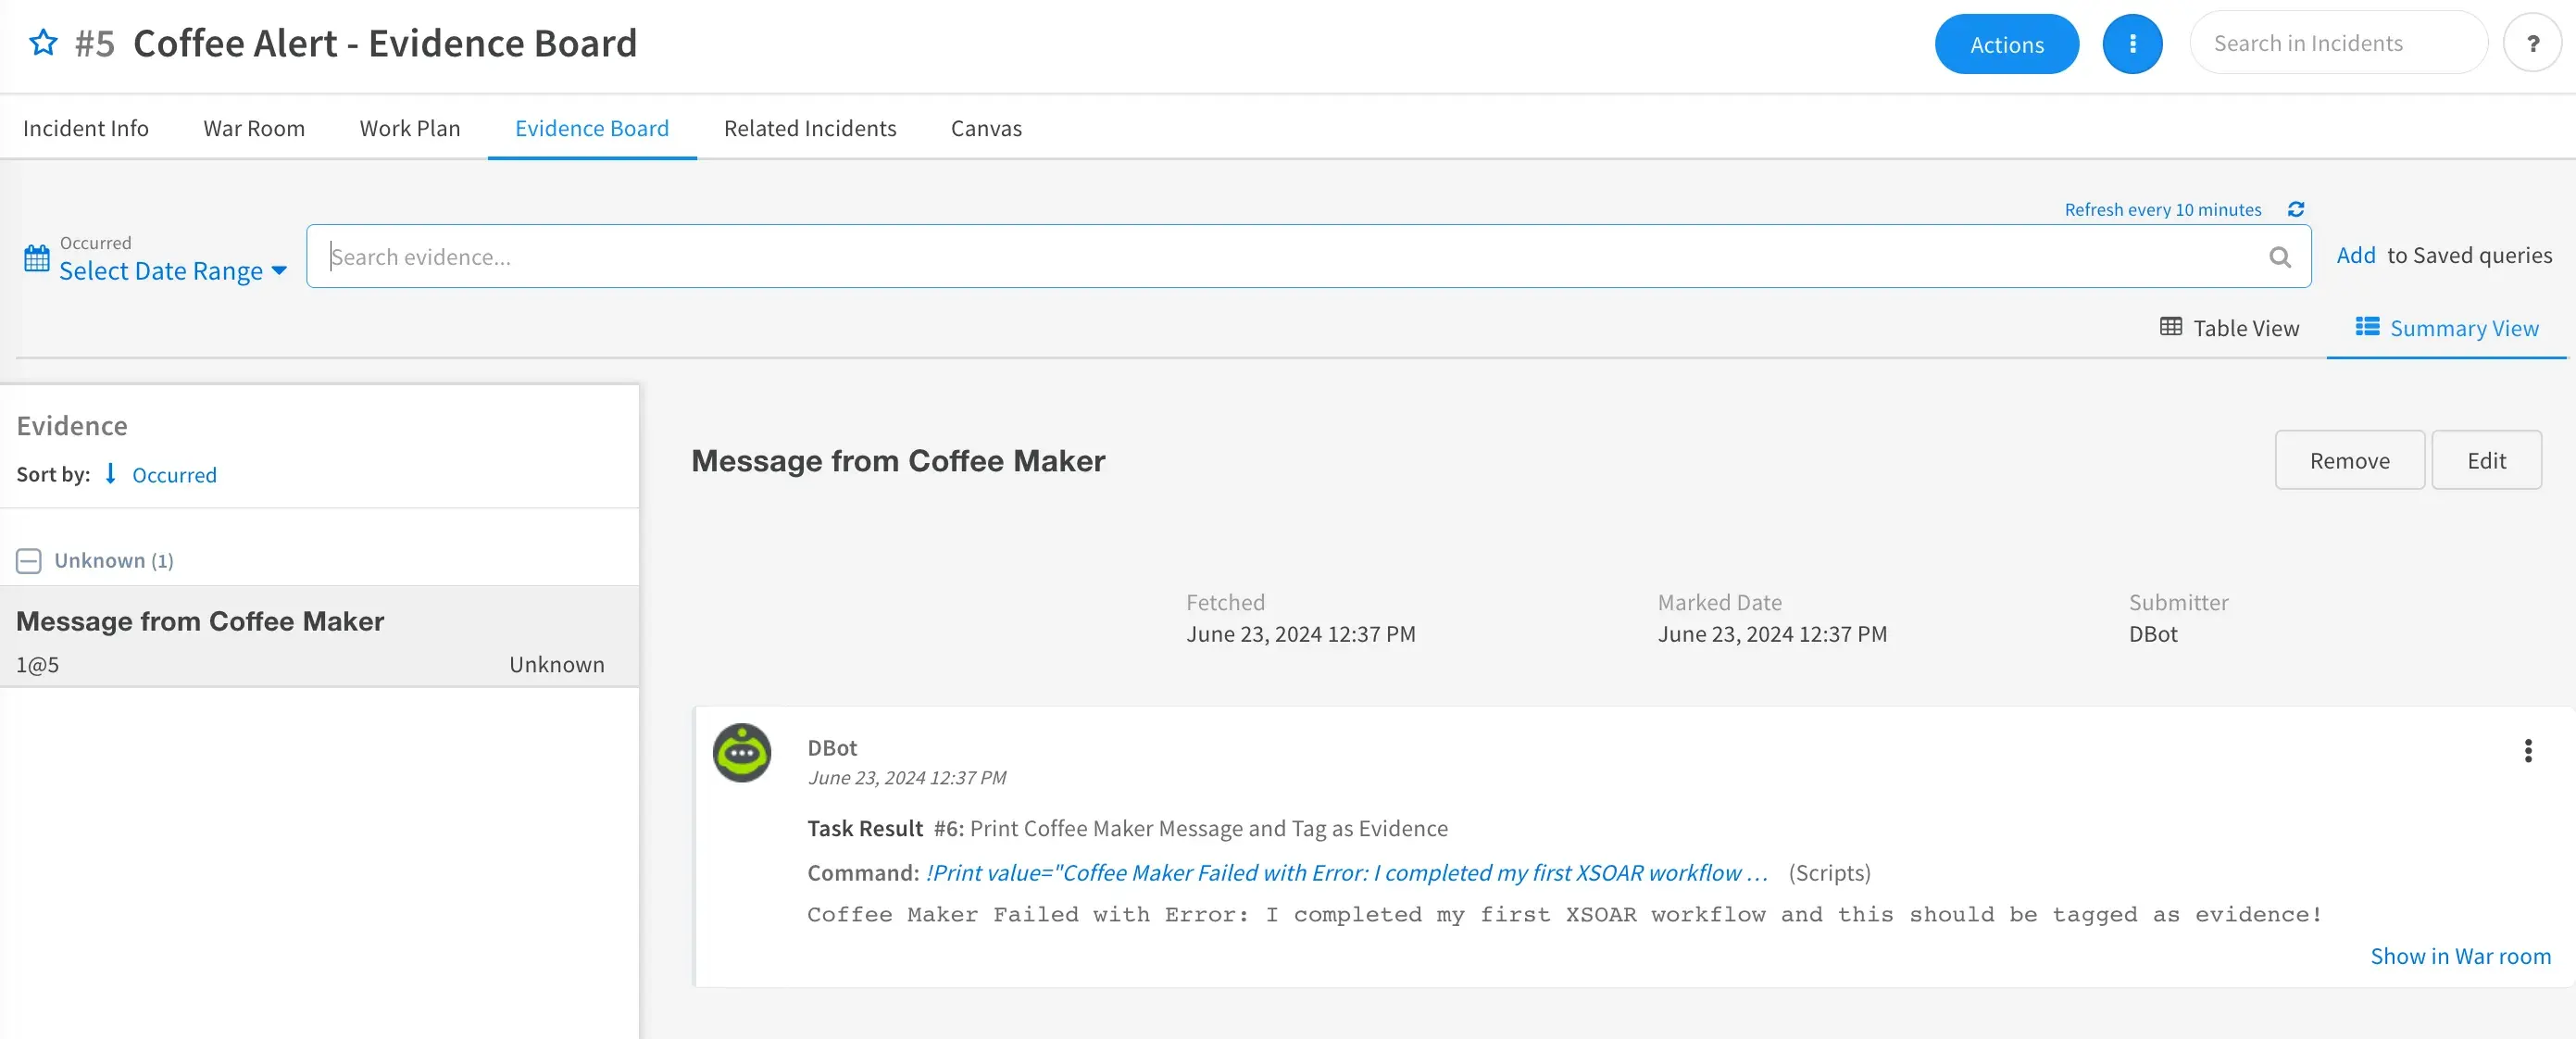
Well done! If you’d like, feel free to send additional test emails using Code: 1 or Code: 2 to ensure your workflow is working exactly as we designed.
Summary
Although this was a silly example in which we were receiving imaginery alerts from a smart coffee pot, the foundations for building something real in a production environment are there. Expand upon these concepts, learn, and have fun automating!